Epson RX595 Product Information Guide
Epson RX595 - Stylus Photo Color Inkjet Manual
 |
UPC - 010343866157
View all Epson RX595 manuals
Add to My Manuals
Save this manual to your list of manuals |
Epson RX595 manual content summary:
- Epson RX595 | Product Information Guide - Page 1
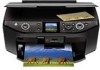
Epson Stylus Photo RX595 Series Product Parts Edge guide Control panel buttons Output tray lever CD/DVD tray guide CD/DVD tray Paper support Display screen Memory card slot cover Output tray and extensions Mini or 8-cm mini CD/DVD adapter Document cover Scanner glass Memory card slots USB - Epson RX595 | Product Information Guide - Page 2
Epson Stylus Photo RX595 Series Epson Media Paper name Epson Ultra Premium Photo Paper Glossy Epson Ultra Premium Photo Paper Luster Epson Premium Photo Paper Glossy Epson Premium Photo Paper Semi-gloss Epson Photo Paper Glossy Epson Bright White Paper Epson Premium Presentation Paper Matte Epson - Epson RX595 | Product Information Guide - Page 3
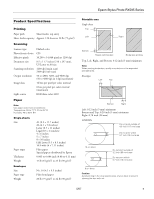
Epson Stylus Photo RX595 Series Product Specifications Printing Paper path Sheet feeder, top entry Sheet feeder capacity Approx. 120 sheets at 20 lb (75 g/m2) Scanning Scanner type Photoelectric device Effective pixels Document size Scanning resolution Output resolution Image data Light - Epson RX595 | Product Information Guide - Page 4
Epson Stylus Photo RX595 Series adapter Ink Cartridges Note: We recommend that you use genuine Epson cartridges and do not refill them. The use of other products may affect your print quality and could result in printer damage. Yields vary considerably based on images printed, print settings, paper - Epson RX595 | Product Information Guide - Page 5
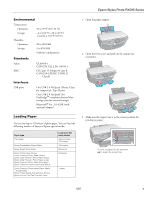
Epson Stylus Photo RX595 Series Environmental Temperature Operation: Storage: Humidity Operation: Storage: 50 to 95 °F (10 t One USB 2.0 Hi-Speed (for PictBridge™ compliant devices/Mass storage class for external storage) Bluetooth® Ver. 2.0+EDR (with optional adapter) 1. Open the paper support - Epson RX595 | Product Information Guide - Page 6
. Load letterhead or pre-printed paper top edge first. Note: For details on paper and instructions on loading envelopes, see the on-screen User's Guide. Copying a Document or Photo Placing an Original on the Scanner Glass Caution: Do not place anything on top of the RX595 Series or use the document - Epson RX595 | Product Information Guide - Page 7
Epson Stylus Photo RX595 Series 8. Press d, then press r to change the layout, if necessary. ❏ With Border leaves a small margin around the image. ❏ Borderless expands the image all the way to the edge of the paper (slight cropping may occur). ❏ CD/DVD Copy copies a label design only onto CDs or - Epson RX595 | Product Information Guide - Page 8
the disc in the adapter. Use only the Epson Print CD software to print on 8-cm discs. 6. Insert the tray into the guides in the output tray. Copying Onto a CD or DVD You can copy a printed photo, illustration, document, or CD/DVD label design directly onto an ink jet-printable 12-cm CD or DVD for - Epson RX595 | Product Information Guide - Page 9
use your RX595 Series to print a design directly onto ink jet-printable CDs or DVDs to create a custom label. You can print on CD/DVDs using the Epson Print CD computer software that came with your RX595 Series, or using the RX595 Series control panel. See the on-screen User's Guide for instructions - Epson RX595 | Product Information Guide - Page 10
Epson Stylus Photo RX595 Series Restoring, Cropping, and Copying Multiple Photos 1. Press the P On button to turn on the RX595 Series. 2. Load 4 × 6-inch, 5 × 7-inch, 8 × 10-inch, letter-, or A4-size Epson photo paper in the sheet feeder. See page 5. Note: Load only up to the recommended number of - Epson RX595 | Product Information Guide - Page 11
Epson Stylus Photo RX595 Series Printing From a Memory Card You can print photos directly from your digital camera's memory card by inserting it into the RX595 Series memory card slots. (You can also use these instructions to print from a USB flash drive connected to the EXT. I/F port.) See the - Epson RX595 | Product Information Guide - Page 12
Epson Stylus Photo RX595 Series Printing Photos Select Individual Photos for Printing You can select individual photos for printing as you view them on the display screen. 1. Press l or r to select View and Print Photos, if necessary, then press OK. 2. Press l or r to move through your photos and - Epson RX595 | Product Information Guide - Page 13
to purchase the optional Bluetooth Photo Print Adapter (part number C12C824383), available from Epson. See the on-screen User's Guide for instructions on printing or transferring files from any of these devices. Scanning to a Computer You can use your RX595 Series to scan a photo or document and - Epson RX595 | Product Information Guide - Page 14
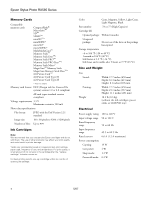
Epson Stylus Photo RX595 Series Removing and Installing Ink Cartridges Caution: Do not open ink cartridge packages until you are ready to install the ink. Cartridges are vacuum packed to maintain reliability. Remove the CD/DVD tray and return the output tray to the paper position before replacing - Epson RX595 | Product Information Guide - Page 15
Stylus Photo RX595 Series Checking and Cleaning the Print Head You can print a nozzle check pattern to check for clogged nozzles and clean the print head using the RX595 Series control panel or your software (see the on-screen User's Guide). Note: You cannot clean the print head if an ink cartridge - Epson RX595 | Product Information Guide - Page 16
ink cartridge holder. If print quality has declined when you print again in a new location, clean (see page 15) and align (see page 15) the print head. Related Documentation CPD-23917 CPD-23918 CPD-23919 Epson Stylus Photo RX595 Series Start Here Epson Stylus Photo RX595 Series Quick Guide Epson
-
 1
1 -
 2
2 -
 3
3 -
 4
4 -
 5
5 -
 6
6 -
 7
7 -
8
-
9
-
10
-
11
-
12
-
13
-
14
-
15
-
16
 |
 |

Epson Stylus Photo RX595 Series
5/07
1
Product Parts
Accessories
Ink Cartridges
Use the following list when you order or purchase new ink
cartridges:
Note:
We recommend that you use genuine Epson
®
cartridges and do not
refill them. The use of other products may affect your print quality
and could result in printer damage.
Yields vary considerably based on images printed, print settings,
paper type, frequency of use, and temperature. For print quality, a
small amount of ink remains in the cartridge after the “replace
cartridge” indicator comes on.
For best printing results, use up a cartridge within six months of
opening the package.
Paper support
Edge
guide
Output tray
and
extensions
Control
panel
buttons
Output
tray
lever
Display
screen
Memory card
slot cover
CD/DVD tray
guide
CD/DVD tray
Mini or 8-cm mini
CD/DVD adapter
Document
cover
Scanner
glass
Memory card
slots
USB connector
(for USB flash drive, or
camera or external
storage device cable)
USB cable for computer
(not included)
Power inlet
(for power cable)
Ink color
Part number
Black
78 or 77 (High Capacity)
Cyan
78 or 77 (High Capacity)
Light Cyan
78 or 77 (High Capacity)
Magenta
78 or 77 (High Capacity)
Light Magenta
78 or 77 (High Capacity)
Yellow
78 or 77 (High Capacity)
Scanner
Ink cartridge holder
(in home position)
USB cable for
computer (not
included)
Front cover
USB port