Epson RX595 Start Here
Epson RX595 - Stylus Photo Color Inkjet Manual
 |
UPC - 010343866157
View all Epson RX595 manuals
Add to My Manuals
Save this manual to your list of manuals |
Epson RX595 manual content summary:
- Epson RX595 | Start Here - Page 1
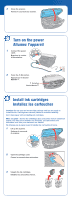
le couvercle du scanner. 2 Connect the USB cable (not included) and route it through the slot. Branchez le câble USB (non inclus) et placez-le dans la fente. Caution: Don't connect the RX595 Series to the computer yet. Mise en garde : Ne branchez pas l'appareil RX595 Series à l'ordinateur tout de - Epson RX595 | Start Here - Page 2
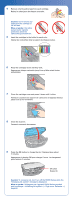
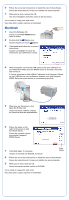
Marche . On button Bouton Marche 4 Install ink cartridges Installez les cartouches Caution: Do not open an ink cartridge package until you are ready to install the ink. Cartridges are vacuum packed to maintain reliability. Don't load paper before installing ink cartridges. Mise en garde : Ouvrez les - Epson RX595 | Start Here - Page 3
toutes enclenchées. 7 Close the cartridge cover and press it down until it clicks. Fermez le couvercle du support de cartouches et appuyez dessus jusqu'à ce qu'il s'enclenche. 8 Close the scanner. Fermez le couvercle du scanner. 9 Press the OK button to charge the ink. Charging takes about 2 minutes - Epson RX595 | Start Here - Page 4
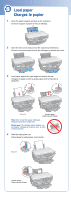
extension. Ouvrez le support à papier et tirez sa rallonge. 2 Open the front cover and pull out the output tray extensions. Ouvrez le couvercle avant et tirez les rallonges du plateau de sortie. 3 Load paper against the right edge and behind the tab. Chargez du papier contre le guide-papier droit et - Epson RX595 | Start Here - Page 5
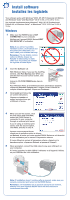
pouvez pas installer les logiciels de cette façon. 2 Insert the Software CD. With Windows Vista, if you see the AutoPlay window, click Run Epsetup.exe. When you see the User Account Control screen, click Continue. Insérez le CD-ROM RX595 Series dans le lecteur. Pour Windows Vista, si la fenêtre Ex - Epson RX595 | Start Here - Page 6
to copy, print, and scan! Vous êtes prêt à copier, imprimer et numériser! Macintosh 1 Insert the Software CD. Insérez le CD-ROM RX595 Series dans le lecteur. 2 Double-click the Epson icon. Double-cliquez sur l'icône Epson. 3 Click Install and follow the on-screen instructions. Cliquez sur Installer - Epson RX595 | Start Here - Page 7
Any questions? Quick Guide Basic instructions for copying, printing, and scanning. Epson Information Center Click the desktop shortcut for easy access to the RX595 Series User's Guide, FAQs, online troubleshooting advice, and software downloads. You can also purchase paper and ink. On-screen help - Epson RX595 | Start Here - Page 8
-la pour l'utiliser au moment d'acheter vos cartouches de remplacement. Epson® RX595 Series Ink Cartridges • Cartouches d'encre High Capacity 77 cartridges are also available at www.epson.com/highcapacity (U.S. sales) or www.epson.ca (Canadian sales). Essayez les cartouches haute capacité 77
-
 1
1 -
 2
2 -
 3
3 -
 4
4 -
 5
5 -
 6
6 -
 7
7 -
8
 |
 |

If anything is missing, contact Epson
®
as described on the back.
S’il manque un composant, communiquez avec Epson
®
comme décrit au
verso dans la section « Avez-vous des questions ? ».
Remove all the tape and
packing material.
Retirez le ruban adhésif et
le matériel d’emballage.
Canada only/Canada seulement
For French speakers, remove stickers from the backing sheet and place
over corresponding text on the control panel.
Pour les francophones, retirez les autocollants de la feuille et placez-Ies
sur l’équivalent anglais du panneau de contrôle.
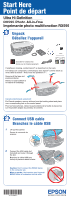
Unpack
Déballez l’appareil
1
1
Lift up the scanner.
Ouvrez le couvercle du
scanner.
2
Connect the USB cable (not
included) and route it through
the slot.
Branchez le câble USB (non
inclus) et placez-le dans la fente.
Caution:
Don’t connect the RX595 Series
to the computer yet.
Mise en garde :
Ne branchez pas l’appareil
RX595 Series à l’ordinateur tout de suite.
Connect USB cable
Branchez le câble USB
2
*411018901*
*411018901*
Start Here
Point de départ
(Included for Canada only)
(Inclus pour le Canada seulement)