Epson RX620 Product Information Guide
Epson RX620 - Stylus Photo Color Inkjet Manual
 |
UPC - 010343851887
View all Epson RX620 manuals
Add to My Manuals
Save this manual to your list of manuals |
Epson RX620 manual content summary:
- Epson RX620 | Product Information Guide - Page 1
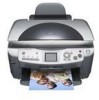
Stylus Photo RX620 Epson Stylus Photo RX620 Parts Paper support LCD screen Scanner lid On (power) button Output tray Document mat Scanner glass Scanner transportation lock USB cable Scanner section Memory card slot cover Ink cartridges Control panel Accessories Ink Cartridges Cartridge - Epson RX620 | Product Information Guide - Page 2
Epson Stylus Photo RX620 Paper name Epson Premium Glossy Photo Paper Size Letter (8.5 × 11 inches) Borderless 4 × 6 inches Epson Premium Semigloss Photo Paper Epson Premium Luster Photo Paper Epson Photo Quality Self Adhesive Sheets Epson Ink Jet Transparencies Epson Iron-On Transfer Paper Epson - Epson RX620 | Product Information Guide - Page 3
Interface Reliability Integrated TPU Flatbed color image scanner Color CCD line sensor 20,400 × 28 inches); reading area is selectable with software 2400 dpi (main), 4800 dpi (sub) 50 to 6400 dpi (adjustable in one-dpi increments) RGB color filters on -off mode 11/04 Epson Stylus Photo RX620 - 3 - Epson RX620 | Product Information Guide - Page 4
card. SmartMedia Middle slot (left) xD Memory Stick Memory Stick PRO Memory Stick Duo* Memory Stick PRO Duo* MagicGate Memory Stick MagicGate Memory Stick Duo* 4 - Epson Stylus Photo RX620 11/04 - Epson RX620 | Product Information Guide - Page 5
Loading Paper Single Sheets 1. Open the output tray. Epson Stylus Photo RX620 6. Flip the feeder guard back over the paper. Feeder guard 2. Flip the feeder guard forward. Feeder guard Output tray 3. Press the sides of the left edge guide together and slide it all the way to the left. 4. Insert - Epson RX620 | Product Information Guide - Page 6
TPU connector and pull the lid straight up. Turn on the RX620 and gently press down the original to keep it flat on the scanner glass as you scan. When you're finished, be sure to turn off the RX620 before replacing the scanner lid and plugging in the connector. 6 - Epson Stylus Photo RX620 11/04 - Epson RX620 | Product Information Guide - Page 7
Epson Stylus Photo RX620 Copying Without a Computer Follow the steps below to copy a photo or document using just the RX620. (To copy using Epson Smart Panel, see the on-screen Reference Guide.) 1. Make sure the RX620 is on, paper is loaded, and the output tray is open. 2. Place your document face - Epson RX620 | Product Information Guide - Page 8
menu. 6. Press the d button to choose Restoration. 7. Press the l button to choose On. Your photo paper type and size are selected automatically. 8. Press the x Color button and follow the instructions on the RX620 screen to copy and restore your photo. 8 - Epson Stylus Photo RX620 11/04 - Epson RX620 | Product Information Guide - Page 9
Epson Stylus Photo RX620 Note: To restore the color in an old film strip photo or slide and copy or scan them, see the on-screen Reference Guide. Canceling Copies To cancel a job in progress, press the y Stop button. Canceling appears on the LCD screen and your page is ejected. Restoring Default - Epson RX620 | Product Information Guide - Page 10
up your print job. Using DPOF to Select Your Photos If your camera supports DPOF (Digital Print Order Format), you can use it to select photos for printing before you insert the card in your printer. See your camera's instruction manual for details. 1. Press the Memory Card button. 2. Use the - Epson RX620 | Product Information Guide - Page 11
Epson Stylus Photo RX620 Loaded paper type Epson Premium Semigloss Photo Paper Epson Semigloss Scrapbook Photo Paper Epson Premium Luster Photo Paper Epson Matte Paper Heavyweight PremierArt Matte Scrapbook Photo Paper Epson ColorLife Photo Paper Epson Iron-On Transfer Paper Paper Type setting - Epson RX620 | Product Information Guide - Page 12
open the scanner lid while scanning, or your scans may not look right. Then check this box 6. Click the Scan button. 7. When you see the File Save Settings window, type a name for your file in the Prefix box, select a file format in the Type box, and click OK. 12 - Epson Stylus Photo RX620 11/04 - Epson RX620 | Product Information Guide - Page 13
holder fit in two small holes near the scanner lid, as shown. Flourescent lamp Film strip is in middle of glass 3. Continue with one of these sections: 5. Close the scanner lid. Now you are ready copy, print, or scan. See the User's Guide for instructions. 11/04 Epson Stylus Photo RX620 - 13 - Epson RX620 | Product Information Guide - Page 14
. Print head cleaning uses ink, so clean it only if quality declines. Note: You can also clean the print head using the printer software. Click the ? or Help button on your printer settings window for instructions on running the print head cleaning utility. 1. Make sure the RX620 is turned on but - Epson RX620 | Product Information Guide - Page 15
Epson Stylus Photo RX620 If you don't see any improvement after cleaning three or four times, check the troubleshooting solutions in the on-screen Reference Guide. You can also turn the RX620 off and wait overnight-this allows any dried ink to soften-and then try cleaning the print head again. - Epson RX620 | Product Information Guide - Page 16
Epson Stylus Photo RX620 3. Open the ink cartridge holder's cover. Caution: Never attempt to open the cartridge holder's cover while the print head is moving. Wait until the cartridges have moved to the replacement position. 7. Close the ink cartridge holder's cover, then close the scanner section - Epson RX620 | Product Information Guide - Page 17
box or one of a similar size. Caution: To avoid damage, always leave the ink cartridges installed when transporting the RX620. Never transport or store the RX620 on its side or in a tilted or upside-down position. 1. Press the P On button to turn on the RX620. Wait until the scanner carriage moves - Epson RX620 | Product Information Guide - Page 18
output is misaligned, align the print head (see page 16). Related Documentation CPD-15868 CPD-15867 CPD-15866 Epson Stylus Photo RX620 Start Here sheet Epson Stylus Photo RX620 Quick Guide Epson Stylus Photo RX620 CD-ROM (includes on-screen Reference Guide) 18 - Epson Stylus Photo RX620 11/04
-
 1
1 -
 2
2 -
 3
3 -
 4
4 -
 5
5 -
 6
6 -
 7
7 -
8
-
9
-
10
-
11
-
12
-
13
-
14
-
15
-
16
-
17
-
18
 |
 |

Epson Stylus Photo RX620
11/04
Epson Stylus Photo RX620
- 1
Epson Stylus Photo RX620 Parts
Accessories
Ink Cartridges
Media
Paper support
LCD screen
Scanner lid
On (power)
button
Output tray
Document mat
Scanner glass
Memory card
slot cover
Scanner transportation lock
Scanner section
USB cable
Ink
cartridges
Cartridge
Part number
Black
T048120
Cyan
T048220
Light Cyan
T048520
Magenta
T048320
Light Magenta
T048620
Yellow
T048420
Paper name
Size
Part number
Epson Premium Bright
White Paper
Letter (8.5 × 11 inches)
S041586
Epson Photo Quality Ink
Jet Paper
Letter (8.5 × 11 inches)
S041062
A4 (8.3 × 11.7 inches)
S041061
Legal (8.3 × 14 inches)
S041067
Epson Photo Quality Ink
Jet Cards
A6 (4.1 × 5.8 inches)
S041054
Epson Photo Paper
Panoramic (8.3 × 23 inches)
S041145
A4 (8.3 × 11.7 inches)
S041140
Letter (8.5 × 11 inches)
S041272
Epson Glossy Photo
Paper
Borderless 4 × 6 inches
S041458/
S041809
Letter (8.5 × 11 inches)
S041141/
S041649/
S041272/
S041271
Epson ColorLife
®
Photo
Paper
Letter (8.5 × 11 inches)
S041500
Epson Matte Paper
Heavyweight
Borderless 8 × 10 inches
S041467
Letter (8.5 × 11 inches)
S041257
Epson Double-Sided
Matte Paper
Letter (8.5 × 11 inches)
S041568
Control panel