Epson Stylus CX3200 Start Here Card
Epson Stylus CX3200 - All-in-One Printer Manual
 |
View all Epson Stylus CX3200 manuals
Add to My Manuals
Save this manual to your list of manuals |
Epson Stylus CX3200 manual content summary:
- Epson Stylus CX3200 | Start Here Card - Page 1
, contact EPSON as described on the back of this sheet. continued 2 Slide the transportation lock back to the unlock position. Stylus CX Paper support USB cable Software CD-ROM Booklet Ink cartridges Feeder guard 2 Remove any tape and packing materials, as shown. 3 Close the scanner lid - Epson Stylus CX3200 | Start Here Card - Page 2
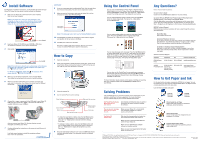
came with your Stylus CX. Make sure your EPSON Stylus CX3200 software is installed correctly. Make sure you insert paper behind the feeder guard, not in front of it. Any Questions? Here's where to look for answers: On-screen User's Guide Double-click the EPSON User's Guide icon on your desktop
-
 1
1 -
 2
2
 |
 |

EPSON Stylus
®
CX3200
Start Here
1
Lift up the scanner.
2
Peel off the tape and remove the plastic piece from the
ink cartridge holder.
3
Press and hold the
On
button for 2 seconds. The green light flashes
and the scanner carriage and print head move.
4
Unwrap the ink cartridges and remove the yellow tape.
5
Lift up the ink cartridge clamps.
6
Insert the ink cartridges with the labels face-up.
Install Ink Cartridges
5
1
Flip the feeder guard forward.
2
Place a stack of paper against the right side of the feeder, beneath
the tab. Pinch the left edge guide and slide it against the paper.
Caution:
Make sure you load paper
behind
the feeder guard.
3
Flip the feeder guard back over the stack of paper.
4
Position the Stylus CX so the front is at least 9 inches
from the edge of the table.
1
Open the scanner lid, as shown. Remove any packing materials
under the lid.
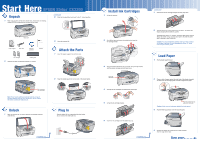
1
Make sure you have all the parts shown here. If any parts are missing,
contact EPSON as described on the back of this sheet.
2
Remove any tape and packing materials, as shown.
Note:
There may be additional packing materials or tape in
locations different from the ones shown here. Do not remove
the sticker covering the USB port yet.
Unpack
Unlock
Turn over
1
Plug the Stylus CX into a grounded electrical outlet.
Do not connect the USB cable yet.
Plug In
1
2
2
4
6
Load Paper
7
Press down the ink cartridge clamps until they snap shut.
8
Carefully lower the scanner back down into place. The Stylus CX
begins charging the ink delivery system.
Charging takes about 1
1
/
2
minutes. The green light flashes and the
Stylus CX makes various sounds. Don’t turn it off while the green
light is flashing or you’ll waste ink.
Caution:
You must install both cartridges and leave them installed
for all types of printing. To avoid damaging the Stylus CX, never
move the print head by hand.
continued
1
Insert the paper support into its three slots.
2
Snap the feeder guard into its two slots in the sheet feeder.
Attach the Parts
3
continued
2
Slide the transportation lock back to the
unlock position.
3
Close the scanner lid.
Paper support
USB cable
Software
CD-ROM
Booklet
Stylus CX
Ink cartridges
Feeder guard
Do not remove
this sticker yet
Press the
On
button
continue
continue
Open the output tray and
pull out the extension