Epson Stylus CX4600 Quick Reference Guide
Epson Stylus CX4600 - All-in-One Printer Manual
 |
View all Epson Stylus CX4600 manuals
Add to My Manuals
Save this manual to your list of manuals |
Epson Stylus CX4600 manual content summary:
- Epson Stylus CX4600 | Quick Reference Guide - Page 1
Quick Reference Basic Copying, Printing, and Scanning Maintaining Your CX4600 Solving Problems CPD-18250R1 4049976-01 XXX - Epson Stylus CX4600 | Quick Reference Guide - Page 2
Computer 19 Printing in Windows 19 Printing With Macintosh OS X 22 Using Special Papers 25 Scanning a Photo or Document 26 Maintaining Your CX4600 29 Checking the Print Head Nozzles and Ink 29 Cleaning the Print Head 30 Replacing Ink Cartridges 31 Solving Problems 36 Error Indicators 36 - Epson Stylus CX4600 | Quick Reference Guide - Page 3
and quality of your prints and scanned images or producing double-sided documents. For complete instructions on everything the CX4600 can do, see the on-screen CX4600 Reference Guide. An icon for the manual was automatically placed on your desktop when you installed the software. Please follow these - Epson Stylus CX4600 | Quick Reference Guide - Page 4
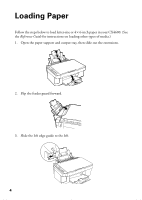
Loading Paper Follow the steps below to load letter-size or 4 × 6-inch paper in your CX4600. (See the Reference Guide for instructions on loading other types of media.) 1. Open the paper support and output tray, then slide out the extensions. 2. Flip the feeder guard forward. 3. Slide the left edge - Epson Stylus CX4600 | Quick Reference Guide - Page 5
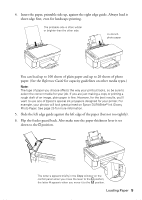
the best results, you'll want to use one of Epson's special ink jet papers designed for your printer. For example, your photos will look great printed on Epson DURABrite® Ink Glossy Photo Paper. See page 25 for more information. 5. Slide the left edge guide against the left edge of the paper (but - Epson Stylus CX4600 | Quick Reference Guide - Page 6
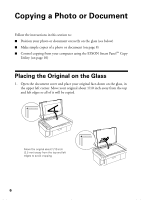
or Document Follow the instructions in this section to: ■ Position your photo or document correctly on the glass (see below) ■ Make simple copies of a photo or document (on page 8) ■ Control copying from your computer using the EPSON Smart Panel™ Copy Utility (on page 10) Placing the Original on - Epson Stylus CX4600 | Quick Reference Guide - Page 7
it stops and do not place heavy objects on top of the CX4600. If you need to copy or scan a thick or large document, you can remove the document cover. Just it straight up. If you need to press the document flat while you copy or scan it, do not press too hard and be careful not to move it. Caution: - Epson Stylus CX4600 | Quick Reference Guide - Page 8
. 8. To make a color copy, press the x Start Color button. To make a black and white copy, press the x Start B&W button. The On light flashes and after a moment the CX4600 starts printing. If you need to stop copying at any time, just press the y Stop button. Do not pull out paper that is being - Epson Stylus CX4600 | Quick Reference Guide - Page 9
instructions.) 4. Press the Copy button until you see the correct number of copies in the Copy window. You can select up to 9 copies at a time this way. To make more than 9 copies, see page 10 Start B&W button. The On light flashes and after a moment the CX4600 starts printing. If you need to stop - Epson Stylus CX4600 | Quick Reference Guide - Page 10
the On light starts flashing, release both buttons. Using the Computer to Copy EPSON Smart Panel (installed on your computer when you installed your printer software), includes a Copy Utility that lets you control copying from your computer. Follow these steps to use it: 1. Make sure the CX4600 is - Epson Stylus CX4600 | Quick Reference Guide - Page 11
Reprint Photos icon. You see this screen: Make sure EPSON Stylus CX4600 is selected Click for more information Select your document type Click to select output paper size Select the copied page size Adjust print quality Select how many copies to print From here you can choose the size and number - Epson Stylus CX4600 | Quick Reference Guide - Page 12
Restoring Color in Faded Photos 1. From the Copy Utility screen, click the Source Type box. You see this screen: Choose Photo 2. Choose Photo and click OK. You see this screen: Click this box Start copying 3. Click the Color Restoration check box. 4. Change any other copy settings, as necessary. - Epson Stylus CX4600 | Quick Reference Guide - Page 13
an Index Sheet to Select Photos" on page 15 ■ "Printing All Photos or DPOF Photos" on page 18 For instructions on copying memory card files between your CX4600 and a computer or other device, see the Reference Guide. Compatible Cards and Image Formats You can use the following types of cards - Epson Stylus CX4600 | Quick Reference Guide - Page 14
Japan Electronics and Information Technology Industries Association (JEITA) ** Supports Exif Version 2.1/2.2 Inserting the Card 1. Make sure the CX4600 is turned on. Note: When you are printing directly from a memory card, it is best if the CX4600 is not connected to your computer (or your computer - Epson Stylus CX4600 | Quick Reference Guide - Page 15
slot. (See page 13 for details.) Memory card light Insert just one card at a time The memory card light flashes and then stays on. 4. Close the memory card door. Now you can: ■ Print an index sheet so you can select which photos to print (page 15) ■ Print all the photos on the card (page 18 - Epson Stylus CX4600 | Quick Reference Guide - Page 16
button. The On light flashes, and the CX4600 starts printing the index sheet(s). (This may take a few minutes.) For multiple index sheets, the pages are printed from the last sheet to the first, so the most recent images are printed first. Now you can follow the instructions below to select which - Epson Stylus CX4600 | Quick Reference Guide - Page 17
the document cover. 4. Load the type of paper you want to use (see page 4). Load enough sheets for the number of photos you'll be printing. 5. Make sure the Print From Index Sheet light is on. 6. Select Plain Paper or Photo Paper (whichever you loaded). If you select Plain Paper, the photo - Epson Stylus CX4600 | Quick Reference Guide - Page 18
sheets for the number of photos you'll be printing. 3. Press the Memory Card button until the Print All/DPOF light comes on. Note: If the memory card does not contain DPOF information, one copy of all the photos on the card will be printed. 4. Select Plain Paper or Photo Paper (whichever you loaded - Epson Stylus CX4600 | Quick Reference Guide - Page 19
page 22 ■ "Using Special Papers" on page 25 Printing in Windows 1. Load paper (see page 4). 2. Open the photo or document in your application program. 3. Open the File menu and select Print. You see a window like this one: Select EPSON Stylus CX4600 Series Click here to open your printer software 19 - Epson Stylus CX4600 | Quick Reference Guide - Page 20
4. Make sure EPSON Stylus CX4600 series is selected, then click the Preferences or Properties button. (If you see a Setup, Printer, or Options button, click it. Then click Preferences or Properties on the next screen.) 5. On the Main Properties window, select the basic print settings: Select the - Epson Stylus CX4600 | Quick Reference Guide - Page 21
you access your print settings Note: For more information about advanced settings, or instructions on saving Print to start printing. This window appears and shows the progress of your print job. Click to cancel printing Pause or resume printing Check remaining ink levels here Printing in Windows - Epson Stylus CX4600 | Quick Reference Guide - Page 22
Sheet Feeder - Borderless) option in the Paper Size list for your paper size (Letter, 8 x 10, or 4 x 6). 4. Click OK to close the Page Setup window. 5. Select Print from the File menu. You see a window like this one: Select Stylus CX4600 Click and choose Print Settings 22 Printing From Your Computer - Epson Stylus CX4600 | Quick Reference Guide - Page 23
Black ink Select higher quality or faster printing (if available) Select Automatic mode Note: For more information about printer printing. ■ ColorSync or Color Management: Select ColorSync®or adjust the color controls, change the gamma setting, or turn off color adjustments in the printer software - Epson Stylus CX4600 | Quick Reference Guide - Page 24
OS X 10.2.x, click the Print Center icon instead, then double-click Stylus CX4600 in the Printer List window. You see a screen like this: Pause printing Resume printing Cancel printing Select the print job 11. When you're finished, close the CX4600 window or Print Center. 24 Printing From Your - Epson Stylus CX4600 | Quick Reference Guide - Page 25
in your printer software: For this paper DURABrite Ink Glossy Photo Paper Plain paper sheets or envelopes Epson Premium Bright White Paper Epson Matte Paper Heavyweight Epson Double-Sided Matte Paper Epson Photo Paper or Glossy Photo Paper Epson Glossy Photo Greeting Cards Epson Premium Semigloss - Epson Stylus CX4600 | Quick Reference Guide - Page 26
or Document You can use the CX4600 to scan a photo or document and save it on your computer or other device, or to fax or e-mail it to someone else. This section gets you started using EPSON Scan. Note: You can also use EPSON Smart Panel to scan. See the Reference Guide (or Smart Panel Help) for - Epson Stylus CX4600 | Quick Reference Guide - Page 27
and select EPSON Stylus CX4600. If EPSON Scan is set to the default Full Auto Mode, it starts previewing your image. To switch modes, click the Pause button at the bottom of the screen. Then go to step 4. If you are scanning directly from your desktop, do one of the following: ■ In Windows, select - Epson Stylus CX4600 | Quick Reference Guide - Page 28
select Image Adjustments and click the Color Restoration check box. 7. Click the Scan button. If you scanned from an application like Photoshop, your scanned image opens in your application window. If you opened EPSON Scan from the Start button or the Applications folder, and you did not already - Epson Stylus CX4600 | Quick Reference Guide - Page 29
Maintaining Your CX4600 If you notice a decline in print quality, follow the instructions in this chapter for: ■ "Checking the Print Head Nozzles and Ink" (below) ■ "Cleaning the Print Head" on page 30 ■ "Replacing Ink Cartridges" on page 31 Checking the Print Head Nozzles and Ink If your printouts - Epson Stylus CX4600 | Quick Reference Guide - Page 30
clean the print head. In this case, replace the appropriate ink cartridge first. (See page 31.) 1. Make sure the CX4600 is on and the B ink light is off. 2. Hold down the B ink button for 3 seconds until the On light starts flashing. The CX4600 runs a head cleaning cycle and the On light flashes - Epson Stylus CX4600 | Quick Reference Guide - Page 31
new ones. Color Black Cyan Magenta Yellow Part number T044120 T044220 T044320 T044420 Caution: Leave the empty cartridge installed until you have obtained a replacement, or the ink remaining in the print head nozzles may dry out. To ensure good results, use genuine Epson ink cartridges and - Epson Stylus CX4600 | Quick Reference Guide - Page 32
position and the On and B ink lights flash. If one of the cartridges is low or empty, the CX4600 moves that cartridge to the _ ink out mark. Note: Do not hold down the B ink button; when held down for 3 or more seconds, it tells the printer to start cleaning the print head. Caution: Do not move the - Epson Stylus CX4600 | Quick Reference Guide - Page 33
five times. Then remove it from the package. Caution: Do not remove or tear the label on the cartridge; otherwise, ink will leak. Do not touch the green chip on the side of the cartridge. This can damage the ink cartridge. Do not damage the tab Do not touch this part Replacing Ink Cartridges 33 - Epson Stylus CX4600 | Quick Reference Guide - Page 34
7. Place the new ink cartridge into the cartridge holder and push it down until it clicks into place. 8. Replace any other cartridges that need to be replaced. 9. Close the ink cartridge cover and press it until it clicks into place. 10. Close the scanner. 34 Maintaining Your CX4600 - Epson Stylus CX4600 | Quick Reference Guide - Page 35
about one minute. When it's finished, the On light stops flashing and remains on, and the B ink light goes out. Caution: Never turn off the CX4600 while the On light is flashing or you'll waste ink. Note: If the B ink light stays on (not flashing), the ink cartridge may not be installed correctly - Epson Stylus CX4600 | Quick Reference Guide - Page 36
have a problem with your Stylus CX4600, check the lights on the control panel and the number or letter in the Copy window to diagnose what may be causing it. You can also check "Problems and Solutions" on page 38 for basic troubleshooting suggestions, or double-click the CX4600 Reference Guide icon - Epson Stylus CX4600 | Quick Reference Guide - Page 37
position. Error: On E Ink: On All other lights: Flashing A part on the CX4600 needs to be replaced. Contact your local authorized servicer or contact Epson for a referral. (See "Where To Get Help" on page 40.) All lights: E Flashing There is a problem with the CX4600. Turn the CX4600 off - Epson Stylus CX4600 | Quick Reference Guide - Page 38
trouble using your CX4600. Copying Problems ■ Make sure your original is positioned in the top left corner of the glass. Place it 1/10 the Reference Guide for more information. ■ If paper is jammed, the red m Error light flashes. Follow CX4600, press the P On button to turn it off. Open the scanner - Epson Stylus CX4600 | Quick Reference Guide - Page 39
may need to align the print head. See your Reference Guide for instructions. ■ The ink cartridges may be old or low on ink; see page 31 for instructions on replacing an ink cartridge. ■ If a dotted line appears in the image, clean the scanner glass with a soft, dry, lint-free cloth (paper towels are - Epson Stylus CX4600 | Quick Reference Guide - Page 40
: ■ Product name (Epson Stylus CX4600) ■ Product serial number (located on the back) ■ Proof of purchase (such as a store receipt) and date of purchase ■ Computer configuration ■ Description of the problem You can purchase ink cartridges, paper, manuals, and accessories from the Epson Store at (800 - Epson Stylus CX4600 | Quick Reference Guide - Page 41
: ■ Be sure to follow all warnings and instructions marked on the CX4600. ■ Use only the type of power source indicated on the CX4600 label. ■ Use only the power cord that comes with the CX4600. Use of another cord may cause fires or shock. Do not use the cord with any other equipment. ■ Connect all - Epson Stylus CX4600 | Quick Reference Guide - Page 42
the ink cartridges installed. Removing the cartridges can dehydrate the print head and may prevent the CX4600 from printing. ■ Do not put your hand inside the CX4600 or touch any cartridges during printing. ■ Do not move the print head by hand; this may damage the CX4600. ■ Install the ink cartridge - Epson Stylus CX4600 | Quick Reference Guide - Page 43
touches. Do not touch the ink cartridge ink supply port or surrounding area. Memory Card Safety Instructions ■ Do not remove the memory card or turn off the CX4600 while the computer and memory card are communicating (the memory card light or the On light is flashing). ■ Use only memory cards - Epson Stylus CX4600 | Quick Reference Guide - Page 44
à la norme NMB-003 du Canada. Declaration of Conformity According to 47CFR, Part 2 and 15 for: Class B Personal Computers and Peripherals; and/or CPU Boards and Power Supplies used with Class B Personal Computers: We: Located at: Epson America, Inc. MS 3-13 3840 Kilroy Airport Way Long Beach, CA - Epson Stylus CX4600 | Quick Reference Guide - Page 45
to the manufacturer's specifications and will be free from defects in workmanship and materials for a period of one (1) year from the date of original purchase. Epson also warrants that the consumable ink cartridges enclosed with the printer will perform to the manufacturer's specified usage - Epson Stylus CX4600 | Quick Reference Guide - Page 46
change or fading of prints or reimbursement of materials or services required for reprinting. This warranty does not cover damage to the Epson product caused by parts or supplies not manufactured, distributed or certified by Epson. This warranty does not cover ribbons, ink cartridges or third party - Epson Stylus CX4600 | Quick Reference Guide - Page 47
digital cameras, scanners, and ink jet printers. Trademarks Epson and Epson Stylus are registered trademarks and EPSON Smart Panel is a trademark of Seiko Epson Corporation. DURABrite is a registered trademark and Epson Connection, Epson Store, and SoundAdvice are service marks of Epson America, Inc - Epson Stylus CX4600 | Quick Reference Guide - Page 48
Printed in XXXXXX XX.XX-XX
-
 1
1 -
 2
2 -
 3
3 -
 4
4 -
 5
5 -
 6
6 -
 7
7 -
8
-
9
-
10
-
11
-
12
-
13
-
14
-
15
-
16
-
17
-
18
-
19
-
20
-
21
-
22
-
23
-
24
-
25
-
26
-
27
-
28
-
29
-
30
-
31
-
32
-
33
-
34
-
35
-
36
-
37
-
38
-
39
-
40
-
41
-
42
-
43
-
44
-
45
-
46
-
47
-
48
 |
 |

Quick Reference
Basic Copying, Printing, and Scanning
Maintaining Your CX4600
Solving Problems
CPD-18250R1
4049976-01
XXX