Epson Stylus NX105 Quick Guide
Epson Stylus NX105 - All-in-One Printer Manual
 |
View all Epson Stylus NX105 manuals
Add to My Manuals
Save this manual to your list of manuals |
Epson Stylus NX105 manual content summary:
- Epson Stylus NX105 | Quick Guide - Page 1
Epson Stylus® NX100 Series Quick Guide Basic Copying, Printing, and Scanning Maintaining Your NX100 Series Solving Problems - Epson Stylus NX105 | Quick Guide - Page 2
Your NX100 Series 20 Checking the Print Head Nozzles 20 Cleaning the Print Head 21 Checking the Ink Cartridge Status 22 Replacing Ink Cartridges 23 Solving Problems 28 Checking for Software Updates 28 Error Indicators 28 Problems and Solutions 29 Where To Get Help 31 Notices 33 2 Contents - Epson Stylus NX105 | Quick Guide - Page 3
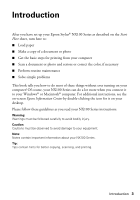
Introduction After you have set up your Epson Stylus® NX100 Series as described on the Start Here sheet, turn here to: ■ Load paper ■ Make a copy of a document or photo ■ Get the basic steps for printing from your computer ■ Scan a document or photo and restore or correct the color, if necessary ■ - Epson Stylus NX105 | Quick Guide - Page 4
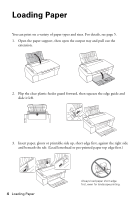
Loading Paper You can print on a variety of paper types and sizes. For details, see page 5. 1. Open the paper support, then open the output tray and pull out the extension. 2. Flip the clear plastic feeder guard forward, then squeeze the edge guide and slide it left. 3. Insert paper, glossy or - Epson Stylus NX105 | Quick Guide - Page 5
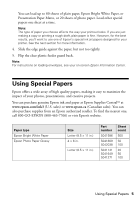
results, you'll want to use one of Epson's special ink jet papers designed for your printer. See the next section for more information. 4. Slide the edge guide against the paper, but not too tightly. 5. Flip the clear plastic feeder guard back. Note: For instructions on loading envelopes, see your - Epson Stylus NX105 | Quick Guide - Page 6
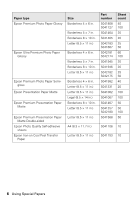
Premium Photo Paper Glossy Epson Ultra Premium Photo Paper Glossy Epson Premium Photo Paper Semigloss Epson Presentation Paper Matte Epson Premium Presentation Paper Matte Epson Premium Presentation Paper Matte Double-sided Epson Photo Quality Self-adhesive sheets Epson Iron-on Cool Peel Transfer - Epson Stylus NX105 | Quick Guide - Page 7
Copying a Document or Photo Follow the instructions in this section to position your originals correctly on the glass and make color or black-and-white copies. Placing the Original on the Glass 1. - Epson Stylus NX105 | Quick Guide - Page 8
Copying a Document You can copy documents onto letter- or A4-size plain paper or Epson special paper just like a copy machine. 1. Load letter- or A4-size plain paper or Epson special paper. 2. Place your original document on the document table. 3. Press the x B&W Text button (for black-and-white - Epson Stylus NX105 | Quick Guide - Page 9
photo paper (various types available) for borderless photo reprints. 1. Load up to 20 sheets of 4 × 6-inch Epson photo paper. 2. Place your original photo on the document table. 3. Press the x Color Photo button to start copying. The NX100 Series automatically sizes your photo - Epson Stylus NX105 | Quick Guide - Page 10
Documents You can make quick draft copies of documents on plain paper or Epson Bright White paper. Draft copies have reduced print quality, but they print faster. 1. Load letter- or A4-size plain paper or Epson Bright White paper. 2. Place your original document on the document table. 3. Press and - Epson Stylus NX105 | Quick Guide - Page 11
Windows or Macintosh computer. For detailed instructions on printing, see the on-screen Epson Information Center. Before you start, make sure you've installed your printer software and connected the NX100 Series to your computer as described on the Start Here sheet. Tip: It's a good idea to check - Epson Stylus NX105 | Quick Guide - Page 12
print double-sided, click the Page Layout tab and select settings as necessary. 8. For more printing options, click the Advanced tab. Note: For more information about print settings, click Help or see your on-screen Epson Information Center 9. Click OK to save your settings. 12 Printing in Windows - Epson Stylus NX105 | Quick Guide - Page 13
of your print job. Check ink cartridge status Cancel printing Printing With a Macintosh See one of the sections below for your Mac OS® operating system. Mac OS X 10.5 1. Open a photo or document in an application. 2. Open the File menu and select Print. 3. Select EPSON Stylus NX100 as the Printer - Epson Stylus NX105 | Quick Guide - Page 14
example, Scale), check for it in your application before printing. Page setup options Pop-up menu 6. Choose Print Settings from the Ink Only output Select higher quality or faster printing (if available) 7. Choose any other printing options you may need from the pop-up menu. See the on-screen Epson - Epson Stylus NX105 | Quick Guide - Page 15
9. To monitor your print job, click the printer icon in the dock. Select your print job, then select an option to cancel, pause, or resume printing, if necessary. Pause or resume printing Cancel printing Print job Mac OS X 10.3 to 10.4 1. Open a photo or document in an application. 2. Select Page - Epson Stylus NX105 | Quick Guide - Page 16
. You see a window like this one: Select your printer Select Print Settings 5. Choose Print Settings from the pop-up menu and select the following settings as necessary: Select your paper type (see page 17) Select Color or Black Ink Only Select higher quality or faster printing (if available) Select - Epson Stylus NX105 | Quick Guide - Page 17
print job Selecting the Correct Paper Type Select the correct Type (see page 12) or Media Type (see page 14 or page 16) setting in your printer software. This tells the NX100 Series what kind of paper you're using, so the ink coverage can be adjusted accordingly. For this paper Plain paper Epson - Epson Stylus NX105 | Quick Guide - Page 18
to start Epson Scan: ■ Windows: Double-click the EPSON Scan icon on your desktop. ■ Macintosh: Double-click EPSON Scan in the Applications folder. ■ If you are scanning from an application, start your application. Then open the File menu, choose Import or Acquire, and select Epson Stylus NX100 - Epson Stylus NX105 | Quick Guide - Page 19
Epson Scan settings window. (You can change the mode using the Mode selector in the upper right corner.) 5. If you want to restore faded color in a photo or make other corrections, click Customize. Then follow the instructions Epson Information Center. You can also click Help on the Epson Scan - Epson Stylus NX105 | Quick Guide - Page 20
Maintaining Your NX100 Series Follow the instructions in this chapter for checking and cleaning the print head nozzles and replacing ink cartridges. To align the print head, if necessary, see your on-screen Epson Information Center. Caution: To keep your NX100 Series looking like new, don't place - Epson Stylus NX105 | Quick Guide - Page 21
off your NX100 Series and wait at least six hours to let any dried ink soften. Then try cleaning the print head again. If quality does not improve, one of the ink cartridges may need to be replaced. If that doesn't help, contact Epson as described on page 31. If you do not use your NX100 Series - Epson Stylus NX105 | Quick Guide - Page 22
asking if you want to receive these Epson offers the first time you try to print when ink is low. Click Accept or Decline. Note: To disable checking for ink offers or updates from Epson, see the instructions in your onscreen Epson Information Center. Tip: If a cartridge is more than six months old - Epson Stylus NX105 | Quick Guide - Page 23
you use genuine Epson cartridges and do not refill them. The use of other products may affect your print quality and could result in printer damage. The printer ships with full cartridges and part of the ink from this first set of cartridges is used for priming the printer. Yields vary considerably - Epson Stylus NX105 | Quick Guide - Page 24
scanner and prop it up with its support. Caution: Do not touch the white cable inside the printer or you may damage it. 3. Press the y Stop button. The print head moves to the _ position to indicate which cartridge is low or expended. Caution: Do not move the print head by hand; this may damage your - Epson Stylus NX105 | Quick Guide - Page 25
of it carefully. Do not take the used cartridge apart or try to refill it. Caution: Do not touch the white cable inside the printer or you may damage it. Warning: If ink gets on your hands, wash them thoroughly with soap and water. If ink gets into your eyes, flush them immediately with water - Epson Stylus NX105 | Quick Guide - Page 26
of the ink cartridge. Caution: Do not remove any other labels or seals, or ink may leak. 8. Insert the new ink cartridge into the holder and push it down until it clicks into place. 9. Once you replace all the cartridges that need replacing, lift the scanner slightly, release its support, and lower - Epson Stylus NX105 | Quick Guide - Page 27
: Never turn off the NX100 Series while ink is charging or you'll waste ink. If the B ink light flashes, press the y Stop button and press down all the cartridges securely. Note: If you replaced a cartridge while copying a document or photo, cancel printing and make sure your original is still - Epson Stylus NX105 | Quick Guide - Page 28
Epson Stylus NX100 Series software. Open your on-screen Epson Information Center and select Download the Latest Software or visit Epson's support website at epson.com/support (U.S.) or epson.ca (Canada). With Windows, you can select Driver Update on the Maintenance tab in the printer settings window - Epson Stylus NX105 | Quick Guide - Page 29
more cartridges have low ink. You can continue printing until a cartridge needs replacement. Check the cartridge status to determine which cartridges are affected (see page 22). One or more ink cartridges are expended, incorrectly installed, or cannot be used with the printer. If an ink cartridge is - Epson Stylus NX105 | Quick Guide - Page 30
the type of paper you loaded matches the paper size and paper type settings in your printer software (see page 17). ■ For the best print quality, use Epson special paper (see page 5) and genuine Epson ink cartridges (see page 22). ■ If you notice light or dark bands across your printouts or they are - Epson Stylus NX105 | Quick Guide - Page 31
to common problems. You can download drivers and documentation, get FAQs and troubleshooting advice, or e-mail Epson with your questions. Speak to a Support Representative Before you call Epson for support, please have the following information ready: ■ Product name (Epson Stylus NX100 Series - Epson Stylus NX105 | Quick Guide - Page 32
Days and hours of support are subject to change without notice. Toll or long distance charges may apply. Purchase Supplies and Accessories You can purchase genuine Epson ink and paper at Epson Supplies Central at www.epson.com/ink3 (U.S. sales) or www.epson.ca (Canadian sales). You can also purchase - Epson Stylus NX105 | Quick Guide - Page 33
these safety instructions: ■ Be sure to follow all warnings and instructions marked until the P On light stops flashing before unplugging the printer or cutting off power to the electrical outlet. ■ ■ Avoid locations that are subject to rapid changes in heat or humidity, shocks or vibrations, or - Epson Stylus NX105 | Quick Guide - Page 34
the NX100 Series or touch any cartridges during printing. ■ Install a new ink cartridge immediately after removing an expended one. Leaving cartridges uninstalled can dry out the print head and may prevent the NX100 Series from printing. ■ If you remove an ink cartridge for later use, protect the - Epson Stylus NX105 | Quick Guide - Page 35
installation. This equipment generates, uses, and can radiate radio frequency energy and, if not installed and used in accordance with the instructions technician for help. WARNING The interference levels which exceed one interface connector, do not leave cables connected to unused interfaces. Changes - Epson Stylus NX105 | Quick Guide - Page 36
CPU Boards and Power Supplies used with Class B Personal Computers: We: Located at: Epson America, Inc. MS 3-13 3840 Kilroy Airport Way Long Beach, CA 90806 Telephone: cause undesired operation. Trade Name: Epson Type of Product: Multifunction printer Model: C411A 36 Declaration of Conformity - Epson Stylus NX105 | Quick Guide - Page 37
any color change or fading of prints or reimbursement of materials or services required for reprinting. This warranty does not cover damage to the Epson product caused by parts or supplies not manufactured, distributed or certified by Epson. This warranty does not cover ribbons, ink cartridges or - Epson Stylus NX105 | Quick Guide - Page 38
with non-Epson products, or service other than by an Epson Authorized Servicer. If a claimed defect Epson Authorized Reseller nearest you, visit our website at: http://www.epson.com. To find the Epson Customer Care Center nearest you, visit: http://www.epson.com/support. You can also write to: Epson - Epson Stylus NX105 | Quick Guide - Page 39
Epson Corporation. Epson Connection is a service mark of Epson America, Inc. General Notice: Other product names used herein are for identification purposes only and may be trademarks of their respective owners. Epson disclaims any and all rights in those marks. This information is subject to change - Epson Stylus NX105 | Quick Guide - Page 40
CPD-25632 oss Printed in XXXXXX
-
 1
1 -
 2
2 -
 3
3 -
 4
4 -
 5
5 -
 6
6 -
 7
7 -
8
-
9
-
10
-
11
-
12
-
13
-
14
-
15
-
16
-
17
-
18
-
19
-
20
-
21
-
22
-
23
-
24
-
25
-
26
-
27
-
28
-
29
-
30
-
31
-
32
-
33
-
34
-
35
-
36
-
37
-
38
-
39
-
40
 |
 |
Epson Stylus
NX100 Series
Quick Guide
Basic Copying, Printing, and Scanning
Maintaining Your NX100 Series
Solving Problems
®