Epson Stylus NX305 Quick Guide
Epson Stylus NX305 Manual
 |
View all Epson Stylus NX305 manuals
Add to My Manuals
Save this manual to your list of manuals |
Epson Stylus NX305 manual content summary:
- Epson Stylus NX305 | Quick Guide - Page 1
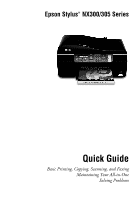
Epson Stylus® NX300/305 Series Quick Guide Basic Printing, Copying, Scanning, and Faxing Maintaining Your All-in-One Solving Problems - Epson Stylus NX305 | Quick Guide - Page 2
a Phone or Answering Machine 14 Setting Up Fax Features 16 Sending a Fax 20 Receiving Faxes 22 Using the One-touch Dial Buttons 23 Printing From Your Computer 24 Printing in Windows 24 Printing With a Macintosh 26 Selecting the Correct Paper Type 30 Scanning a Document or Photo 31 Basic - Epson Stylus NX305 | Quick Guide - Page 3
Your Product 34 Checking the Print Head Nozzles 34 Cleaning the Print Head 35 Checking the Ink Cartridge Status 36 Purchasing Epson Ink Cartridges 37 Replacing Ink Cartridges 38 Solving Problems 40 Checking for Software Updates 40 Error Indicators 41 Problems and Solutions 41 Where to - Epson Stylus NX305 | Quick Guide - Page 4
your Epson Stylus® NX300/305 Series as described on the Start Here sheet, turn here to: ■ Load paper ■ Make a copy of a document or photo ■ Fax a document or photo ■ Get the basic steps for printing from your computer ■ Scan multiple pages ■ Perform routine maintenance ■ Solve simple problems This - Epson Stylus NX305 | Quick Guide - Page 5
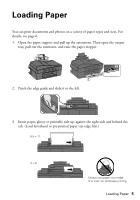
Loading Paper You can print documents and photos on a variety of paper types and sizes. For details, see page 6. 1. Open the paper support and pull up the extensions. Then open the output tray, pull out the extension, and raise the paper stopper. 2. Pinch the edge guide and slide it to the left. - Epson Stylus NX305 | Quick Guide - Page 6
best results, you'll want to use one of Epson's special ink jet papers designed for your printer (see "Using Special Papers" for more information). 4. Slide the edge guide against the paper, but not too tightly. Note: For details on paper and instructions on loading envelopes, see your online User - Epson Stylus NX305 | Quick Guide - Page 7
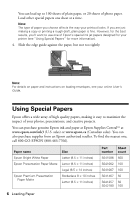
× 6 inches Letter (8.5 × 11 inches) Borderless 4 × 6 inches Letter (8.5 × 11 inches) Epson Ultra Premium Presentation Paper Matte Letter (8.5 × 11 inches) Epson Photo Quality Selfadhesive Sheets A4 (8.3 × 11.7 inches) Epson Iron-on Cool Peel Transfer Letter (8.5 × 11 inches) paper Part Sheet - Epson Stylus NX305 | Quick Guide - Page 8
for Copying, Scanning, or Faxing Before you copy, scan, or fax, place your documents or photos on the scanner glass (below) or in the Automatic Document Feeder (see page 9). Using the Scanner Glass You can place two photos or a document up to letter-size (or A4) on the scanner glass to make color or - Epson Stylus NX305 | Quick Guide - Page 9
sheets or 10 legal-size sheets in the Automatic Document Feeder. 1. Tap the originals on a flat surface to even the edges. 2. Open the ADF paper support. 3. Slide the edge guide to the side. 4. Insert the originals face-up. Using the Automatic Document Feeder 9 - Epson Stylus NX305 | Quick Guide - Page 10
against the originals. Once they're loaded, you can copy, scan, or fax. Note: When you use the Copy function, letter-size paper is automatically selected for your printed copies. If you copy a legal-size document, the image will be cropped to fit lettersize paper. 10 Placing Originals for Copying - Epson Stylus NX305 | Quick Guide - Page 11
on the NX300/305 Series. 2. Load letter- or A4-size plain paper, Epson Bright White Paper, or Epson Presentation Paper Matte in the sheet feeder (see page 5). 3. Place your original document(s) on the scanner glass or in the Automatic Document Feeder (see page 8 or 9). 4. Press the Copy/Fax button - Epson Stylus NX305 | Quick Guide - Page 12
on the NX300/305 Series. 2. Load Epson photo paper in the sheet feeder (see page 5). 3. Place your photo on the scanner glass (see page 8). 4. Press the Copy/Fax button to enter Copy mode. 5. Press u or d or use the numeric keypad to select the number of copies you want (up to 99). 6. To change the - Epson Stylus NX305 | Quick Guide - Page 13
Premium Photo Paper Glossy Ultra Glossy Epson Photo Paper Glossy Glossy 9. To change any other print settings, press u or d and select your settings (see page 11). 10. When you're done, press OK and then Menu to exit settings. 11. Press the x Color button to begin copying. To cancel copying - Epson Stylus NX305 | Quick Guide - Page 14
NX300/305 Series lets you send faxes by entering fax numbers, selecting entries from a speed dial list, or using the one-touch dial buttons. Using the Automatic Document Feeder, you can fax up to 30 pages at a time. Note: For more information on faxing and fax settings, see the online User's Guide - Epson Stylus NX305 | Quick Guide - Page 15
cable. Connect one end of the cable to the telephone or answering machine, and connect the other end to the EXT. port on the back of the NX300/305 Series. Note: to the EXT. port for the NX300/305 Series to detect an incoming fax call when a phone is picked up. If a fax call comes in, and you pick - Epson Stylus NX305 | Quick Guide - Page 16
: To change other settings or print fax reports, see the online User's Guide. Entering Fax Header Information You should enter your name and phone number in the fax header before sending faxes so that recipients can identify the origin of the fax. Note: If you leave the NX300/305 Series unplugged - Epson Stylus NX305 | Quick Guide - Page 17
/ Backspace Function Moves the cursor to the left or right. Inserts a space and moves the cursor one character to the right. Deletes a character and moves the cursor one space to the left. ■ To enter a fax number, use the numeric keypad. Use the # button to type the + symbol when entering a phone - Epson Stylus NX305 | Quick Guide - Page 18
Size (On), or printed at their original size on multiple sheets (Off). Indicates when the NX300/305 Series prints a report on the last transmitted fax. Select Off to turn off report printing, On Error to print reports only when an error occurs, or On Send to print reports for every fax you send. 18 - Epson Stylus NX305 | Quick Guide - Page 19
, add names to identify the recipients, and print a list for easy reference (see page 20). You can quickly access the first five entries using the one-touch dial buttons (see page 23). Creating a Speed Dial List 1. Press the Copy/Fax button to select Fax mode, then press Menu. 2. Press u or d to - Epson Stylus NX305 | Quick Guide - Page 20
in step 4. 5. Make sure letter-size paper is loaded in the NX300/305 Series, then press the x Color button to print your list. Sending a Fax You can send a fax by manually entering a fax number or redialing the previous fax number, selecting an entry from your speed dial list, or using a connected - Epson Stylus NX305 | Quick Guide - Page 21
to the NX300/305 Series, dial the number from the phone. You see the screen at right. Press 1 to confirm. Note: Don't hang up the phone until you begin transmitting the fax in step 5. 4. Press Menu to change any of the following fax settings: ■ Resolution to increase the scanning resolution of - Epson Stylus NX305 | Quick Guide - Page 22
message and the NX300/305 Series redials after one minute. To redial immediately, press Redial/Pause. Receiving Faxes Before receiving faxes, make sure you load plain paper and select the Paper Size setting that matches the size of paper you've loaded (see "Select Scan and Print Settings" on page - Epson Stylus NX305 | Quick Guide - Page 23
faxes manually, turn off the Auto Answer light and follow these steps: 1. When your telephone rings, lift the phone off the hook. You see this screen: 2. Press 2 to receive. 3. To receive the fax Replace the phone on the hook. 5. Press OK to print the fax after receiving the data. Using the One- - Epson Stylus NX305 | Quick Guide - Page 24
describes the basic steps for printing a document or photo stored on your Windows or Macintosh computer. For detailed instructions on printing, see the online User's Guide. Before you start, make sure you've installed your printer software and connected the NX300/305 Series to your computer as - Epson Stylus NX305 | Quick Guide - Page 25
select one of the print double-sided, click the Page Layout tab and select settings as necessary. 5. For more printing options, click the Advanced tab. Note: For more information about print settings, click Help or see your online User's Guide. 6. Click OK to save your settings. Printing in Windows - Epson Stylus NX305 | Quick Guide - Page 26
job. Check ink cartridge status Cancel printing Printing With a Macintosh See the section below for your Mac OS® operating system. Mac OS X 10.5 or 10.6 1. Open a document or photo in an application, open the File menu, and select Print. 2. Select EPSON Stylus NX300 as the Printer setting. Select - Epson Stylus NX305 | Quick Guide - Page 27
this window. (If you're printing from Preview, you see the settings shown below.) Copy and page settings Application settings 5. Choose Print Settings from the pop-up menu, and select the following print settings: Choose Print Settings Select your Media Type (see page 30) Select Color or Black Ink - Epson Stylus NX305 | Quick Guide - Page 28
User's Guide for details. 7. Click Print. 8. To monitor your print job, click the printer icon in the dock. Cancel printing Pause or resume printing Select the print job Mac OS X 10.4 1. Open a document or photo in an application, open the File menu, and select Page Setup. 2. Select Stylus NX300 as - Epson Stylus NX305 | Quick Guide - Page 29
Advanced before you can select Print Settings. For more information about printer settings, click the ? button. 8. Choose any other printing options you may need from the pop-up menu. See the online User's Guide for details. 9. Click the Advanced button to change additional settings. Note: For more - Epson Stylus NX305 | Quick Guide - Page 30
printing Pause or resume printing Select the print job Selecting the Correct Paper Type Select the correct Type (see page 25) or Media Type (see page 28) setting in your printer software so the ink coverage can be adjusted accordingly. For this paper/media Select this setting Plain paper Epson - Epson Stylus NX305 | Quick Guide - Page 31
Scan: ■ Windows: Double-click the EPSON Scan icon on your desktop. ■ Macintosh: Double-click EPSON Scan in the Applications folder. ■ If you are scanning from an application, start your application. Then open the File menu, choose Import or Acquire, and select your Epson Stylus NX300/305 Series - Epson Stylus NX305 | Quick Guide - Page 32
. Click here to change the scan mode Note: You cannot use Home mode to scan with the Automatic Document Feeder. 5. Click Scan and select the name, location, and format (such as PDF) for your scanned document. 6. Click OK. The image is scanned and you see its icon in Windows Explorer or Macintosh - Epson Stylus NX305 | Quick Guide - Page 33
■ Print or convert to editable text (OCR): 300 dpi ■ Fax: 200 dpi 8. Click the Preview button to scan and scanned document and click OK. The document is scanned and you see its icon(s) in Windows Explorer or Macintosh Finder. Note: Depending on the file format you select, Epson Scan may create one - Epson Stylus NX305 | Quick Guide - Page 34
Maintaining Your Product Follow the instructions in this chapter for checking and cleaning the print head nozzles and replacing ink cartridges. To align the print head, if necessary, see your online User's Guide. Checking the Print Head Nozzles If your printouts are faint or have gaps in them, some - Epson Stylus NX305 | Quick Guide - Page 35
any improvement after cleaning the print head three times, turn off your NX300/305 Series and wait at least six hours to let any dried ink soften. Then try printing again. If quality does not improve, one of the ink cartridges may need to be replaced. If that doesn't help, contact Epson as described - Epson Stylus NX305 | Quick Guide - Page 36
using the NX300/305 Series display screen. To check the ink cartridge status with your Windows or Macintosh software, see the instructions in your online User's Guide. Note: You cannot print or copy when an ink cartridge is expended even if the other cartridges are not expended. Replace any expended - Epson Stylus NX305 | Quick Guide - Page 37
: Ink color Black Cyan Magenta Yellow Moderate use 88 88 88 88 Standard capacity High capacity 69 68 69 - 69 - 69 - Note: We recommend that you use genuine Epson cartridges and do not refill them. The use of other products may affect your print quality and could result in printer damage - Epson Stylus NX305 | Quick Guide - Page 38
cartridge(s) installed until you have obtained a replacement, or the ink remaining in the print head nozzles may dry out. 1. Turn on the NX300/305 Series. If an ink cartridge is low or expended, you see a message on the NX300/305 Series display screen indicating which color to replace. Press - Epson Stylus NX305 | Quick Guide - Page 39
the NX300/305 Series while ink is charging, or you'll waste ink. If you see an ink replacement message on the display screen, press OK and press down all the cartridges securely. If you remove a low or expended ink cartridge, you cannot reinstall and use the cartridge. Replacing Ink Cartridges 39 - Epson Stylus NX305 | Quick Guide - Page 40
Epson Stylus NX300/305 Series software. Open your online User's Guide and select Download the Latest Software or visit Epson's support website at epson.com/support (U.S.) or epson.ca/support (Canada). With Windows, you can select Driver Update on the Maintenance tab in the printer settings window - Epson Stylus NX305 | Quick Guide - Page 41
printer's ink pads are at the end of their service life. Contact Epson to replace ink pads (see page 44). Problems and Solutions Check the solutions below if you're having trouble using your all-in-one. Note: If the screen shows only the clock, the NX300/305 Series is in sleep mode to save power - Epson Stylus NX305 | Quick Guide - Page 42
paper. Load other special papers one sheet at a time. If paper has jammed, follow these steps: 1. Gently pull out jammed paper from the output tray or sheet feeder. 2. If paper is stuck inside, press the P On button to turn off the NX300/305 Series. Then lift the scanner, remove the jammed paper and - Epson Stylus NX305 | Quick Guide - Page 43
align the print head. See the online User's Guide for instructions. ■ The ink cartridges may be low on ink. Check your cartridge status (see page 36) and replace cartridges, if necessary (see page 38). ■ If you're copying, place the document flat against the scanner glass. ■ Clean the scanner glass - Epson Stylus NX305 | Quick Guide - Page 44
to common problems. You can download drivers and documentation, get FAQs and troubleshooting advice, or e-mail Epson with your questions. Speak to a Support Representative Before you call Epson for support, please have the following information ready: ■ Product name (Epson Stylus NX300/305 Series - Epson Stylus NX305 | Quick Guide - Page 45
the product, do not tilt it, stand it on its side, or turn it upside down; otherwise ink may leak from the cartridges. ■ Avoid placing the product in locations that are subject to rapid changes in heat or humidity, shocks or vibrations, or dust. ■ Leave enough room around the product for sufficient - Epson Stylus NX305 | Quick Guide - Page 46
or touch any cartridges during printing. ■ Install a new ink cartridge immediately after removing an expended one. Leaving cartridges uninstalled can dry out the print head and may prevent the product from printing. ■ If you remove an ink cartridge for later use, protect the ink supply area from - Epson Stylus NX305 | Quick Guide - Page 47
credit card number to secure the cost of the replacement printer in the event that you fail to return the defective one. If your printer is being repaired, Epson will direct you to send your printer to Epson or its authorized service center, where the printer will be fixed and sent back to you. You - Epson Stylus NX305 | Quick Guide - Page 48
any color change or fading of prints or reimbursement of materials or services required for reprinting. This warranty does not cover damage to the Epson product caused by parts or supplies not manufactured, distributed or certified by Epson. This warranty does not cover ribbons, ink cartridges or - Epson Stylus NX305 | Quick Guide - Page 49
you, visit: http://epson.com/support. You can also write to: Epson America, Inc., P.O. Box 93012, Long Beach, CA 90809-3012 Declaration of Conformity According to 47CFR, Part 2 and 15 for: Class B Personal Computers and Peripherals; and/or CPU Boards and Power Supplies used with Class B Personal - Epson Stylus NX305 | Quick Guide - Page 50
but not all areas, the sum of the RENs of all devices connected to one line should not exceed five (5.0). To be certain of the number of devices service. This product is not intended to be repaired. If you experience trouble with this equipment, please contact: Name: Address: Telephone: Epson - Epson Stylus NX305 | Quick Guide - Page 51
to a compatible modular jack that is also compliant. See installation instructions for details. The Telephone Consumer Protection Act of 1991 makes it unlawful for any person to use a computer or other electronic device, including fax machines, to send any message unless such message clearly - Epson Stylus NX305 | Quick Guide - Page 52
to obtain and use a shielded equipment interface cable with this device. If this equipment has more than one interface connector, do not leave cables connected to unused interfaces. Changes or modifications not expressly approved by the manufacturer could void the user's authority to operate the - Epson Stylus NX305 | Quick Guide - Page 53
any questions regarding copyright law. Trademarks Epson and Epson Stylus are registered trademarks, Epson Exceed Your Vision is a registered logomark, and Supplies Central is a service mark of Seiko Epson Corporation. Epson Connection is a service mark of Epson America, Inc. General Notice: Other - Epson Stylus NX305 | Quick Guide - Page 54
- Epson Stylus NX305 | Quick Guide - Page 55
- Epson Stylus NX305 | Quick Guide - Page 56
CPD-27761R1 Printed in XXXXXX
-
 1
1 -
 2
2 -
 3
3 -
 4
4 -
 5
5 -
 6
6 -
 7
7 -
8
-
9
-
10
-
11
-
12
-
13
-
14
-
15
-
16
-
17
-
18
-
19
-
20
-
21
-
22
-
23
-
24
-
25
-
26
-
27
-
28
-
29
-
30
-
31
-
32
-
33
-
34
-
35
-
36
-
37
-
38
-
39
-
40
-
41
-
42
-
43
-
44
-
45
-
46
-
47
-
48
-
49
-
50
-
51
-
52
-
53
-
54
-
55
-
56
 |
 |
Epson Stylus
NX300/305 Series
Quick Guide
Basic Printing, Copying, Scanning, and Faxing
Maintaining Your All-in-One
Solving Problems
®