Epson Stylus Photo R300M Start Here Card
Epson Stylus Photo R300M - Ink Jet Printer Manual
 |
View all Epson Stylus Photo R300M manuals
Add to My Manuals
Save this manual to your list of manuals |
Epson Stylus Photo R300M manual content summary:
- Epson Stylus Photo R300M | Start Here Card - Page 1
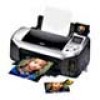
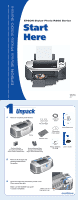
EPSON Stylus Photo R300 Series EPSON Stylus® Photo R300 Series Start Here CPD-17016 4044644-00 XXX 1 Unpack 1 Remove everything from the box. Printer Ink cartridges Small CD insert Quick Reference CD position check paper CD/DVD Tray Preview Monitor (included with EPSON Stylus Photo R300M only - Epson Stylus Photo R300M | Start Here Card - Page 2
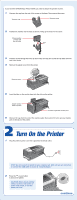
If you have the EPSON Stylus Photo R300M, you need to attach the printer. 2 Turn On the Printer 1 Plug the printer's power cord into a grounded electrical outlet. STOP: Do not connect the printer to your computer yet. Wait until you are instructed to connect the USB cable in section 5, "Install - Epson Stylus Photo R300M | Start Here Card - Page 3
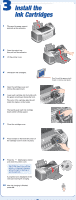
3 Install the Ink Cartridges 1 Flip open the paper support and pull up the extension. 2 Open the output tray, then pull out the extension. 3 Lift the printer cover. 4 Unwrap the ink cartridges. 5 Open the cartridge cover and remove the paper insert. 6 Lower each cartridge into its holder with the - Epson Stylus Photo R300M | Start Here Card - Page 4
paper. NOTE: For instructions on loading and printing on CDs or DVDs, see your User's Guide. 5 Install Software Windows® Make sure your printer is NOT connected to your computer, then follow the steps below. 1 Turn on your computer. Wait for the system to start up, then insert the EPSON® CD-ROM in - Epson Stylus Photo R300M | Start Here Card - Page 5
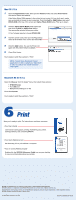
the on-screen instructions. When installation is complete, click Back. To add a link to EPSON PhotoCenter, click EPSON PhotoCenter Link, then click Add. Click Back, then click Back again. 12 From the Install Menu, click Install Printer Manual to install your on-screen Reference Guide. 13 When you - Epson Stylus Photo R300M | Start Here Card - Page 6
select Print Center. You see the Printer List window. If the Stylus Photo R300 appears in the printer list, go to step 2. If you don't see it, make sure your printer is turned on and connected. Then click Add or Add Printer, and select EPSON USB at the top of the screen and Stylus Photo R300 below
-
 1
1 -
 2
2 -
 3
3 -
 4
4 -
 5
5 -
 6
6
 |
 |

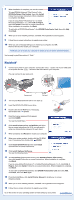
Unpack
Unpack
1
Remove everything from the box.
2
Remove all the tape and
packing material from
the printer.
3
Open the output tray and lift the printer cover.
Then remove the tape.
Make sure the CD/DVD tray guide
is closed completely.
CD position
check paper
Small CD
insert
Printer
User’s Guide
EPSON Stylus Photo R300 Series
EPSON Stylus
®
Photo R300 Series
CPD-17016
4044644-00
XXX
Printer Software
CD-ROM
Start
Here
Start
Here
1
1
CD/DVD Tray
Quick Reference
Ink cartridges
Preview Monitor
(included with EPSON
Stylus Photo R300M only)
Preview Monitor Base
(included with EPSON
Stylus Photo R300M only)
continue
Make sure the
tray guide is up