Epson Stylus Photo R300M User Manual (P.I.M Plug-in)
Epson Stylus Photo R300M - Ink Jet Printer Manual
 |
View all Epson Stylus Photo R300M manuals
Add to My Manuals
Save this manual to your list of manuals |
Epson Stylus Photo R300M manual content summary:
- Epson Stylus Photo R300M | User Manual (P.I.M Plug-in) - Page 1
enabled digital cameras embed information in digital photo files to maximize the image quality of ensures that P.I.M.-enabled digital cameras and printers work together perfectly to consistently and easily the web site at www.printimagematching.com. This guide tells you how to import and print your - Epson Stylus Photo R300M | User Manual (P.I.M Plug-in) - Page 2
driver. The following printers currently support PRINT Image Matching II, PRINT Image Matching, and Exif Print with this P.I.M. II Plug-in: ■ Epson Stylus® Photo R200 ■ Epson Stylus Photo R300/R300M ■ Epson Stylus Photo R320 ■ Epson Stylus Photo R800 ■ Epson Stylus Photo RX500 ■ Epson Stylus Photo - Epson Stylus Photo R300M | User Manual (P.I.M Plug-in) - Page 3
or Exif Print image. Instead, it creates a profile by converting the information into the file and embedding a color space called EPSON RGB 2001. This profile supports all the PRINT Image Matching color advantages and enhancements. You can crop, rotate, resize, work with layers, use filters, and - Epson Stylus Photo R300M | User Manual (P.I.M Plug-in) - Page 4
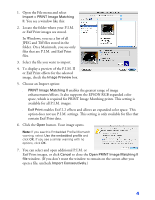
the Image Preview box. 5. Choose an Import option: ■ PRINT Image Matching II enables the greatest range of image enhancements/effects. It also supports the EPSON RGB expanded color space, which is required for PRINT Image Matching prints. This setting is available for all P.I.M. images. ■ Exif Print - Epson Stylus Photo R300M | User Manual (P.I.M Plug-in) - Page 5
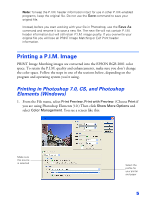
or Exif Print header information. Printing a P.I.M. Image PRINT Image Matching images are converted into the EPSON RGB 2001 color space. To retain the P.I.M. quality and enhancements, make sure you don't change : Make sure this source is selected Select the profile for your printer and paper 5 - Epson Stylus Photo R300M | User Manual (P.I.M Plug-in) - Page 6
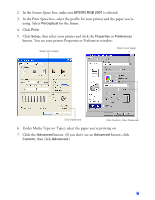
2. In the Source Space box, make sure EPSON RGB 2001 is selected. 3. In the Print Space box, select the profile for your printer and the paper you're using. Select Perceptual for the Intent. 4. Click Print. 5. Click Setup, then select your printer and click the Properties or Preferences button. - Epson Stylus Photo R300M | User Manual (P.I.M Plug-in) - Page 7
. (If you don't see No Color Adjustment, click ICM, then click Off (Not Color Adjustment) or No Color Adjustment.) 9. Continue clicking OK to print your photo. 7 - Epson Stylus Photo R300M | User Manual (P.I.M Plug-in) - Page 8
like this: Make sure this source is selected Select the profile for your printer and paper 2. In the Source Space box, make sure EPSON RGB 2001 is selected. 3. In the Print Space box, select the profile for your printer and the paper you're using. Select Perceptual for the Intent. 4. Click Print - Epson Stylus Photo R300M | User Manual (P.I.M Plug-in) - Page 9
You see your Print window: . Select your paper Mac OS X Select your paper Mac OS 9 5. Under Media Type, select the paper you're printing on. 6. In Mac OS X, choose Color Management to show the Color Management settings. In Mac OS 9.x, click Custom in the Mode box, then click the Advanced button. - Epson Stylus Photo R300M | User Manual (P.I.M Plug-in) - Page 10
You see the Color Management or Advanced settings: Select Off (No Color Adjustment) Select Off (No Color Adjustment) Mac OS 9 Mac OS X 7. Under Color Management, select Off (No Color Adjustment). Click OK if necessary. 8. Click Print to print your photo. 10 - Epson Stylus Photo R300M | User Manual (P.I.M Plug-in) - Page 11
Select the profile for your printer and paper 2. In the Source Space box, make sure Document: EPSON RGB 2001 is selected. 3. In the Print Space box, select the profile for your printer and the paper you're .) 6. Continue clicking OK (Windows) or click Print (Macintosh) to print your photo. 11 - Epson Stylus Photo R300M | User Manual (P.I.M Plug-in) - Page 12
Finish. 5. Follow the on-screen instructions to uninstall the plug-in. PRINT Image Matching II. Copyright 2003 Seiko Epson Corporation. All rights reserved. PRINT Image Matching and the PRINT Image Matching logo are trademarks and Epson, Epson Stylus, and PictureMate are registered trademarks of
-
 1
1 -
 2
2 -
 3
3 -
 4
4 -
 5
5 -
 6
6 -
 7
7 -
8
-
9
-
10
-
11
-
12
 |
 |

1
PRINT Image Matching II Plug-in
for Adobe Photoshop and Adobe Photoshop Elements
PRINT Image Matching
™
(P.I.M.)-enabled digital cameras embed information in
digital photo files to maximize the image quality of the print—including a wider
range of colors and enhancements set in the camera itself. PRINT Image Matching
technology ensures that P.I.M.-enabled digital cameras and printers work together
perfectly to consistently and easily create the best possible prints. The P.I.M. II
Plug-in for Adobe
®
Photoshop
®
allows you to retain the PRINT Image Matching
image quality
when you import files from your P.I.M.-enabled or Exif Print-enabled
digital camera.
Note:
Results will vary among camera makes and models.
For more information about PRINT Image Matching, including a complete list of
P.I.M.-enabled camera models and software titles, visit the web site at
www.printimagematching.com
.
This guide tells you how to import and print your PRINT Image Matching and Exif
Print images in Adobe Photoshop and Photoshop Elements in the following sections:
■
What Is New About P.I.M. II
. . . . . . . . . . . . . . . . . . . . . . . . . . . .
page 2
■
How Does P.I.M. II Work in Adobe Photoshop?
. . . . . . . . . . . . . .
page 3
■
Importing a P.I.M. Image
. . . . . . . . . . . . . . . . . . . . . . . . . . . . . . .
page 3
■
Printing a P.I.M. Image
. . . . . . . . . . . . . . . . . . . . . . . . . . . . . . . . .
page 5
■
Printing in Photoshop 7.0, CS, and Photoshop Elements
(Windows)
. . . . . . . . . . . . . . . . . . . . . . . . . . . . . . . . . . . . . . . .
page 5
■
Printing in Photoshop 7.0, CS, and Photoshop Elements
(Macintosh)
. . . . . . . . . . . . . . . . . . . . . . . . . . . . . . . . . . . . . . .
page 8
■
Printing in Photoshop 6.0
. . . . . . . . . . . . . . . . . . . . . . . . . . .
page 11
■
Uninstalling the Plug-in
. . . . . . . . . . . . . . . . . . . . . . . . . . . . . . .
page 12