Epson Stylus Photo RX600 Product Information Guide
Epson Stylus Photo RX600 - All-in-One Printer Manual
 |
View all Epson Stylus Photo RX600 manuals
Add to My Manuals
Save this manual to your list of manuals |
Epson Stylus Photo RX600 manual content summary:
- Epson Stylus Photo RX600 | Product Information Guide - Page 1
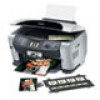
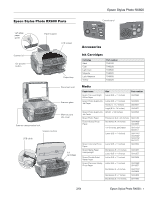
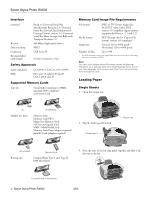
Photo RX600 Parts Epson Stylus Photo RX600 Control panel Left edge paper guide Paper support LCD screen Accessories Scanner lid On (power) button Output tray Document mat Scanner glass Memory card slot cover Scanner transportation lock Scanner section USB cable Ink cartridges Ink Cartridges - Epson Stylus Photo RX600 | Product Information Guide - Page 2
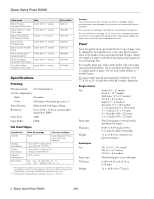
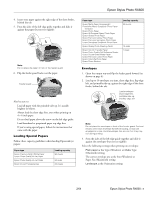
17 to 24 lb (64 to 90 g/m2) for plain bond paper Envelopes Size Paper type Thickness Weight No. 10 (4.1 × 9.5 inches) DL (4.3 × 8.7 inches) C6 (4.5 × 6.4 inches) Plain bond paper or air mail paper 0.006 to 0.02 inch (0.16 to 0.52 mm) 12 to 20 lb (45 to 75 g/m2) 2 - Epson Stylus Photo RX600 2/04 - Epson Stylus Photo RX600 | Product Information Guide - Page 3
(10 to 35 °C) Storage* - 4 to 140 °F (- 20 to 60 °C) 1 month at 104 °F (40 °C) Transit* - 4 to 140 °F (- 20 to 60 °C) 120 hours at 140 °F (60 °C) Humidity (without condensation) Operation 20 to 80% RH Storage* 5 to 85% RH * Stored in shipping container. 2/04 Epson Stylus Photo RX600 - 3 - Epson Stylus Photo RX600 | Product Information Guide - Page 4
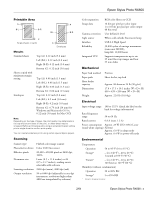
C108.8 class B Supported Memory Cards Top slot SmartMedia (maximum 128MB; standard 2000 compliant) xD-Picture Card Memory Card Image File Requirements File format JPEG or edge guide together and slide it all the way to the left. CompactFlash or Microdrive 4 - Epson Stylus Photo RX600 2/04 - Epson Stylus Photo RX600 | Product Information Guide - Page 5
too tightly). Select the following settings when printing on envelopes: ❏ Plain paper as the Type (Windows) or Media Type (Macintosh) setting ❏ The correct envelope size as the Size (Windows) or Paper Size (Macintosh) setting ❏ Landscape as the Orientation setting 2/04 Epson Stylus Photo RX600 - 5 - Epson Stylus Photo RX600 | Product Information Guide - Page 6
Epson Stylus Photo RX600 Selecting the Correct Media Type Select the paper Type (Windows) or Media Type (Macintosh) setting according to these guidelines: For this paper Plain paper sheets or envelopes Epson Iron-on Transfer paper Epson Premium Bright White Paper Epson Photo Quality Ink Jet Paper - Epson Stylus Photo RX600 | Product Information Guide - Page 7
large poster. Multi-Photo Copies multiple photos at once and makes a separate print for each one. (Follow the instructions on the LCD screen.) Also provides color restoration for 4 x 6-inch photos. (See the "Restoring Color as You Copy" below for more information. 2/04 Epson Stylus Photo RX600 - 7 - Epson Stylus Photo RX600 | Product Information Guide - Page 8
selected automatically. 7. Press the x Color button and follow the instructions on the RX600 screen to copy and restore your photo. Note: To restore the color in an old film strip photo or slide and copy or scan them, see the User's Guide. Saving and Reusing Copy Settings Follow these steps to save - Epson Stylus Photo RX600 | Product Information Guide - Page 9
Epson Stylus Photo RX600 4. Press the OK button. The RX600 screen displays the first, second, and last photo on the card. Last First Second 5. Use the l and r buttons to move through the photos. To select photos for printing, follow the instructions in the next section. Printing From a Memory - Epson Stylus Photo RX600 | Product Information Guide - Page 10
Photos If your camera supports DPOF (Digital Print Order Format), you can use it to select photos for printing before you insert the card in your printer. See your camera's instruction manual Note: To cancel a print job while printing, press the y Stop button. 10 - Epson Stylus Photo RX600 2/04 - Epson Stylus Photo RX600 | Product Information Guide - Page 11
as shown on page 6, and make sure your computer and RX600 are turned on. 2. Close the scanner lid. 3. Start Epson Scan. Windows: Select Start > All Programs (or Programs) > EPSON Scan > EPSON Scan. Macintosh: Double-click EPSON Scan in the Applications folder. 2/04 Epson Stylus Photo RX600 - 11 - Epson Stylus Photo RX600 | Product Information Guide - Page 12
Epson Stylus Photo RX600 You see the File Save Settings window: 5. For Windows, if you see the screen below on your computer, select EPSON Scan and click the Always use this program for this action checkbox. Then click OK. Type a name for your file here Select a file format here 4. - Epson Stylus Photo RX600 | Product Information Guide - Page 13
center of the scanner glass. The positioning posts on the film holder fit in two small holes near the scanner lid, as shown. Holes 3. Continue with one of these sections the User's Guide for instructions. 3. Replace the film cover. (It should snap into place.) 2/04 Epson Stylus Photo RX600 - 13 - Epson Stylus Photo RX600 | Product Information Guide - Page 14
the User's Guide for instructions. ❏ If your printout looks okay, you're done. Click Cancel to return to the main menu. ❏ If you see any gaps (as shown below) in the dot pattern, press OK. Then follow the instructions on the LCD screen to clean the print head again. 14 - Epson Stylus Photo RX600 - Epson Stylus Photo RX600 | Product Information Guide - Page 15
Epson Stylus Photo RX600 If you don't see any improvement after cleaning three or four times, check the troubleshooting solutions in the User's Guide. You can also turn the RX600 off and wait overnight-this allows any dried ink to soften-and then try cleaning the print head again. Caution: When you - Epson Stylus Photo RX600 | Product Information Guide - Page 16
Epson Stylus Photo RX600 3. Open the ink cartridge cover holder by pulling the back up and toward you. Caution: Never attempt to open the cartridge holder's cover while the print head is moving. Wait until the cartridges have moved to the replacement position. Open the cover from the back 7. Close - Epson Stylus Photo RX600 | Product Information Guide - Page 17
on the LCD screen. Press OK to return to the Setup Menu. Transporting the RX600 If you move your RX600 some distance, you need to prepare it for transportation in its original box or one of a similar size. Caution: To avoid damage, always leave the ink cartridges installed when transporting - Epson Stylus Photo RX600 | Product Information Guide - Page 18
page 16). Related Documentation CPD-17415 CPD-17417 CPD-17418 CPD-17416 Epson Stylus Photo RX600 Start Here Epson Stylus Photo RX600 How to Copy and Print Epson Stylus Photo RX600 User's Guide Epson Stylus Photo RX600 CD-ROM (includes online Reference Guide) 18 - Epson Stylus Photo RX600 2/04
-
 1
1 -
 2
2 -
 3
3 -
 4
4 -
 5
5 -
 6
6 -
 7
7 -
8
-
9
-
10
-
11
-
12
-
13
-
14
-
15
-
16
-
17
-
18
 |
 |

Epson Stylus Photo RX600
2/04
Epson Stylus Photo RX600
- 1
Epson Stylus Photo RX600 Parts
Accessories
Ink Cartridges
Media
Left edge
paper
guide
Paper support
LCD screen
Scanner lid
On (power)
button
Output tray
Document mat
Scanner glass
Memory card
slot cover
Scanner transportation lock
Scanner section
USB cable
Ink
cartridges
Cartridge
Part number
Black
T048120
Cyan
T048220
Light Cyan
T048520
Magenta
T048320
Light Magenta
T048620
Yellow
T048420
Paper name
Size
Part number
Epson Premium Bright
White Paper
Letter (8.5 × 11 inches)
S041586
Epson Photo Quality Ink
Jet Paper
Letter (8.5 × 11 inches)
S041062
A4 (8.3 × 11.7 inches)
S041061
Legal (8.3 × 14 inches)
S041067
Epson Photo Quality Ink
Jet Cards
A6 (4.1 × 5.8 inches)
S041054
Epson Photo Paper
Panoramic (8.3 × 23 inches)
S041145
Epson Glossy Photo
Paper
Borderless 4 × 6 inches
S041458/
S041809
4 × 6 inches, perforated
S041134/
S041671
Letter (8.5 × 11 inches)
S041141/
S041649/
S041272/
S041271
Epson ColorLife Photo
Paper
Letter (8.5 × 11 inches)
S041500
Epson Matte Paper
Heavyweight
Borderless 8 × 10 inches
S041467
Letter (8.5 × 11 inches)
S041257
Epson Double-Sided
Matte Paper
Letter (8.5 × 11 inches)
S041568
Epson Premium Glossy
Photo Paper
Letter (8.5 × 11 inches)
S041286/
S041667
Borderless 4 × 6 inches
S041727/
S041808
Borderless 5 × 7 inches
S041464
Borderless 8 × 10 inches
S041465
Control panel