Epson Stylus Photo RX600 Start Here Card
Epson Stylus Photo RX600 - All-in-One Printer Manual
 |
View all Epson Stylus Photo RX600 manuals
Add to My Manuals
Save this manual to your list of manuals |
Epson Stylus Photo RX600 manual content summary:
- Epson Stylus Photo RX600 | Start Here Card - Page 1
Epson Stylus Photo RX600 Epson Stylus® Photo RX600 Start Here CPD-17415 4048047-00 XXX - Epson Stylus Photo RX600 | Start Here Card - Page 2
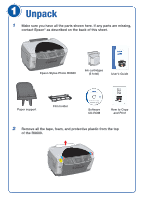
all the parts shown here. If any parts are missing, contact Epson® as described on the back of this sheet. 4043426-00 Printed in XXX Epson Stylus Photo RX600 Ink cartridges (6 total) User's Guide Paper support Film holder Software CD-ROM How to Copy and Print 2 Remove all the tape, foam - Epson Stylus Photo RX600 | Start Here Card - Page 3
2 Unlock the Scanner 1 Open the scanner lid. 2 Remove the white instruction sheet covering the scanner glass. 3 Slide the transportation lock to the unlocked position. Caution: You must unlock the scanner, or it won't work. 3 Store the Film Holder 1 Slide the document mat handle to the left and - Epson Stylus Photo RX600 | Start Here Card - Page 4
the RX600 into a grounded electrical outlet. Do not connect the USB cable yet. 2 Press and hold the On button until the Mode and Setup lights flash. 6 Install Ink Cartridges 1 Press the Color button on the front of the RX600. The print head moves into loading position. 2 Lift up the entire scanner - Epson Stylus Photo RX600 | Start Here Card - Page 5
easily, open it and make sure all the cartridges are firmly seated. 7 Lower the scanner unit. The RX600 begins charging the ink delivery system. Charging takes about 2 minutes. Initial charge appears on the RX600 screen. Caution: Don't turn the RX600 off while you see the Initial charge message or - Epson Stylus Photo RX600 | Start Here Card - Page 6
turned on and connected, you may see several New Hardware screens. Click Cancel on each of these screens and disconnect the RX600. You can't install your software that way. 2 Insert the Epson CD-ROM in your CD-ROM or DVD drive. Note: If you're using Windows XP and you see a message asking what to do - Epson Stylus Photo RX600 | Start Here Card - Page 7
is finished, click Print Test Page to make sure your software is installed correctly. 9 After the test page prints, click Exit. You see the product registration screen. 10 Register your RX600 with Epson as instructed. 11 At the restart screen, click OK. Then remove the CD-ROM and restart your - Epson Stylus Photo RX600 | Start Here Card - Page 8
LCD screen. They give you guidance for solving problems. If your problem is listed below, try the suggestions here. For more solutions, see your User's Guide. A New Hardware Wizard Click Cancel and follow the steps in section 8. screen appears on your Disconnect the RX600 cable before installing - Epson Stylus Photo RX600 | Start Here Card - Page 9
. Epson Stylus Photo RX600 User's Guide Comprehensive instructions for everything you can do with the RX600. On-screen Epson Stylus Photo RX600 Reference Guide Additional details about your RX600. Double-click the SPRX600 Reference Guide icon on your desktop. On-screen Help in your software programs
-
 1
1 -
 2
2 -
 3
3 -
 4
4 -
 5
5 -
 6
6 -
 7
7 -
8
-
9
 |
 |

Epson Stylus Photo RX600
CPD-17415
4048047-00
XXX
Epson Stylus
®
Photo RX600
Start
Here
Start
Here