Epson Stylus Pro 10600 Product Support Bulletin
Epson Stylus Pro 10600 Manual
 |
View all Epson Stylus Pro 10600 manuals
Add to My Manuals
Save this manual to your list of manuals |
Epson Stylus Pro 10600 manual content summary:
- Epson Stylus Pro 10600 | Product Support Bulletin - Page 1
Plug-in Up-Date v1.0cE for the Epson MAC OS-X Printer Driver This bulletin was created to inform you of a Epson Driver Plug-in up-date for the Stylus Pro 5500, 7600DYE, 7600UCM, 9600DYE, 9600UCM, 10000DYE, 10000CF, 10600UCM standard Mac OS X Epson printer drivers released prior to January 01, 2004 - Epson Stylus Pro 10600 | Product Support Bulletin - Page 2
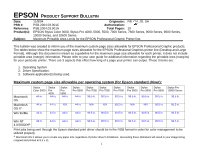
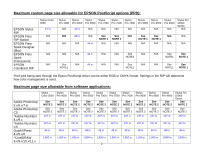
EPSON Stylus Color 3000, Stylus Pro 4000, 5000, 5500, 7000 Series, 7600 Series, 9000 Series, 9600 Series, 10000 Series, and 10600 Series Maximum Printable Area Limits for the EPSON Professional Graphic Printer Print jobs being sent through the Epson standard print driver should be in the RGB format - Epson Stylus Pro 10600 | Product Support Bulletin - Page 3
N/A See See NOTE1 NOTE 1 Print jobs being sent through the Epson PostScript driver can be either RGB or CMYK format. Settings in the RIP will determine CS QuarkXPress 4.x/5.x/6 *CorelDRAW 8.x/9.x/10.x/11.x Stylus Stylus Stylus Stylus Color 3000 Pro 4000 Pro 5000 Pro 5500 See NOTE 2 See - Epson Stylus Pro 10600 | Product Support Bulletin - Page 4
The Stylus Pro 5000/5500 however will give a slight page break at the 44 inch limit as these printers do not support banner mode. Also, printing any Epson large format printer using the standard Epson print driver would be 83.33 inches (30,000 pixels / 360dpi). As for the Epson desktop products - Epson Stylus Pro 10600 | Product Support Bulletin - Page 5
For Windows Users, if you encounter partial/incomeplete prints while having Finest Detail enabled, please disable this setting. It is recommended for low resolution text and line art to sharpen their edges. For photos, this may create a massive print file that is too large for the printer driver to - Epson Stylus Pro 10600 | Product Support Bulletin - Page 6
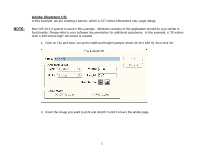
max. page setup). Mac O/S 10.3.3 system is used in this example. Windows versions of this application should be wide X 180 inches high" document is created. 1. Click on File and New, set up the width and height (sample shows 20 W x 180 H), then click OK. 2. Insert the image you want to print - Epson Stylus Pro 10600 | Product Support Bulletin - Page 7
the drop down arrow, select Tile Full 4. Pages and click the Printer button. 5. When the printer setup window comes up, select your printer name and set the Roll Paper Options to: Roll Paper Banner Roll Paper Banner - No Margin ( if printing no margins) 6. In the Copies and Pages section, click on - Epson Stylus Pro 10600 | Product Support Bulletin - Page 8
7. Then click on Print. This will bring you back to the Print window. 8. This time click on Page Setup, you see the following screen, just click on Continue (If you don't want to see the window again, place a check mark on Don't Show Again box). 7 - Epson Stylus Pro 10600 | Product Support Bulletin - Page 9
the banner size by a value that will make it less than the printer maximum custom page size (90.5 inches). In this example we take (180/2 = 90), therefore the custom page size created would be 20x90 (inches). 10. Click on New, name the custom size (i.e. 20 x 180 in this example), - Epson Stylus Pro 10600 | Product Support Bulletin - Page 10
11. Under Paper Size, click on the drop down arrow and select the custom paper size you created (i.e. 20 X 180) orientation is set to portrait mode. Then click OK. 12. In the Print windows the preview pane will show 2 grids or pages. This indicates that a full image is tiled. 9 - Epson Stylus Pro 10600 | Product Support Bulletin - Page 11
13. Click on General, then click the square on Reverse Order. 4. Click on Print. 10 - Epson Stylus Pro 10600 | Product Support Bulletin - Page 12
have to check the "Reverse Order". NOTE 2: Always select the custom page size last, if not, it will default to other paper sizes. NOTE 3: Before printing a large document, make sure you have enough ink to prevent getting an Ink Out message, causing the print job to stop and not completing the entire - Epson Stylus Pro 10600 | Product Support Bulletin - Page 13
setup). 1. Launch Illustrator and open or place your file in the page layout. 2. Click on File, then Document Setup. The following screen appears. 3. Uncheck Use Print Setup, enable Tile Full Pages and create the page size (in our example we used 44x227 inches). 4. Click - Epson Stylus Pro 10600 | Product Support Bulletin - Page 14
) and also enable Save Roll Paper. 7. When creating the custom page size, divide the banner size by a value that will make it less than the printer maximum custom page size. In this example we take (227/3 = 75.7), therefore the custom page size created would be 44x75.7 inches. The reason for this - Epson Stylus Pro 10600 | Product Support Bulletin - Page 15
8. After setting the custom page size and other driver settings (media type, resolution, etc.), click OK. This will bring you back to the document setup. Now double-click the "Page" tool. 9. The page should now show the following. 10. At this point you can and resize the image to fit within the - Epson Stylus Pro 10600 | Product Support Bulletin - Page 16
CorelDRAW: In this example, a banner is created at 227 inches. 1. Launch CorelDRAW and open or place an image in your page layout. 2. Adjust the page size and image for the document as shown in the following image. 3. Click on File and Print Setup. 15 - Epson Stylus Pro 10600 | Product Support Bulletin - Page 17
4. Click on the Paper Tab. The following appears. 5. Set the Paper Source to Roll Paper (Banner) and also enable Save Roll Paper. 16 - Epson Stylus Pro 10600 | Product Support Bulletin - Page 18
size, divide the banner size by a value that will make it less than the printer maximum custom page size. In this example we take (227/3 = 75.7), therefore setting the custom page size and other driver settings (media type, resolution, etc.), click OK. This will bring you back to the document. 17 - Epson Stylus Pro 10600 | Product Support Bulletin - Page 19
8. At this point, click File then Print. CorelDRAW will then run a pre-flight check and will show the following window. 18 - Epson Stylus Pro 10600 | Product Support Bulletin - Page 20
and set any additional parameters as you see fit. 10. At this point you could check other tab settings (if necessary) and click Print Preview (recommended) if you want to see how the file will be printed or Print to output the file to your printer. For all other applications, please refer to your - Epson Stylus Pro 10600 | Product Support Bulletin - Page 21
Plug-in Update v1.0bE for the Epson MAC OS X Printer Driver A connectivity plug-in update is available for the standard Epson MAC OS X printer drivers released prior to January 1, 2004. This update applies to these printers: Stylus Pro 5500, 7600DYE, 7600UCM, 9600DYE, 9600UCM, 10000DYE, 10000CF - Epson Stylus Pro 10600 | Product Support Bulletin - Page 22
performing the driver installation, this insures a complete driver installation. NOTE: Although this document references the Epson Stylus Pro 7600/9600 ALL Epson Stylus Pro series Macintosh OS X printer driver Installation and Removal steps follow the same instructions. EPSON Professional Graphics - Epson Stylus Pro 10600 | Product Support Bulletin - Page 23
driver. 2. Click on the file with the .DMG file extension (example: SP7600_1.6bE.dmg) to create the printer driver installation package. 3. The printer driver SPro7600_16b.pkg) double click on the file to start the printer driver installation. TIP Prior to starting the installation it is recommended - Epson Stylus Pro 10600 | Product Support Bulletin - Page 24
CONTINUE. 6. Read the License Agreement and click CONTINUE. You are asked to Agree or Disagree to the License Agreement click AGREE to continue the installation. EPSON Professional Graphics Group Page 3. - Epson Stylus Pro 10600 | Product Support Bulletin - Page 25
during the installation. 9. The Printer Driver will now be installed, a progress window is displayed during the installation. 10. When the Printer Driver installation has completed the following window is displayed, click RESTART to Finish the installation. EPSON Professional Graphics Group Page - Epson Stylus Pro 10600 | Product Support Bulletin - Page 26
Print Center to the Short Cut Task Bar for ease of access. 3. You have Two ways to Add a printer. You can use the Add button or you can select Add Printer from the Printers drop down menu, click Add. 4. On the Add printer window you first need to select the Epson Interface Connection the printer - Epson Stylus Pro 10600 | Product Support Bulletin - Page 27
The choices you make are print queues for the specific job types and will be listed in the Print Center. 5.3 When you have completed making your Paper Setup choices click Add. 1 2 3 6. The printer and queues will be added to the Print Center Printer List: EPSON Professional Graphics Group Page - Epson Stylus Pro 10600 | Product Support Bulletin - Page 28
information you would like to display: 8. To make the printer the Default printer highlight the printer then go to the Printers Menu and select Make Default or click the Make Default button. 9. The Default printer will be highlighted in the Printer List: EPSON Professional Graphics Group Page 7. - Epson Stylus Pro 10600 | Product Support Bulletin - Page 29
10. To view the Job Status of a printer double click on it in the Printer List to display its information and status: EPSON Professional Graphics Group Page 8. - Epson Stylus Pro 10600 | Product Support Bulletin - Page 30
from the new Printer List window select your printer and click OK. 2 1 3 4 1.4 From the Epson Printer Utility you can Check the Status of Ink-Paper-and the printer itself, perform print head Nozzle Checks, Clean the print head, or perform Print Head Alignments. EPSON Professional Graphics Group - Epson Stylus Pro 10600 | Product Support Bulletin - Page 31
you must first properly remove the existing Driver and all of its components. 1. Open the Epson Driver from any application and select print. Remove all user created "Presets" that were created for the printer you are removing. From the Presets drop down menu select the Preset (example: MYPRESET - Epson Stylus Pro 10600 | Product Support Bulletin - Page 32
used to install OS X and/or the Printer Driver, in addition a password may be required if assigned for the user. (Example Only) 4. You have TWO choices for removing files from the Epson Folder. The two choices are outlined below: 4.1 Removing ONLY the Stylus Pro 7600 or 9600 Plug-in and Preference - Epson Stylus Pro 10600 | Product Support Bulletin - Page 33
to the TRASH. NOTE: If you only removed the Stylus Pro 7600/9600/ 10000/10600 files from the Epson folder, then ONLY remove the Stylus Pro 7600/9600/10000/ 10600.pkg file. If the entire Epson folder was deleted then remove ALL the Epson Printer.pkg files. EPSON Professional Graphics Group Page 12. - Epson Stylus Pro 10600 | Product Support Bulletin - Page 34
, 10000, 10600, 5000, 5500 and Stylus Color 3000 Printers PostScript Printing Support for Mac OS X Native Mode This bulletin provides instructions for installing and configuring a Mac OS X Client with your existing EPSON hardware or software RIP. If your EPSON Professional Wide Format printer was - Epson Stylus Pro 10600 | Product Support Bulletin - Page 35
Then select AppleTalk from the top sub-menu and your AppleTalk zone if applicable. 3. The Print Center should scan the network and find all your devices. Select your printer from the list and click on the Printer Model sub-menu. Select Other to continue. 4. Navigate to the location of your PPD file - Epson Stylus Pro 10600 | Product Support Bulletin - Page 36
, which can be found on your HDD under Applications - Utilities 2. Click on the Add button and select IP Printing from the sub-menu. 3. Enter the IP Address of the Postscript Server under Printer's Address. Uncheck the Use default queue on server and type in the queue you wish to add. Click on - Epson Stylus Pro 10600 | Product Support Bulletin - Page 37
4. Navigate to the location of your PPD file. After selecting the PPD file it should reflect the name of the printer under the Printer Model section. Click on the Add button. 5. The Print Center should now show the Queue that you typed along with the IP address. 6. Repeat the process to add your - Epson Stylus Pro 10600 | Product Support Bulletin - Page 38
EPSON PRODUCT SUPPORT BULLETIN Date: 10/22/2003 Bulletin #: PSB.2002.09.002A Reference: NA Product: EPSON Stylus Pro 10600 UC (UltraChrome Only) Subject: Printer Control Panel Paper Configuration Originator:RS Authorization: Total Pages: 7 This bulletin was created to inform you of the use and - Epson Stylus Pro 10600 | Product Support Bulletin - Page 39
possible image quality and results. The EPSON Stylus Pro 10600 UC Printer control panel Paper Configuration menu contains the following features and functions: 1. Paper Configuration Number - *Standard with Custom Paper Configuration 1 - 10. 2. Paper Thickness - *AUTO with Custom Configuration - Epson Stylus Pro 10600 | Product Support Bulletin - Page 40
Stylus Pro 10600 UC PSB.2002.09.002A 10/22/03 Stylus Pro 10600 UC Paper Configuration Control Panel Navigation Map Power On Normaly START Press SelcType PRINTER SETTING MENU C A U T IO N Press SelcType TEST PRINT MENU Press SelcType 1. Check Nozzle Test Pattern. 2. Select a Paper Number 1st. - Epson Stylus Pro 10600 | Product Support Bulletin - Page 41
Stylus Pro 10600 UC PSB.2002.09.002A PAPER CIONFIGURATION DESCRIPTION 10/22/03 This section describes each of the Custom Paper Configuration choices and how they can be used. In most cases when the Epson driver value dynamically by printing a test Printer Control Panel Paper Configuration Page 4. - Epson Stylus Pro 10600 | Product Support Bulletin - Page 42
Stylus Pro 10600 UC PSB.2002.09.002A 10/22/03 3. Cut Pressure: The default is *100%. The Cut Pressure configuration setting is useful to insure good cuts with supported by using the built in Auto Cutter to cut these medias. Epson has a manual cutter option that can cut these medias. 4. Cut Method: - Epson Stylus Pro 10600 | Product Support Bulletin - Page 43
Stylus Pro 10600 UC PSB.2002.09.002A 10/22/03 6. Drying Time: The default is *0.0 Sec. Setting a Dry Time is useful if the printer pauses during a print waiting for more data to print from the computer. Ideally the print head of the printer should continue moving consistently from start to finish - Epson Stylus Pro 10600 | Product Support Bulletin - Page 44
Stylus Pro 10600 UC PSB.2002.09.002A 10/22/03 ISSUES AND SOLUTIONS Below are some common issues you could experience and suggestions on how they may be corrected: • General Print Quality: Head Cleaning, Paper Thickness Adj., Print Adj. • Paper Cutting: Cut Pressure Adj., Cut Method Adj., Suction
-
 1
1 -
 2
2 -
 3
3 -
 4
4 -
 5
5 -
 6
6 -
 7
7 -
8
-
9
-
10
-
11
-
12
-
13
-
14
-
15
-
16
-
17
-
18
-
19
-
20
-
21
-
22
-
23
-
24
-
25
-
26
-
27
-
28
-
29
-
30
-
31
-
32
-
33
-
34
-
35
-
36
-
37
-
38
-
39
-
40
-
41
-
42
-
43
-
44
 |
 |
EPSON Professional Graphics Group
Page 1
.
EPSON
PRODUCT SUPPORT BULLETIN
Date: 3/25/04
Originator: rws
Bulletin #: PSB.2004.03.006
Authorization:
Reference: TE03-461 Rev.A, epson10997, TE03-620Rev.A, TE03-620 Rev.B
Total Pages: 1
Product: Stylus Pro 5500, 7600DYE, 7600UCM, 9600DYE, 9600UCM, 10000DYE, 10000CF, 10600UCM
Subject: Driver Plug-in Up-Date v1.0cE for the Epson MAC OS-X Printer Driver
This bulletin was created to inform you of a Epson Driver Plug-in up-date for the
Stylus Pro 5500, 7600DYE, 7600UCM, 9600DYE,
9600UCM, 10000DYE, 10000CF, 10600UCM
standard Mac OS X Epson printer drivers released prior to January 01, 2004.
Description of Change
:
This change updates the standard
Epson driver interface plug-ins
ONLY
that were included as part of the Epson MAC OS X driver
released prior to January 01, 2004, and supersedes the epson10997 connectivity Plug-in up-date previously posted.
NOTE:
Should you need to reinstall the Epson Printer Driver after this up-date, you will need to re-apply the update again
afterward to update the drivers standard plug-ins.
Reason
:
This Update stabilizes Epson driver Interface communications during printing and corrects Epson Status Monitor functions for the
following Professional Graphics printer driver plug-ins and upgrades their versions to: FireWire v1.81, USB v1.81, TCPIP v1.81.
NOTE:
In addition we recommend you upgrade your MAC OS-X operating system to the most current version.
How Do I Get The Up-Date?
The up-date is available for download on our WEB SIte:
www.epson.com
from the MAC
Drivers & Downloads
section for each of the
printers listed. The file name is
epson11054
.