Epson Stylus Pro 5000 Product Support Bulletin(s)
Epson Stylus Pro 5000 - Print Engine Manual
 |
View all Epson Stylus Pro 5000 manuals
Add to My Manuals
Save this manual to your list of manuals |
Epson Stylus Pro 5000 manual content summary:
- Epson Stylus Pro 5000 | Product Support Bulletin(s) - Page 1
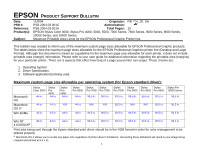
Software application(s) being used. Maximum custom page size allowable per operating system (for Epson standard driver): Macintosh OS Macintosh OS X* Win 9x/Me Stylus Color 3000 44 in. Stylus Pro 4000 44 in. Stylus Pro 5000 44 in. Stylus Stylus Stylus Stylus Stylus Stylus Stylus Stylus - Epson Stylus Pro 5000 | Product Support Bulletin(s) - Page 2
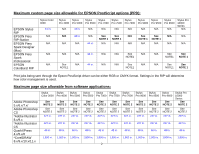
(Mac) EPSON Fiery Spark Professional EPSON ColorBurst RIP Stylus Color 3000 44 in. N/A N/A N/A N/A Stylus Pro 4000 N/A Stylus Pro 5000 44 in. Stylus Pro 5500 N/A Stylus Pro 7000 N/A Stylus Pro 7500 N/A Stylus Pro 7600 N/A Stylus Pro 9000 N/A Stylus Pro 9500 N/A Stylus Pro 9600 N/A Stylus - Epson Stylus Pro 5000 | Product Support Bulletin(s) - Page 3
The Stylus Pro 5000/5500 however will give a slight page break at the 44 inch limit as these printers do not support banner mode. Also, printing certain any Epson large format printer using the standard Epson print driver would be 83.33 inches (30,000 pixels / 360dpi). As for the Epson desktop - Epson Stylus Pro 5000 | Product Support Bulletin(s) - Page 4
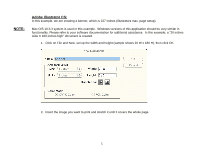
for the printer driver to process correctly. The following examples show how to setup banner printing from Adobe Illustrator 8.x/9.x and CorelDRAW 9 from the PC platform. The Macintosh versions of these applications should be very similar in function. Please refer to your software documentation for - Epson Stylus Pro 5000 | Product Support Bulletin(s) - Page 5
a banner, which is 227 inches (Illustrators max. page setup). Mac O/S 10.3.3 system is used in this example. Windows versions of this application should be very similar in functionality. Please refer to your software documentation for additional assistance. In this example, a "20 inches wide - Epson Stylus Pro 5000 | Product Support Bulletin(s) - Page 6
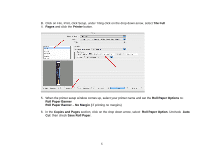
the drop down arrow, select Tile Full 4. Pages and click the Printer button. 5. When the printer setup window comes up, select your printer name and set the Roll Paper Options to: Roll Paper Banner Roll Paper Banner - No Margin ( if printing no margins) 6. In the Copies and Pages section, click on - Epson Stylus Pro 5000 | Product Support Bulletin(s) - Page 7
7. Then click on Print. This will bring you back to the Print window. 8. This time click on Page Setup, you see the following screen, just click on Continue (If you don't want to see the window again, place a check mark on Don't Show Again box). 7 - Epson Stylus Pro 5000 | Product Support Bulletin(s) - Page 8
NOTE: 9. When Page Setup is open, click on the down arrow for Custom Paper Size. When creating the custom page size, divide the banner size by a value that will make it less than the printer maximum custom page size (90.5 inches). In this example we take (180/2 = 90), therefore the custom page size - Epson Stylus Pro 5000 | Product Support Bulletin(s) - Page 9
11. Under Paper Size, click on the drop down arrow and select the custom paper size you created (i.e. 20 X 180) orientation is set to portrait mode. Then click OK. 12. In the Print windows the preview pane will show 2 grids or pages. This indicates that a full image is tiled. 9 - Epson Stylus Pro 5000 | Product Support Bulletin(s) - Page 10
13. Click on General, then click the square on Reverse Order. 4. Click on Print. 10 - Epson Stylus Pro 5000 | Product Support Bulletin(s) - Page 11
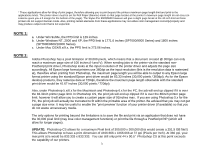
have to check the "Reverse Order". NOTE 2: Always select the custom page size last, if not, it will default to other paper sizes. NOTE 3: Before printing a large document, make sure you have enough ink to prevent getting an Ink Out message, causing the print job to stop and not completing the entire - Epson Stylus Pro 5000 | Product Support Bulletin(s) - Page 12
and open or place your file in the page layout. 2. Click on File, then Document Setup. The following screen appears. 3. Uncheck Use Print Setup, enable Tile Full Pages and create the page size (in our example we used 44x227 inches). 4. Click, Print Setup. This will bring up the print driver. 12 - Epson Stylus Pro 5000 | Product Support Bulletin(s) - Page 13
Tab. The following appears. 6. Set the Paper Source to Roll Paper (Banner) and also enable Save Roll Paper. 7. When creating the custom page size, divide the banner size by a value that will make it less than the printer maximum custom page size. In this example we take (227/3 = 75.7), therefore - Epson Stylus Pro 5000 | Product Support Bulletin(s) - Page 14
size and other driver settings (media type, resolution, etc.), click OK. This will bring you back to the document setup. Now double-click the "Page" tool. 9. The page should now show the following. 10. At this point you can and resize the image to fit within the printable area and print. 14 - Epson Stylus Pro 5000 | Product Support Bulletin(s) - Page 15
CorelDRAW: In this example, a banner is created at 227 inches. 1. Launch CorelDRAW and open or place an image in your page layout. 2. Adjust the page size and image for the document as shown in the following image. 3. Click on File and Print Setup. 15 - Epson Stylus Pro 5000 | Product Support Bulletin(s) - Page 16
4. Click on the Paper Tab. The following appears. 5. Set the Paper Source to Roll Paper (Banner) and also enable Save Roll Paper. 16 - Epson Stylus Pro 5000 | Product Support Bulletin(s) - Page 17
size, divide the banner size by a value that will make it less than the printer maximum custom page size. In this example we take (227/3 = 75.7), therefore setting the custom page size and other driver settings (media type, resolution, etc.), click OK. This will bring you back to the document. 17 - Epson Stylus Pro 5000 | Product Support Bulletin(s) - Page 18
8. At this point, click File then Print. CorelDRAW will then run a pre-flight check and will show the following window. 18 - Epson Stylus Pro 5000 | Product Support Bulletin(s) - Page 19
could check other tab settings (if necessary) and click Print Preview (recommended) if you want to see how the file will be printed or Print to output the file to your printer. For all other applications, please refer to your software documentation for information on maximum custom page sizes for - Epson Stylus Pro 5000 | Product Support Bulletin(s) - Page 20
EPSON Stylus Pro 9000, 9500, 9600, 7000, 7500, 7600, 10000, 10600, 5000, 5500 and Stylus Color 3000 Printers PostScript Printing Support for Mac OS X Native Mode This bulletin provides instructions for installing and configuring a Mac OS X Client with your existing EPSON hardware or software RIP - Epson Stylus Pro 5000 | Product Support Bulletin(s) - Page 21
Other to continue. 4. Navigate to the location of your PPD file. After selecting the PPD file it should reflect the name of the printer under the Printer Model section. Click on the Add button. 5. Repeat the process to add your additional queues. Your Mac OS X Client should now be ready to print. 2 - Epson Stylus Pro 5000 | Product Support Bulletin(s) - Page 22
, which can be found on your HDD under Applications - Utilities 2. Click on the Add button and select IP Printing from the sub-menu. 3. Enter the IP Address of the Postscript Server under Printer's Address. Uncheck the Use default queue on server and type in the queue you wish to add. Click on the - Epson Stylus Pro 5000 | Product Support Bulletin(s) - Page 23
you typed along with the IP address. 6. Repeat the process to add your additional queues. Your Mac OS X Client should now be ready to print. Note: The StylusRIP does not have a separate folder on the CD to select the printer's PPD. In order to select the PPD it must be copied from another client - Epson Stylus Pro 5000 | Product Support Bulletin(s) - Page 24
2. Driver Specification. 3. Software application(s) being used. Maximum custom page size allowable per operating system (for Epson standard driver): Stylus Stylus Stylus Stylus Stylus Stylus Stylus Stylus Stylus Stylus Pro Color 3000 Pro 5000 Pro 5500 Pro 7000 Pro 7500 Pro 7600 Pro 9000 Pro - Epson Stylus Pro 5000 | Product Support Bulletin(s) - Page 25
1 N/A Stylus Pro 9600 N/A N/A N/A N/A See NOTE1 Stylus Pro 10000 Series N/A N/A N/A See NOTE 1 Print jobs being sent through the Epson PostScript driver can be either RGB or CMYK format. Settings in the RIP will determine how color management is used. Maximum page size allowable from software - Epson Stylus Pro 5000 | Product Support Bulletin(s) - Page 26
inches. b. Under Windows NT, 2000 and XP, the PPD limit is 1771.6 inches (SP7000/9000 Series) and 1800 inches (SP7600/9600/10000 Series). c. Under Mac OS 8.x/9.x, the PPD Epson large format printer using the standard Epson print driver would be 83.33 inches (30,000 pixels / 360dpi). As for the Epson - Epson Stylus Pro 5000 | Product Support Bulletin(s) - Page 27
. page setup). 1. Launch Illustrator and open or place your file in the page layout. 2. Click on File, then Document Setup. The following screen appears. 3. Uncheck Use Print Setup, enable Tile Full Pages and create the page size (in our example we - Epson Stylus Pro 5000 | Product Support Bulletin(s) - Page 28
5. Click on the Paper Tab. The following appears. 6. Set the Paper Source to Roll Paper (Banner) and also enable Save Roll Paper. 5 - Epson Stylus Pro 5000 | Product Support Bulletin(s) - Page 29
7. When creating the custom page size, divide the banner size by a value that will make it less than the printer maximum custom page size (not necessary for OS/Drivers that support 590.5 inches). In this example we take (227/3 = 75.7), therefore the custom page size created would be 44x75.7 inches. - Epson Stylus Pro 5000 | Product Support Bulletin(s) - Page 30
8. After setting the custom page size and other driver settings (media type, resolution, etc.), click OK. This will bring you back to the document setup. The page should now show the following. 9. At this point you can and resize the image to fit within the printable area and print. 7 - Epson Stylus Pro 5000 | Product Support Bulletin(s) - Page 31
CorelDRAW 9: In this example, a banner is created at 227 inches. 1. Launch CorelDRAW and open or place an image in your page layout. 2. Adjust the page size and image for the document as shown in the following image. 3. Click on File and Print Setup. 8 - Epson Stylus Pro 5000 | Product Support Bulletin(s) - Page 32
4. Click on the Paper Tab. The following appears. 5. Set the Paper Source to Roll Paper (Banner) and also enable Save Roll Paper. 9 - Epson Stylus Pro 5000 | Product Support Bulletin(s) - Page 33
6. When creating the custom page size, divide the banner size by a value that will make it less than the printer maximum custom page size (not necessary for OS/Drivers that support 590.5 inches, unless the document is beyond that size). In this example we take (227/3 = 75.7), therefore the custom - Epson Stylus Pro 5000 | Product Support Bulletin(s) - Page 34
8. At this point, click File then Print. CorelDRAW will then run a pre-flight check and will show the following window. 11 - Epson Stylus Pro 5000 | Product Support Bulletin(s) - Page 35
could check other tab settings (if necessary) and click Print Preview (recommended) if you want to see how the file will be printed or Print to output the file to your printer. For all other applications, please refer to your software documentation for information on maximum custom page sizes for - Epson Stylus Pro 5000 | Product Support Bulletin(s) - Page 36
SUPPORT BULLETIN Date: 11/21/2001 PSB No.: PSB.2001.11.002 Reference: N/A Originator: RD/RR Authorization: Affected Product(s): Epson Stylus Pro 5000/5500/7000/7500/9000/9500/10000/10000CF Subject: Windows XP Driver & Status Monitor 3 Installation Procedure This bulletin describes Windows XP printer - Epson Stylus Pro 5000 | Product Support Bulletin(s) - Page 37
As instructed at following EPSON Printer Utility Setup screen Power ON your printer. Your printer will be detected automatically. Select Install the software automatically (Recommended) option then click NEXT to continue at the Found New Hardware Wizard screen. 3. Your will be prompted with Windows - Epson Stylus Pro 5000 | Product Support Bulletin(s) - Page 38
click OK. Next, you will see the progress bar followed by the Windows Logo verification screen. Click on Continue Anyway option to continue. 2. As instructed at the following EPSON Printer Utility Setup screen Power ON your printer. The IEEE 1394 card will be detected automatically. At the Found New - Epson Stylus Pro 5000 | Product Support Bulletin(s) - Page 39
Windows Logo verification screen. Click on Continue Anyway option to continue. 7. After the driver files have been copied to you local hard disk drive, click on Finish to compete the driver installation. 8. To install Epson Status Monitor 3 follow the instructions under section heading Installation - Epson Stylus Pro 5000 | Product Support Bulletin(s) - Page 40
Instructions for Ethernet Connection 1. At the EPSON Printer Utility Setup screen highlight your printer then click OK. Next, you will see the progress bar followed by the Windows Logo verification screen. Click on Continue Anyway option to continue. 2. At this point DO NOT POWER On your printer and - Epson Stylus Pro 5000 | Product Support Bulletin(s) - Page 41
's IP address. Click on the Start button, then Control Panel followed by Printers and Other Hardware then go to Printers and Faxes. Right click on the printer icon and choose Properties from the pop-up menu. 5. At the printer properties screen, click on Ports and then on the Add Port... button. On - Epson Stylus Pro 5000 | Product Support Bulletin(s) - Page 42
address. Check with your System Administrator for the correct IP address assigned to the Epson Type B Ethernet card on your network. 7. If Windows identifies the Epson card automatically, click Finish at the Completing the Add Standard TCP/IP Printer Port Wizard. If your card is not identifies as an - Epson Stylus Pro 5000 | Product Support Bulletin(s) - Page 43
the next screen click on Apply and then on Close to finish the installation. Your printer driver installation has been completed and the printer is ready to print. 9. To install Epson Status Monitor 3 follow the instructions under section heading Installation Procedure for Epson Status Monitor 3. 8 - Epson Stylus Pro 5000 | Product Support Bulletin(s) - Page 44
Installation procedure for Epson Status Monitor 3 1. At the EPSON Status Monitor 3 setup screen highlight your printer then click OK. Next, you will see the progress bar followed by a window indicating that EPSON Status Monitor 3 is complete. 9 - Epson Stylus Pro 5000 | Product Support Bulletin(s) - Page 45
the EPSON Stylus COLOR 3000 and Stylus Pro 5000 printers. Windows Me: Follow the installation instructions for Windows 95/98 that came with your EPSON Stylus RIP package. Windows 2000: 1. Download the Adobe Universal PS Installer v1.04 from Adobe's Web Site (http://www.adobe.com/support/downloads - Epson Stylus Pro 5000 | Product Support Bulletin(s) - Page 46
and Restart. 6. Once back at the Windows Desktop, double-click the Adobe PS Installer that was downloaded and follow the screen prompts. 7. Once at the "Local Port Selection" screen, select Stylus RIP for the port and click next. 8. At the "Select Printer Model" screen, click Browse and navigate to - Epson Stylus Pro 5000 | Product Support Bulletin(s) - Page 47
Names) and click OK to continue with the driver installation. 10. (Stylus Pro 5000 only): If you have the optional Lower Paper Cassette and you get to the screen for configuring options, select yes for configuring options and click next to bring up the printer properties. 11. Set the Lower Tray to - Epson Stylus Pro 5000 | Product Support Bulletin(s) - Page 48
of Stylus RIP the Stylus RIP Server should open to an Idle State. If the printer does not have a license, you will be prompted to input the software license key. The license key is located: a. Stylus Color 3000 - Located on CD Jewel Case (if After Service Part 3002911) b. Stylus Pro 5000 - Located - Epson Stylus Pro 5000 | Product Support Bulletin(s) - Page 49
printing are not yet supported at this time. Printers using Stylus Rip with Adobe PostScript drivers are not yet supported at this time. B) The following models are not supported in OS X Classic when using the connector type(s) described in the chart below. Model Stylus Color 3000 Stylus Pro 5000 - Epson Stylus Pro 5000 | Product Support Bulletin(s) - Page 50
Web" the most current driver can be found on the EPSON Internet Support Web Site at: http://support.epson.com/filelibrary.html IEEE 1394 Reference Table: Printer Models: EPSON Stylus COLOR 3000 Windows 2000 Update on the Web Windows Me Update on the Web EPSON Stylus PRO 5000 Update on the Web
-
 1
1 -
 2
2 -
 3
3 -
 4
4 -
 5
5 -
 6
6 -
 7
7 -
8
-
9
-
10
-
11
-
12
-
13
-
14
-
15
-
16
-
17
-
18
-
19
-
20
-
21
-
22
-
23
-
24
-
25
-
26
-
27
-
28
-
29
-
30
-
31
-
32
-
33
-
34
-
35
-
36
-
37
-
38
-
39
-
40
-
41
-
42
-
43
-
44
-
45
-
46
-
47
-
48
-
49
-
50
 |
 |

EPSON
P
RODUCT
S
UPPORT
B
ULLETIN
Date:
11/8/04
Originator:
RB, CH, JD, SA
PSB #:
PSB.2004.03.001C
Authorization:
Reference:
PSB.2004.03.001A
Total Pages:
19
Product(s):
EPSON Stylus Color 3000, Stylus Pro 4000, 5000, 5500, 7000 Series, 7600 Series, 9000 Series, 9600 Series,
10000 Series, and 10600 Series
Subject:
Maximum Printable Area Limits for the EPSON Professional Graphic Printer line.
This bulletin was created to inform you of the maximum custom page sizes allowable for EPSON Professional Graphic products.
The tables below show the maximum page sizes allowable for the EPSON Professional Graphics printer line (Desktop and Large
Format). Although this document is meant as a guideline for the maximum page size allowable for each printer, it does not include
printable area (margin) information. Please refer to your user guide for additional information regarding the printable area (margins)
for your particular printer. There are 3 aspects that effect how long of a page your printer can output. Those 3 items are:
1. Operating System.
2. Driver Specification.
3. Software application(s) being used.
Maximum custom page size allowable per operating system (for Epson standard driver):
Print jobs being sent through the Epson standard print driver should be in the RGB format in order for color management to be
utilized properly.
Stylus
Color 3000
Stylus
Pro
4000
Stylus
Pro
5000
Stylus
Pro 5500
Stylus
Pro 7000
Stylus
Pro 7500
Stylus
Pro 7600
Stylus
Pro 9000
Stylus
Pro 9500
Stylus
Pro 9600
Stylus Pro
10000 Series
Macintosh
OS
44 in.
44 in.
44 in.
44 in.
90.5 in.
90.5 in.
90.5 in.
90.5 in.
90.5 in.
90.5 in.
90.5 in.
Macintosh
OS X
*
44 in.
44 in.
N/A
44 in.
N/A
N/A
90.5 in.
N/A
N/A
90.5 in.
90.5 in.
Win 9x/Me
44 in.
44 in.
44 in.
44 in.
90.5 in.
90.5 in.
90.5 in.
90.5 in.
90.5 in.
90.5 in.
90.5 in.
Win NT
4.0/2000/XP
44 in.
44 in.
44 in.
44 in.
90.5 in.
90.5 in.
90.5 in.
90.5 in.
90.5 in.
90.5 in.
90.5 in.
1
*
Macintosh OS X allows you to create any paper size regardless of printer driver’s limitations.
Exceeding these limitations will result in your image being
cropped and printed at 8.5 x 11.