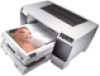
Epson Stylus Pro 5500 User Manual
Epson Stylus Pro 5500 - Print Engine Manual
 |
View all Epson Stylus Pro 5500 manuals
Add to My Manuals
Save this manual to your list of manuals |
Epson Stylus Pro 5500 manual content summary:
- Epson Stylus Pro 5500 | User Manual - Page 1
EPSON Stylus® Pro 5500 PRINTER GUIDE - Epson Stylus Pro 5500 | User Manual - Page 2
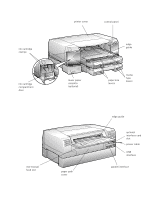
ink cartridge clamps ink cartridge compartment door printer cover control panel edge guide lower paper cassette (optional) paper size levers media type levers rear manual feed slot paper path cover 1 edge guide optional interface card slot power cable USB interface parallel interface - Epson Stylus Pro 5500 | User Manual - Page 3
EPSON Stylus® Pro 5500 PRINTER GUIDE - Epson Stylus Pro 5500 | User Manual - Page 4
any use of this information as applied to other printers. Trademarks EPSON, EPSON Stylus, ESC/P, and Micro Piezo are registered trademarks of SEIKO EPSON CORPORATION. DX3, PhotoEnhance, and EPSON Archival are trademarks and EPSON Preferred is a service mark of Epson America, Inc. EFI and Fiery are - Epson Stylus Pro 5500 | User Manual - Page 5
Computers and Peripherals; and/or CPU Boards and Power Supplies used with Class B Personal Computers: We: EPSON AMERICA, INC. Located at: MS: 6-43 3840 Kilroy Airport Way Long Beach, CA 90806-2469 cause undesired operation. Trade Name: Type of Product: Model: EPSON Ink Jet Printer P991A iii - Epson Stylus Pro 5500 | User Manual - Page 6
radio frequency energy and, if not installed and used in accordance with the instructions, may cause harmful interference to radio or television reception. However, there is no apparatus complies with ICES-003. Cet appareil numérique de la classe B est conforme à la norme NMB-003 du Canada. iv - Epson Stylus Pro 5500 | User Manual - Page 7
Optional Equipment and Software 2 Using This Printer Guide 2 Warnings and Cautions 3 Macintosh System Requirements 3 Windows System Requirements 4 Where To Get Help 5 ENERGY STAR Compliance 5 Important Safety Instructions 6 1 Setting Up the Printer Unpacking the Printer 1-1 Installing the - Epson Stylus Pro 5500 | User Manual - Page 8
Media Type 3-4 Choosing Advanced Print Options 3-5 Color Management Settings 3-7 Managing Print Jobs 3-8 Setting Up Background Printing 3-8 Using Monitor3 3-9 Cancelling Printing 3-10 4 Printing with EPSON Drivers for Windows Choosing Basic Print Options 4-1 Selecting the Correct Media - Epson Stylus Pro 5500 | User Manual - Page 9
the Printer 6-13 7 Troubleshooting Diagnosing Problems 7-1 Improving Print Quality 7-1 Solving General Printing Problems 7-3 Solving Paper Problems 7-6 Uninstalling and Reinstalling the Printer Software 7-7 A Specifications Printing A-1 Paper A-1 Printable Areas A-2 Ink Cartridges - Epson Stylus Pro 5500 | User Manual - Page 10
job. Six-color EPSON Archival™ Ink technology gives you photographic images that will last up to 200 years.* Individual, high-capacity ink cartridges with auto ink-level detection provide increased productivity, ease of use, and low per-copy printing costs. The EPSON Stylus Pro 5500's media handling - Epson Stylus Pro 5500 | User Manual - Page 11
how to use EPSON printer driver for Windows. Chapter 5 explains what to do when the printer's control panel lights indicate a paper jam or other problem, and how to use the printer's monitoring utilities. Chapter 6 gives instructions for replacing ink cartridges, running print head cleaning cycles - Epson Stylus Pro 5500 | User Manual - Page 12
troubleshooting tips and solutions for any printing problems you may have. Appendix A provides the technical details on your printer, ink cartridges, and EPSON media. An Index is included at the end of the book. Warning Warnings and Cautions You'll find this information throughout this guide - Epson Stylus Pro 5500 | User Manual - Page 13
software • For parallel connection: a high-speed, bidirectional, IEEE-1284 compliant parallel cable, 6 to 10 ft. (1.8 to 3 m) long, with a D-SUB, 25-pin, male connector for your computer and a 36-pin, Centronics® compatible connector for the printer For USB connection: a computer running Windows - Epson Stylus Pro 5500 | User Manual - Page 14
that came with your printer. You'll also need your printer serial number and proof of purchase. EPSON also provides technical assistance 24 hours a day through the electronic support services listed in the following table: Service World Wide Web Automated Telephone Services Access From the - Epson Stylus Pro 5500 | User Manual - Page 15
off. • Place the printer near a wall outlet where the plug can be easily unplugged. Placez l'imprimante près d'une prise de contacte où la fiche , do not attempt to service the printer yourself. • Unplug the printer and refer servicing to qualified service personnel under the following conditions - Epson Stylus Pro 5500 | User Manual - Page 16
the following list of precautions before operating your ink jet printer: • Do not put your hand inside the printer or touch the print head during printing. Do not move the print head by hand. • Under normal circumstances, ink will not leak out of the cartridges. If it does get on your skin, wash - Epson Stylus Pro 5500 | User Manual - Page 17
8 | Introduction 8 - Epson Stylus Pro 5500 | User Manual - Page 18
set up your EPSON Stylus Pro 5500, you need to unpack it , install the paper tray(s) and ink cartridges, load paper, and run a printer check. Once the printer is set up, you need to install the printer driver and utilities from the printer software CD-ROM and then align the print head. This chapter - Epson Stylus Pro 5500 | User Manual - Page 19
the power, which can erase the printer's memory and damage the power supply. 3. Leave plenty of room in back to access the manual feed slot and enough room in front lower paper cassette, you need to place the printer on top of it. Follow the instructions in the next section. Installing the Optional - Epson Stylus Pro 5500 | User Manual - Page 20
and the cassette. Warning Do not try to move the paper cassette or printer without securing the screws; otherwise the cassette and printer may come apart and cause injury. 4. Attach the printer and cassette using the two screws that come with the cassette. Use the hexagonal wrench that comes - Epson Stylus Pro 5500 | User Manual - Page 21
Installing the Paper Tray Insert the paper tray into the slots at the front of the printer as shown below: don't touch the black pad Be careful not to touch the and dirt on the pad may cause a paper feeding problem. If you installed the lower paper cassette, insert the paper tray that came with it in - Epson Stylus Pro 5500 | User Manual - Page 22
then turn off. This is normal operation. Installing the Ink Cartridges Always use new ink cartridges. Reinstalling partially empty ink cartridges prevents the ink counter from accurately indicating the amount of ink remaining. 1. Plug in the printer and turn it on by pressing the P Operate button - Epson Stylus Pro 5500 | User Manual - Page 23
in any order; however, each slot can only hold the specified ink color. Warning 5. Hold the ink cartridge with the arrow mark face-up and pointing to the rear of the printer, and fully insert the cartridge into the slot. If ink gets on your hands, wash them thoroughly with soap and water - Epson Stylus Pro 5500 | User Manual - Page 24
. The P Operate light stops flashing when the ink charging process is finished. Loading Paper Your EPSON Stylus Pro 5500 printer has four paper paths: one for the standard paper tray, one for the optional lower paper cassette, and two for the manual feed slots. Follow these steps to load paper - Epson Stylus Pro 5500 | User Manual - Page 25
1-8 | Setting Up the Printer 2. Lift off the paper tray cover and raise the paper guide roller. 3. Slide the switch to the roller position that matches the paper size you're loading. roller switch 4. If you're using legal-size or - Epson Stylus Pro 5500 | User Manual - Page 26
Setting Up the Printer | 1-9 5. Slide both edge guides out as far as they will go. Note Make sure the paper is loaded printable side down and the stack lies flat on of the paper resting against the right side of the paper tray. Don't load paper above the arrow mark inside the left edge guide. 1-9 - Epson Stylus Pro 5500 | User Manual - Page 27
1-10 | Setting Up the Printer 8. Slide the edge guides against the paper stack. 9. Close the paper guide roller. 10. Replace the paper tray cover. (If you pulled out the paper tray extension, slide out the cover extension before you replace the cover.) paper tray cover extension 1-10 - Epson Stylus Pro 5500 | User Manual - Page 28
loaded in the tray. The cards let users know what's in the printer at a glance, and prevent anyone from inadvertently changing the lever settings. Matte Paper The levers don't directly affect print quality, but they allow your software to verify that the print settings for a job are correct for the - Epson Stylus Pro 5500 | User Manual - Page 29
Release the buttons when the P Operate light begins flashing. press to run a printer check After a few moments, the printer prints one page showing the version of your printer's ROM, a nozzle check pattern, and the printer's default settings, as shown below: 4. Press the P Operate button to turn off - Epson Stylus Pro 5500 | User Manual - Page 30
described on page 6-1. • If nothing prints at all, make sure your ink cartridges are correctly installed. Then run a cleaning cycle, as described on page 6-1. Note Check the system requirements on page 3 (Macintosh) or page 4 (Windows) before connecting your printer to make sure your system meets - Epson Stylus Pro 5500 | User Manual - Page 31
port. 3. Connect the flat end of the cable to your computer's USB port or a first tier USB hub. Now follow the steps in "Installing Printer Software for Windows" on page 1-18 or "Installing Printer Software for Macintosh" on page 1-19 to install the printer driver and utilities on your system. 1-14 - Epson Stylus Pro 5500 | User Manual - Page 32
to turn off the printer. (If you later need to turn off ECP mode, follow steps above, but hold down the Reset button until the H cyan ink out light comes on instead.) Now follow the steps in "Installing Printer Software for Windows" on page 1-18 to install the printer driver and utilities. 1-15 - Epson Stylus Pro 5500 | User Manual - Page 33
an Optional Interface Card The optional interface cards listed below let you use your printer on a FireWire interface or a network. The Ethernet card automatically detects the protocols on your network, so you can print from Windows 95, 98, Me, 2000, or NT 4.0, or a Macintosh on an AppleTalk network - Epson Stylus Pro 5500 | User Manual - Page 34
Installing Printer Software for Windows" on page 1-18 or "Installing Printer Software for Macintosh" on page 1-19 to install the printer driver and utilities on your system. If you use your printer on a network, also see "Setting Up Your Printer on a Network" on page 1-21 for additional instructions - Epson Stylus Pro 5500 | User Manual - Page 35
If you'll be using the optional RIP software drivers to control your printer instead, see the documentation on the RIP software CD-ROM for instructions on installing and using the software. Installing Printer Software for Windows After connecting the printer to your computer, you need to install - Epson Stylus Pro 5500 | User Manual - Page 36
Turn on your Macintosh and your printer. 2. Insert the printer software CD-ROM in a CD-ROM or DVD drive. Double-click the EPSON CD-ROM icon to open its window. 3. Double-click the Printer Driver Installer folder icon to open the folder. Then double-click the Stylus Pro 5500 Installer icon inside it - Epson Stylus Pro 5500 | User Manual - Page 37
button to turn background printing on or off. With background printing on, you can use your Macintosh while it is preparing a document for printing and use the EPSON Monitor3 utility to manage print jobs. 11. Close the Chooser. For instructions on using your printer software, see Chapter 3. 1-20 - Epson Stylus Pro 5500 | User Manual - Page 38
on the computer to which you connected the printer: 1. Click Start, point to Settings, then click Control Panel. 2. Double-click the Network icon. 3. Click the File and Print Sharing button. You see this dialog box: Note If you see a dialog box requesting the Windows 95, 98, or Me CD-ROM, insert - Epson Stylus Pro 5500 | User Manual - Page 39
Click Network printer, then click Next. 5. Click Browse. 6. Double-click the icon of the host computer (directly connected to the printer). Then click the printer's icon. 7. Click OK and follow the messages on the screen to complete configuration. For instructions on using your printer software, see - Epson Stylus Pro 5500 | User Manual - Page 40
. In step 3, don't choose any drivers from the Alternate Drivers list. Setting Up on a Windows NT 4.0 or Windows 2000 Network This section tells you how to set up your printer so that computers on the network can share it. First install the printer software on every computer that will need to - Epson Stylus Pro 5500 | User Manual - Page 41
instructions on using your printer software, see Chapter 4. Note This section tells you how to configure your printer as a shared printer on a network. To connect your printer the printer: 1. Turn on the printer. 2. Select Chooser from the Apple menu. Then click the SPro 5500 icon and the - Epson Stylus Pro 5500 | User Manual - Page 42
Chooser. 6. Close the Chooser. Configuring the Client Macintosh Computers Perform these steps on every Macintosh that will need to access the printer: 1. Select Chooser from the Apple menu. Then click the SPro 5500 icon and select the shared printer name on the right. You can only select from the - Epson Stylus Pro 5500 | User Manual - Page 43
on page 3-2 (Macintosh) or page 4-1 (Windows). Or, with Windows, click Start, point to Settings, and select Printers. Right-click the EPSON Stylus Pro 5500 printer icon. Then select Properties (Windows 95, 98, or Me), Document Defaults (Windows NT), or Printing Preferences (Windows 2000). 1-26 - Epson Stylus Pro 5500 | User Manual - Page 44
Setting Up the Printer | 1-27 3. Macintosh: Click the utility button. Windows: Click the Utility tab. 4. Click the Print Head Alignment button. 5. Follow the instructions on the screen to print a test page. Printing takes several minutes. You see this window: Note You may want to check the - Epson Stylus Pro 5500 | User Manual - Page 45
1-28 | Setting Up the Printer 1-28 - Epson Stylus Pro 5500 | User Manual - Page 46
Papers Your EPSON Stylus Pro 5500 prints on a variety of substrates, from plain paper to high-quality matte and glossy media. With four paths to choose from (if you have the optional lower cassette), you can use paper sizes from 4 × 6 inches to 13 × 19 inches. The straight-through rear manual feed - Epson Stylus Pro 5500 | User Manual - Page 47
paper tray - - OK OK OK OK OK - Optional lower paper tray Front manual slot Rear manual slot - - OK - OK OK OK OK OK OK OK OK OK OK This allows your software to verify that the print settings for a project are correct for the paper you're using. If the print settings don't match - Epson Stylus Pro 5500 | User Manual - Page 48
Printing on Various Papers | 2-3 Note You can't load Watercolor Paper - Radiant White or card stock in the paper trays. Use the rear manual feed slot only. For more information about EPSON support sheet packed with the paper - - - Use the rear manual into the printer. • Some EPSON special media - Epson Stylus Pro 5500 | User Manual - Page 49
the next section for instructions.) • Always choose the correct Media Type setting in your printer software before you send your print job. • Press the identifies the media type settings for EPSON media and similar papers: Media Luster Photo Paper Use only if ink smears Use for unlisted papers Media - Epson Stylus Pro 5500 | User Manual - Page 50
Printing on A3 LGR LGL A4 LTR Other Other 1. Load the paper following the instructions on page 1-7. The trays can hold 250 sheets of plain paper ( example). Follow the guidelines for tray capacities on page 2-3 when you use EPSON media or similar papers. 2. Set the media type and paper size levers - Epson Stylus Pro 5500 | User Manual - Page 51
of the upper paper tray, so your printouts will be supported when they come out of the printer. To print on paper in the lower tray, select Paper Tray (Lower) or Auto Select in your printer software before you send the print job. Using the Front Manual Feed Slot You can load one sheet at a time - Epson Stylus Pro 5500 | User Manual - Page 52
guide and insert the paper in the slot until it meets resistance. The printer automatically feeds the paper, and it starts printing when it receives a print up to 200 lb) through the rear manual slot, one sheet at a time, printable side face-up. 1. Make sure the printer is turned on. 2. If you're - Epson Stylus Pro 5500 | User Manual - Page 53
with the edge guide and insert the Note paper in the slot, printable side up, until it meets resistance. If you're using long or heavy paper, you may need to hold the sheet until the printer starts to feed it. The printer automatically feeds the paper, and it starts printing when it receives - Epson Stylus Pro 5500 | User Manual - Page 54
Printing on Various Papers | 2-9 Selecting EPSON Paper You can use many types of coated, glossy, and other papers with your EPSON Stylus Pro 5500. EPSON media, which is specially formulated for the inks used in your printer, ensure high-quality results. The following table lists the product codes - Epson Stylus Pro 5500 | User Manual - Page 55
2-10 | Printing on Various Papers Warning Clearing Paper Jams If the Paper Out light and all three paper lights on the printer's control panel are flashing, you have a paper jam. Follow as many of the steps below as necessary to clear the paper path. 1. Turn off the printer. 2. Remove the upper - Epson Stylus Pro 5500 | User Manual - Page 56
. 6. Pull on the manual feed cover to open the paper path cover, and if necessary, open the paper guide inside. paper guide paper path cover 7. Gently pull out the jammed paper. If the jammed paper comes out, close the paper path cover, replace the paper tray, turn the printer back on, and press - Epson Stylus Pro 5500 | User Manual - Page 57
2-12 | Printing on Various Papers 8. Open the printer cover. Gently pull out the jammed paper. 9. Replace the paper trays, close the covers, and turn the printer back on. Then press the Eject/Continue button to make sure paper is feeding properly. 2-12 - Epson Stylus Pro 5500 | User Manual - Page 58
3: The EPSON Stylus Pro 5500 comes with drivers that let you use the printer Printing with EPSON Drivers in non-PostScript mode and utilities that allow you to manage background printing jobs. ICC profiles for ColorSync® 3.0 are included, so you can use the advanced color management features - Epson Stylus Pro 5500 | User Manual - Page 59
Page Setup options, you need to select your printing options. The EPSON driver offers automatic settings that optimize print quality and speed when you're using EPSON media. You can also choose advanced settings for more control over your printer and color management options, as described on page - Epson Stylus Pro 5500 | User Manual - Page 60
Select a Media Type setting appropriate for the media you're printing on, as listed in "Selecting the Correct Media Type" on page 3-4. 4. Select Color or Black ink. 5. Set the Mode option as follows: • Click Automatic to have the printer driver analyze the contents of your image or file and make - Epson Stylus Pro 5500 | User Manual - Page 61
Printing with EPSON Drivers for Macintosh Note For a description of the available settings, click the help button. 7. Choose from the following buttons to access additional features: • Click to access the printer instructions included with the paper. If you're using a non-EPSON printing material - Epson Stylus Pro 5500 | User Manual - Page 62
Printing with EPSON Drivers for Macintosh | 3-5 Choosing Advanced Print Options The advanced print options give you complete control over printing. Use these settings to experiment or to fine-tune a range of options to meet your individual needs. Follow these steps to print with advanced settings: - Epson Stylus Pro 5500 | User Manual - Page 63
for mapping colors to your printer's Epson Standard profile, created specifically for your printer. Don't select any other printer profile you may have on your system. See page 3-8 for a list of the available settings. • No Color Adjustment Disables color management in the printer driver. Choose - Epson Stylus Pro 5500 | User Manual - Page 64
when viewed under tungsten lighting. Care should be taken that the prints are produced for the lighting conditions in which they will be displayed. The EPSON printer driver was designed to represent color accurately when prints are illuminated with a D50 (daylight) light source. For optimum results - Epson Stylus Pro 5500 | User Manual - Page 65
3-8 | Printing with EPSON Drivers for Macintosh ColorSync Rendering Intent settings Perceptual For photographic images. Maintains the relationship between colors as it scales them to fit within your printer's color gamut. Saturation For charts and business graphics. Maintains the relative - Epson Stylus Pro 5500 | User Manual - Page 66
application icon at the right end of the menu bar and select EPSON Monitor3. You see a window like this: current print job jobs waiting to print appear here click to see details and change print job priorities If necessary, click a print job, then click to delete the job, to restart the job, or - Epson Stylus Pro 5500 | User Manual - Page 67
a stop sign icon and the message Print queue on hold in the EPSON Monitor3 dialog box, click the Start print queue button to release the queue and resume printing. Priority list box settings selected for the highlighted print job You can also click to check your ink levels or click to clean the - Epson Stylus Pro 5500 | User Manual - Page 68
your printer and color management options. See page 4-5 for instructions on advanced settings. Follow these steps to make basic settings: 1. Start an application, open a document, and choose Print from the File menu. You see the Print dialog box. 2. Make sure your EPSON Stylus Pro 5500 printer is - Epson Stylus Pro 5500 | User Manual - Page 69
Select a Media Type setting appropriate for the media you're printing on, as listed in "Selecting the Correct Media Type" on page 4-3. 4. Select Color or Black ink. 5. Set the Mode option as follows: • Click Automatic to have the printer driver analyze the contents of your image or file and make the - Epson Stylus Pro 5500 | User Manual - Page 70
colors based on your printer's ICC profile, using the Image Color Matching system (effective in Windows 98/Me/2000 only). If you're using an ICM-compatible monitor, adjusts printed colors to closely match screen colors. Adjusts colors instructions included with the paper. If you're using a non-EPSON - Epson Stylus Pro 5500 | User Manual - Page 71
4-4 | Printing with EPSON Drivers for Windows Note Many application settings override the printer's Paper options. Always verify settings to get the results you expect. Choosing Paper and Layout Options Follow these steps to choose paper and layout options for your print job: 1. On the Properties - Epson Stylus Pro 5500 | User Manual - Page 72
Note Printing with EPSON Drivers for Windows | 4-5 If your size is not listed, select User Defined. reduce or enlarge your image, select a multiple paper option, or print a watermark, click the Layout tab. You see this window: For descriptions of the available settings, click the Help button. 6. - Epson Stylus Pro 5500 | User Manual - Page 73
4-6 | Printing with EPSON Drivers for Windows You see a dialog box like the following: when you choose PhotoEnhance4, you see a different set of options on the lower part of the screen 3. If necessary, you can change your Media Type and Ink settings. 4. Choose one of the following Print Quality - Epson Stylus Pro 5500 | User Manual - Page 74
Printing with EPSON Drivers for Windows | 4-7 Note Color Controls are most effective with RGB files. 5. Choose any of the following: • MicroWeave This setting eliminates unwanted banding effects and is automatically selected for all media types. • High Speed For fast, bidirectional printing. If - Epson Stylus Pro 5500 | User Manual - Page 75
when viewed under tungsten lighting. Care should be taken that the prints are produced for the lighting conditions in which they will be displayed. The EPSON printer driver was designed to represent color accurately when prints are illuminated with a D50 (daylight) light source. For optimum results - Epson Stylus Pro 5500 | User Manual - Page 76
Printing with EPSON Drivers for Windows | 4-9 Managing Print Jobs Your printer comes with several utilities that let you check on your print jobs and schedule, cancel, pause, or restart them. The Progress Meter opens each time you send a print job. The Spool Manager (not available with Windows NT) - Epson Stylus Pro 5500 | User Manual - Page 77
4-10 | Printing with EPSON Drivers for Windows Using the Spool Manager The Spool Manager (not available with Windows NT) displays the status of your print job files and lets you control them. To open spool manager while you're printing, click the EPSON Stylus Pro 5500 icon that appears on the - Epson Stylus Pro 5500 | User Manual - Page 78
EPSON Stylus Pro 5500 includes a number of utilities for monitoring the printer's status. The printer's control panel lights alert you when a problem occurs or your consumables run out. Status monitoring software utilities for both Macintosh and Windows systems are included with the EPSON drivers - Epson Stylus Pro 5500 | User Manual - Page 79
the Printer Control panel lights Problem Ink Out light flashing and one or more Corresponding ink cartridge H ink out lights flashing nearly empty Response Obtain a replacement ink cartridge. See page 6-5. Ink Out light on and one or more H ink out lights on Corresponding ink cartridge empty - Epson Stylus Pro 5500 | User Manual - Page 80
Monitoring the Printer | 5-3 Control panel lights Problem Paper Out and POperate lights Maintenance required now flashing, Ink Out and Paper Size/Type light on, all paper tray lights flash, and H ink out lights are on Response Turn off the printer and contact EPSON as described in the - Epson Stylus Pro 5500 | User Manual - Page 81
5-4 | Monitoring the Printer 2. Click the EPSON StatusMonitor button. This window opens, showing remaining ink levels and the sizes, types, and quantity of paper in the trays (as indicated by the lever positions and printer sensor): click to recheck ink levels and paper information 3. To close the - Epson Stylus Pro 5500 | User Manual - Page 82
boxes let you choose to have your software check for errors or low ink levels before starting your print job. 4. When you're finished changing your configuration options, click OK to return to the Utility menu. Checking Printer Status from Windows The Windows Status Monitor 3 utility lets you view - Epson Stylus Pro 5500 | User Manual - Page 83
's a printing problem, such as low ink or jammed paper, Status Monitor 3 displays a How To button that you can click for instructions on solving the problem. 3. Click the EPSON Status Monitor 3 button. The following window appears. (It also opens automatically when an error occurs.) printer status - Epson Stylus Pro 5500 | User Manual - Page 84
one of your cartridges is low on ink or if any other problems occur. Follow these steps to set monitoring preferences: 1. Click Start, point to Settings, and click Printers. Make sure your printer icon appears in the Printers window. 2. Right-click the Stylus Pro 5500 icon, then click Properties - Epson Stylus Pro 5500 | User Manual - Page 85
shortcut, you can simply double-click the icon to open the Status Monitor 3 window (shown on page 5-6) or right-click it to display the Monitoring Preferences dialog box. 8. Select Allow monitoring of shared printers if your printer is shared on a network and you want to let other users monitor it - Epson Stylus Pro 5500 | User Manual - Page 86
Transporting the Printer Your EPSON Stylus Pro 5500 requires very little maintenance to keep working at its best. This chapter describes the following routine procedures: • Running a cleaning cycle • Running a printer operation check • Replacing ink cartridges • Aligning the print head • Running - Epson Stylus Pro 5500 | User Manual - Page 87
page 6-5 for instructions. 2. If you have an application running, access the printer settings dialog box as described on page 3-2 (Macintosh) or page 4-1 (Windows). Or, with Windows, click Start, point to Settings, and select Printers. Right-click the EPSON Stylus Pro 5500 printer icon. Then select - Epson Stylus Pro 5500 | User Manual - Page 88
the EPSON printer driver and utilities. Follow these steps: 1. Make sure the printer is turned on but not printing, and the Ink Out light is off. If the Ink Out light is flashing or on, you need to replace the ink cartridge(s)-indicated by the H ink out lights-instead. See page 6-5 for instructions - Epson Stylus Pro 5500 | User Manual - Page 89
press the POperate button to turn on the printer. Release the buttons when the POperate light comes on. press to run printer check The printer prints one page showing the version of your printer's ROM, a nozzle check pattern, and the printer's default settings, as shown below: 4. Press the P Operate - Epson Stylus Pro 5500 | User Manual - Page 90
an Ink Cartridge Ink Out light magenta and yellow ink out lights Caution To ensure good results, use genuine EPSON cartridges and do not refill them. Other products may cause damage to your printer not covered by EPSON's warranty. Always leave the empty cartridge installed in the printer until - Epson Stylus Pro 5500 | User Manual - Page 91
pull the cartridge straight out of the printer. 4. Make sure the replacement cartridge is the correct color, then remove it from its package. Warning 5. Shake the new cartridge gently, as shown. Don't shake the cartridge you remove; ink may leak out. 6. Insert the ink cartridge with the - Epson Stylus Pro 5500 | User Manual - Page 92
Start, point to Settings, and select Printers. Right-click the EPSON Stylus Pro 5500 printer icon. Then select Properties (Windows 95, 98, or Me), Document Defaults (Windows NT), or Printing Preferences (Windows 2000). 3. Macintosh: Click the utility button. Windows: Click the Utility tab. 4. Click - Epson Stylus Pro 5500 | User Manual - Page 93
6-8 | Maintaining and Transporting the Printer 5. Follow the instructions on the screen to print a test page. Printing takes several minutes. You see this window: Note You may want to check the alignment patterns using a standard 8X loupe so they're easier to see. You may need to align more - Epson Stylus Pro 5500 | User Manual - Page 94
light comes on to indicate pattern #2. Ink out light indicators for misaligned pattern Pattern # Black H ink out Cyan H ink out 1 On - 2 - On 3 - - Magenta H ink out - - On 5. Press the Eject/Continue button to enter your selection. The printer prints 15 patterns, similar to the ones - Epson Stylus Pro 5500 | User Manual - Page 95
pattern 8 from the sample above, press the Eject/Continue or Reset button until the yellow H ink out light comes on. 8. Press the Cleaning button to enter your selection. The printer returns to print head alignment mode. 9. If other numbered patterns on the first printout are misaligned (as shown - Epson Stylus Pro 5500 | User Manual - Page 96
the way your printer driver processes multiple-copy print jobs, optimize your printer's parallel port for the fastest data transfer rate, and control display of the Progress Meter and Paper Check windows. To access the utility, you must open your printer software from the Windows Printers utility as - Epson Stylus Pro 5500 | User Manual - Page 97
in your printer software don't match the paper tray lever settings. • EPSON Printer Port (Windows 95, 98 printing by enabling DMA transfers on your system, if your computer supports them. For more information, see your computer documentation or contact your computer manufacturer's technical support - Epson Stylus Pro 5500 | User Manual - Page 98
fed into the printer. 3. If you're shipping the printer or moving it a long distance, remove all four of the ink cartridges. Be sure to store them in separate, resealable plastic bags. Close the ink cartridge clamps and compartment covers. 4. Turn off the printer and make sure the print head is in - Epson Stylus Pro 5500 | User Manual - Page 99
6-14 | Maintaining and Transporting the Printer Caution If it's not, turn the printer back on, wait until the print head stops moving and is in the home position, then turn off the printer. After you turn it off, the P Operate light may flash for a while. Do not unplug the power cord until the - Epson Stylus Pro 5500 | User Manual - Page 100
. To set up the printer after transporting it, follow the instructions in Chapter 1, except: • Turn off the printer before reinstalling the cartridges, if you removed them before transporting the printer. It is best to install new cartridges because your printer's ink counter will be reset and - Epson Stylus Pro 5500 | User Manual - Page 101
6-16 | Maintaining and Transporting the Printer 6-16 - Epson Stylus Pro 5500 | User Manual - Page 102
This chapter provides instructions for the following: • Diagnosing problems • Improving print quality • Solving general printing problems • Solving paper problems • Uninstalling and reinstalling EPSON printer drivers and utilities Diagnosing Problems Your EPSON Stylus Pro 5500 includes a number of - Epson Stylus Pro 5500 | User Manual - Page 103
low on ink; then replace the cartridge. See page 6-5 for instructions. • Try using Automatic mode. See page 3-2 (Macintosh) or page 4-1 (Windows) for instructions. Your printout is faint, blurry, or grainy, or colors are incorrect or missing. • Make sure the Media Type setting for your print job - Epson Stylus Pro 5500 | User Manual - Page 104
print with the support sheet or sheet of plain paper under the paper stack. Load the correct number of sheets for your paper type; see page 2-3 for more information. • If ink has leaked inside the printer, carefully clean it following the instructions on page 6-12. Solving General Printing Problems - Epson Stylus Pro 5500 | User Manual - Page 105
(Macintosh) or Chapter 4 (Windows) for instructions on changing the software settings, if necessary. See Chapter 2 for lever setting details. (Press the Eject/Continue button to force print.) Ink Out, Paper Out, and Paper • The print head is too hot. Turn off the printer, wait a few moments, Size - Epson Stylus Pro 5500 | User Manual - Page 106
remove any foreign objects or paper that may be obstructing print head movement. Then turn on the printer again. If you still see the error indicators, turn off the printer and contact EPSON as described on page 5. Your printer icon (SPro 5500) doesn't • You may have too many items in the Chooser - Epson Stylus Pro 5500 | User Manual - Page 107
thick or too thin, curled, or folded. one of the manual feed slots. • Make sure you insert the sheet into the slot until it meets resistance. • Make sure the correct Paper Source setting is selected in your printer software. See Chapter 3 (Macintosh) or Chapter 4 (Windows) for instructions. 7-6 - Epson Stylus Pro 5500 | User Manual - Page 108
the instructions beginning on page 1-19 to reinstall your printer software. Windows 1. Double-click icon. My Computer, then double-click the Control Panel 2. Double-click Add/Remove Programs. Click EPSON Printer Software in the program list, then select your EPSON Stylus Pro 5500 printer icon - Epson Stylus Pro 5500 | User Manual - Page 109
7-8 | Troubleshooting 3. Click the Add/Remove button (Change/Remove button in Windows 2000) and follow the instructions. 4. If you're using the USB port in Windows 98 or Me, click EPSON USB Printer Devices in the program list; then click the Add/Remove button. 5. Restart your computer. Then follow - Epson Stylus Pro 5500 | User Manual - Page 110
Plain bond paper and special ink jet papers distributed by EPSON** Thickness Plain paper: 0. printing large jobs. Poor quality paper may reduce print quality and cause paper jams and other problems. If you encounter problems, switch to a higher grade of paper. ** Special papers distributed by EPSON - Epson Stylus Pro 5500 | User Manual - Page 111
To ensure good results, use genuine EPSON ink cartridges. Other products may cause damage to your printer not covered by EPSON's warranty. Don't use an ink cartridge if the date on the package has expired. Printable Areas Single sheets A BL BR C Ink Cartridges A: Minimum top margin: 0.12 inch - Epson Stylus Pro 5500 | User Manual - Page 112
manual feed slots, optional lower paper cassette 250 sheets of 17 lb (64 g/m2) plain paper; for EPSON media Printing (A4 size paper, lower paper cassette installed) Width: 25.2 inches (640 mm) Depth: 23 inches (584 mm) maximum Height: 12.5 inches (318 mm) 48.5 lb (22 kg) without the ink cartridges - Epson Stylus Pro 5500 | User Manual - Page 113
A-4 | Specifications Note Check the label on the back of the printer for your printer's voltage. Electrical Specification Input voltage range Rated frequency range Input frequency range Rated current Power consumption 120V model 220−240V model 99 to 132V 198 - Epson Stylus Pro 5500 | User Manual - Page 114
A-5 Interfaces Parallel Interface Compatibility Forward channel mode Data format: 8-bit parallel, IEEE-1284 compatibility mode Synchronization: Bus Specifications Revision 1.1, Universal Serial Bus Device Class Definition for Printing Devices Version 1.1 Bit rate 12 Mbps (full speed device) - Epson Stylus Pro 5500 | User Manual - Page 115
4-9 to 4-10 Cards paper size and media type, 1-11, 2-2 to 2-5 Cleaning print head, 6-1 to 6-3 printer, 6-12 Color management Macintosh, 3-3, 3-6 to 3-8 Windows, 4-7 to 4-8 Color problems, 7-2 ColorSync settings, 3-6 to 3-8 Configuration settings, Macintosh, 5-4 to 5-5 Contrast setting, 3-6 Control - Epson Stylus Pro 5500 | User Manual - Page 116
to 5-5 connecting to USB port, 1-14 custom print job settings, 3-3 drivers, 3-1 to 3-8 managing print jobs, 3-8 to 3-10 Monitor3, 3-9 to 3-10 monitoring printer, 5-3 to 5-5 network, setting up printer on, 1-24 to 1-26 page setup options, 3-1 to 3-2 problems, 7-5 software, installing, 1-19 to 1-20 - Epson Stylus Pro 5500 | User Manual - Page 117
up printer on, 1-21 to 1-26 Noise, 7-5 Nozzle Check, 1-12 to 1-13, 6-2 to 6-5 O Optimizing data transfer, 6-11 to 6-12 Options hardware, 2, 1-16 software, 1 P Panoramic paper, 2-2 Paper EPSON, 2-3 to 2-4, 2-9 jams, 2-10 to 2-12, 5-1, 7-3 lights, 5-1 to 5-3, 7-3 to 7-5 loading in front manual slot - Epson Stylus Pro 5500 | User Manual - Page 118
, A-4 instructions, 6 to 7 Saturation setting, 3-6 Service, EPSON, 5 Smeared printouts, 2-4, 7-3 Software installing, 1-18 to 1-20 options, 1 uninstalling, 7-7 to 7-8 Specifications electrical, A-4 environmental, A-4 ink cartridges, A-2 interface, A-5 mechanical, A-3 paper, A-1 to A-2 printing - Epson Stylus Pro 5500 | User Manual - Page 119
Windows advanced printing, 4-5 to 4-8 basic printing, 4-1 to 4-5 color management, 4-7 to 4-8 drivers, 4-1 to 4-8 managing print jobs, 4-9 to 4-10 monitoring printer, 5-5 to 5-8 network, setting up on, 1-21 to 1-24 paper options, 4-4 to 4-5 printer status, checking, 5-5 to 5-8 problems, 7-5 software - Epson Stylus Pro 5500 | User Manual - Page 120
left edge guide print head (beneath cover) front edge guide paper tray extension release levers paper tray extension manual feed, standard, and lower paper tray lights Operate light black and cyan ink out lights magenta and yellow Ink Out, Paper Out, and ink out lights Paper Size/Type lights
-
 1
1 -
 2
2 -
 3
3 -
 4
4 -
 5
5 -
 6
6 -
 7
7 -
8
-
9
-
10
-
11
-
12
-
13
-
14
-
15
-
16
-
17
-
18
-
19
-
20
-
21
-
22
-
23
-
24
-
25
-
26
-
27
-
28
-
29
-
30
-
31
-
32
-
33
-
34
-
35
-
36
-
37
-
38
-
39
-
40
-
41
-
42
-
43
-
44
-
45
-
46
-
47
-
48
-
49
-
50
-
51
-
52
-
53
-
54
-
55
-
56
-
57
-
58
-
59
-
60
-
61
-
62
-
63
-
64
-
65
-
66
-
67
-
68
-
69
-
70
-
71
-
72
-
73
-
74
-
75
-
76
-
77
-
78
-
79
-
80
-
81
-
82
-
83
-
84
-
85
-
86
-
87
-
88
-
89
-
90
-
91
-
92
-
93
-
94
-
95
-
96
-
97
-
98
-
99
-
100
-
101
-
102
-
103
-
104
-
105
-
106
-
107
-
108
-
109
-
110
-
111
-
112
-
113
-
114
-
115
-
116
-
117
-
118
-
119
-
120
 |
 |

PRINTER GUIDE
EPSON Stylus
®
Pro 5500