Epson Stylus Pro 7600 Product Information Guide
Epson Stylus Pro 7600 Manual
 |
View all Epson Stylus Pro 7600 manuals
Add to My Manuals
Save this manual to your list of manuals |
Epson Stylus Pro 7600 manual content summary:
- Epson Stylus Pro 7600 | Product Information Guide - Page 1
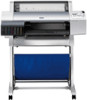
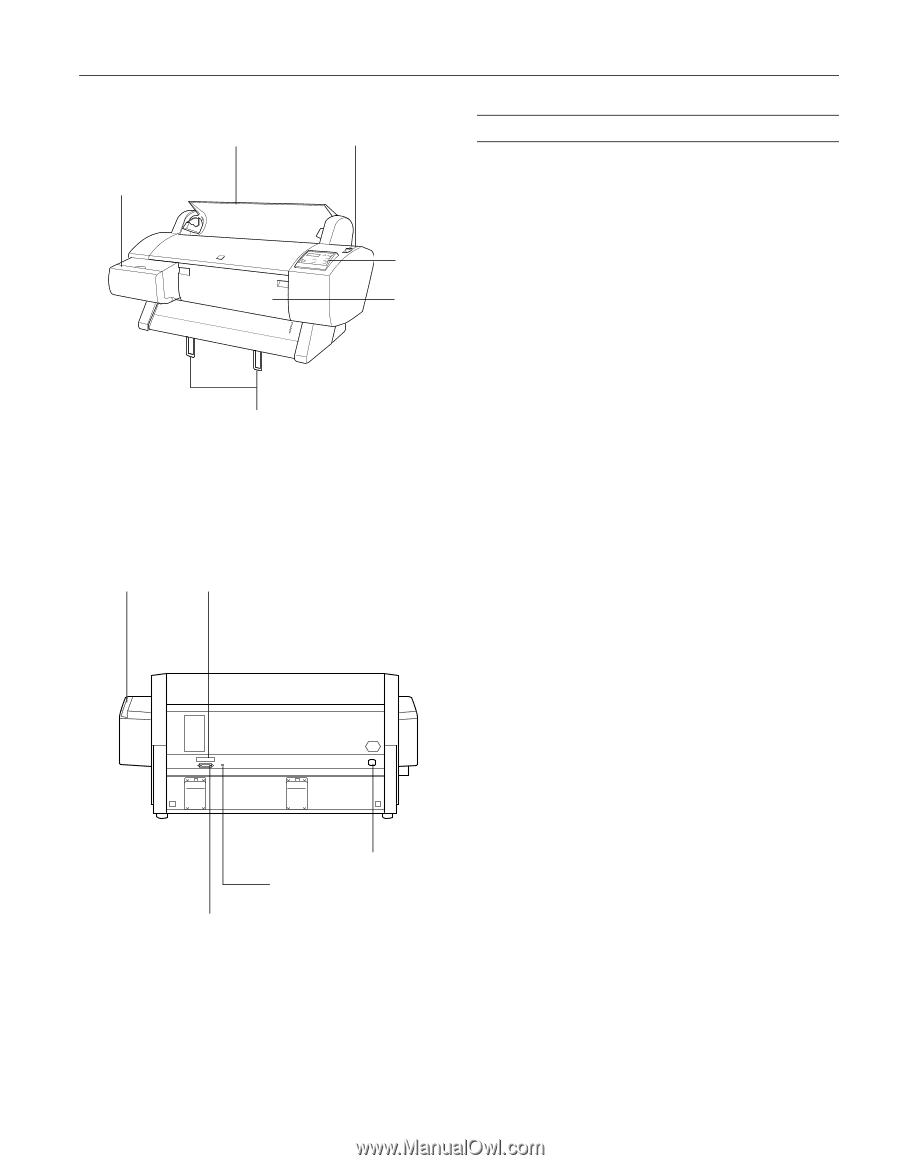
EPSON Stylus Pro 7600 and 9600 - ink cartridge compartment roll paper cover paper set lever control panel front cover paper guides Note: The stand is optional for the Stylus Pro 7600. paper set lever optional interface shield plate AC inlet USB interface connector parallel interface - Epson Stylus Pro 7600 | Product Information Guide - Page 2
mm) Height: 46.5 inches (1181 mm), including stand Weight Stylus Pro 7600: 96 lb (43.5 kg) without ink cartridges or stand Stylus Pro 9600: 185 lb (84 kg) without ink cartridges or stand Environmental Temperature Operation: 50 to 95 °F (10 to 35 °C) Storage: -4 to 104 °F (-20 to 40 °C) 1 month - Epson Stylus Pro 7600 | Product Information Guide - Page 3
X (optional) X X X X X X FireWire (optional) X X X X * Supported on pre-installed operating systems, not upgraded from earlier versions of Windows. In addition, Macintosh OS X supports USB and Ethenet when running applications in Classic mode. 7/02 EPSON Stylus Pro 7600 and 9600 - 4 - Epson Stylus Pro 7600 | Product Information Guide - Page 4
EPSON Stylus Pro 7600 and 9600 Consumables and Accessories Ink Cartridges When you install the printer's first ink cartridges, it takes about 10 minutes to initialize the printer. Do not interrrupt this process by turning off the printer, opening the printer covers, or releasing the paper set - Epson Stylus Pro 7600 | Product Information Guide - Page 5
EPSON Stylus Pro 7600 and 9600 EPSON Paper and Other Media The papers you can use vary, depending on whether you have the Photographic Dye ink model or the UltraChrome ink model, as shown in the tables below. NOTE: The Stylus Pro 7600 cannot use paper wider than 24 inches. Papers supported by - Epson Stylus Pro 7600 | Product Information Guide - Page 6
for your printer. Other cartridges will not work. LOAD PAPER Paper Out light on Paper lever is in the released position (all the way back) while loading paper. After you finish loading paper, pull the paper lever all the way forward, to the secured position. 7 - EPSON Stylus Pro 7600 and 9600 - Epson Stylus Pro 7600 | Product Information Guide - Page 7
Make sure you installed the wrong printer driver. correct driver for your printer. Damaged data was sent to the printer. To clear the data, press the printer's Power button to turn the printer off. Wait for about a minute, then turn the printer on again. 7/02 EPSON Stylus Pro 7600 and 9600 - 8 - Epson Stylus Pro 7600 | Product Information Guide - Page 8
Before you start, make sure the printer is turned on. Then follow these steps to replace an ink cartridge: 1. Note the color of the cartridge whose Ink Out light is on or flashing. This is the cartridge you need to replace. 2. Open the ink compartment cover. 9 - EPSON Stylus Pro 7600 and 9600 7/02 - Epson Stylus Pro 7600 | Product Information Guide - Page 9
to the unlocked position. EPSON Stylus Pro 7600 and 9600 7. Lower the ink lever to its locked position. 4. Remove the empty ink cartridge from the printer. 5. Make sure the replacement cartridge is the correct color, and remove it from its package. If you're using UltraChrome Ink, gently shake the - Epson Stylus Pro 7600 | Product Information Guide - Page 10
EPSON Stylus Pro 7600 and 9600 Printing a Nozzle Check Pattern 1. Load a letter-size sheet of paper in the printer. Ink Out lights on the printer's control panel are off. If an H Ink Out light is flashing or on, you need to replace the corresponding ink cartridge instead. See page 9 for instructions - Epson Stylus Pro 7600 | Product Information Guide - Page 11
replace the cartridges. If any cartridges are low on ink but not low enough to prevent the procedure from being carried out, you should still make sure you have replacements available, or you will be limited in how much you can print after switching black ink modes. 7/02 EPSON Stylus Pro 7600 and - Epson Stylus Pro 7600 | Product Information Guide - Page 12
see a message telling you to remove the draining cartridge. If you are replacing both black ink cartridges, you see a message prompting you to insert the draining cartridge in the second slot. Once you do this, the draining process repeats a second time. 13 - EPSON Stylus Pro 7600 and 9600 7/02 - Epson Stylus Pro 7600 | Product Information Guide - Page 13
EPSON Stylus Pro 7600 and 9600 Charging the Ink Once draining is complete, make sure you have the correct black ink cartridges available for the black ink mode you're switching to. Then follow these steps: 1. Insert all the ink cartridges into the printer. Be sure to install the correct black ink - Epson Stylus Pro 7600 | Product Information Guide - Page 14
ink from the tank when removing it. Hold it upright at all times. 11. Close the front cover. The carriage returns to the home position and the printer returns to its previous status. 3. Insert the new tank. Related Documentation CPD-14021 CPD-14020 EPSON Stylus Pro 7600 and 9600 Printer Guide
-
 1
1 -
 2
2 -
 3
3 -
 4
4 -
 5
5 -
 6
6 -
 7
7 -
8
-
9
-
10
-
11
-
12
-
13
-
14
 |
 |
EPSON Stylus Pro 7600 and 9600
7/02
EPSON Stylus Pro 7600 and 9600 - 2
-
Printer Specifications
Printing
Engine Reliability
roll paper cover
control
panel
front
cover
paper set lever
parallel interface connector
optional interface
shield plate
USB interface
connector
AC inlet
ink cartridge
compartment
paper set lever
Note:
The stand is optional for the Stylus Pro 7600.
paper guides
Printing method
7 color EPSON UltraChrome ink or
6 color EPSON Photographic Dye ink
UltraChrome model switchable between
three ink modes:
❏
Photo Black Mode (uses Photo Black
and Light Black cartridges)
❏
Matte Black Mode (uses Matte Black and
Light Black cartridges)
❏
Dual Matte Black Mode (uses two Matte
Black cartridges)
Nozzle
configuration
96 nozzles for each color: black 1, black 2,
cyan, magenta, yellow, light cyan, light
magenta
Resolution
Maximum 2880 dpi
×
1440 dpi
Print direction
Bidirectional
Control code
ESC/P
®
Raster Photographic Driver
Line spacing
1/6 inch (default), programmable in
1/1440-inch increments
Paper feed speed
200 ± 10 milliseconds per 1/6-inch line
RAM
32MB (Stylus Pro 7600)
64MB (Stylus Pro 9600)
Total print
volume
20,000 B0 images, 360
×
360 dpi
Print head life
28 billion dots per nozzle
Periodic
maintenance
Pump unit, head cleaner, and cap assembly
require replacement approximately every 2
years based on 25% duty cycle
Cutter blade life
Approximately 2000 B0+ sheets (EPSON
media up to 4.33 mil thick); approximately
1000 B0+ film sheets