Epson Stylus Pro 7800 Professional Edition Getting Started - ColorBurst RIP
Epson Stylus Pro 7800 Professional Edition Manual
 |
View all Epson Stylus Pro 7800 Professional Edition manuals
Add to My Manuals
Save this manual to your list of manuals |
Epson Stylus Pro 7800 Professional Edition manual content summary:
- Epson Stylus Pro 7800 Professional Edition | Getting Started - ColorBurst RIP - Page 1
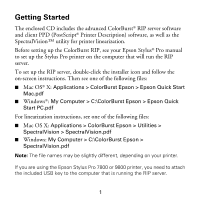
CAT I O NS • SP S for WEB O FFSET PUBLI EC I F I C AT I ON CERTIFIED SYSTEM Certified - June, 2004 ColorBurst RIP for Epson Stylus® Pro Edition 3800 4800 7800 9800 GETTING STARTED - Epson Stylus Pro 7800 Professional Edition | Getting Started - ColorBurst RIP - Page 2
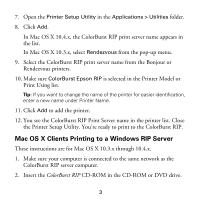
Stylus® Pro manual to set up the Stylus Pro printer on the computer that will run the RIP server. To set up the RIP server, double-click the installer icon and follow the on-screen instructions. Then see one of the following files: ■ Mac OS® X: Applications > ColorBurst Epson > Epson Quick Start Mac - Epson Stylus Pro 7800 Professional Edition | Getting Started - ColorBurst RIP - Page 3
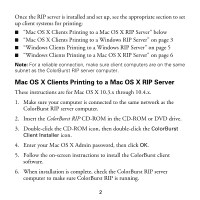
as the ColorBurst RIP server computer. Mac OS X Clients Printing to a Mac OS X RIP Server These instructions are for Mac OS X 10.3.x through 10.4.x. 1. 4. Enter your Mac OS X Admin password, then click OK. 5. Follow the on-screen instructions to install the ColorBurst client software. 6. When - Epson Stylus Pro 7800 Professional Edition | Getting Started - ColorBurst RIP - Page 4
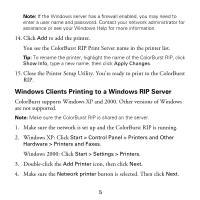
. 11. Click Add to add the printer. 12. You see the ColorBurst RIP Print Server name in the printer list. Close the Printer Setup Utility. You're ready to print to the ColorBurst RIP. Mac OS X Clients Printing to a Windows RIP Server These instructions are for Mac OS X 10.3.x through 10.4.x. 1. Make - Epson Stylus Pro 7800 Professional Edition | Getting Started - ColorBurst RIP - Page 5
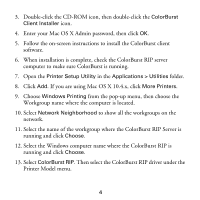
client software. 6. When installation is complete, check the ColorBurst RIP server computer to make sure ColorBurst is running. 7. Open the Printer Setup Utility in the Applications > Utilities folder. 8. Click Add. If you are using Mac OS X 10.4.x, click More Printers. 9. Choose Windows Printing - Epson Stylus Pro 7800 Professional Edition | Getting Started - ColorBurst RIP - Page 6
new name, then click Apply Changes. 15. Close the Printer Setup Utility. You're ready to print to the ColorBurst RIP. Windows Clients Printing to a Windows RIP Server ColorBurst supports Windows XP and 2000. Other versions of Windows are not supported. Note: Make sure the ColorBurst RIP is shared on - Epson Stylus Pro 7800 Professional Edition | Getting Started - ColorBurst RIP - Page 7
ColorBurst RIP as your default printer, choose Yes. If not, choose No. Click Next. 8. Click Finish when you see a screen telling you that setup is complete. You're ready to print to the ColorBurst RIP. Windows Clients Printing to a Mac OS X RIP Server ColorBurst supports Windows XP and Windows 2000 - Epson Stylus Pro 7800 Professional Edition | Getting Started - ColorBurst RIP - Page 8
printer is unchecked. Then click Next. 7. Click Create a new port, select Standard TCP/IP Port, and click Next. 8. When you see the Add Standard TCP/IP Print LPR. 12. For the Queue Name, enter the exact ColorBurst Print Server Name that appears in the Macintosh RIP server's ColorBurst RIP - Epson Stylus Pro 7800 Professional Edition | Getting Started - ColorBurst RIP - Page 9
a new name in the Printer name box. Then click Next. 23. Follow the on-screen instructions to install the software. 24. At the end of the installation, click Finish. 25. Restart your computer. You're ready to print to the ColorBurst RIP. Epson and Epson Stylus are registered trademarks of Seiko - Epson Stylus Pro 7800 Professional Edition | Getting Started - ColorBurst RIP - Page 10
Printed in USA CPD-20261R1
-
 1
1 -
 2
2 -
 3
3 -
 4
4 -
 5
5 -
 6
6 -
 7
7 -
8
-
9
-
10
 |
 |

S
P
E
C
I
F
I
C
A
T
I
O
N
S
f
o
r
W
E
B
O
F
F
S
E
T
P
U
B
L
I
C
A
T
I
O
N
S
•
CERTIFIED
SYSTEM
Certified –
June, 2004
ColorBurst RIP for
Epson Stylus
®
Pro Edition
3800
4800
7800
9800
GETTING STARTED