Epson SureColor P800 Screen Print Edition Basics
Epson SureColor P800 Screen Print Edition Manual
 |
View all Epson SureColor P800 Screen Print Edition manuals
Add to My Manuals
Save this manual to your list of manuals |
Epson SureColor P800 Screen Print Edition manual content summary:
- Epson SureColor P800 Screen Print Edition | Basics - Page 1
Epson® SureColor® P800 Series Basics - Epson SureColor P800 Screen Print Edition | Basics - Page 2
Maintaining Your Printer 31 Checking and Cleaning the Print Head 31 Checking and Aligning the Print Head 33 Checking the Ink Cartridge Status 34 Replacing Ink Cartridges 36 Replacing Maintenance Cartridges 39 Switching Black Ink Types 41 Cleaning the Rollers 43 Solving Problems 44 Checking - Epson SureColor P800 Screen Print Edition | Basics - Page 3
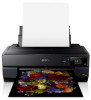
Introduction Your Epson® SureColor® P800 Series printer gives you exhibition quality prints on a wide variety of glossy and matte papers in many sizes. Your outstanding printouts result from these advanced features: ■ Epson® UltraChrome® HD ink cartridges for unprecedented gray balance, outstanding - Epson SureColor P800 Screen Print Edition | Basics - Page 4
the media size and type for paper that is loaded Eject paper that is loaded Display the ink levels remaining Change the Display the black ink type Wi-Fi/Network settings Open the Setup menu For more information on the icons displayed on the screen, see your online User's Guide. 4 Introduction - Epson SureColor P800 Screen Print Edition | Basics - Page 5
board (see page 10). To print multiple photos, panoramics, and banners, load roll paper using the optional roll paper unit (see page 13). You can purchase genuine Epson ink and paper at Epson Supplies Central® at www.epson.com/ink3 (U.S. sales) or www.epson.ca (Canadian sales). You can also purchase - Epson SureColor P800 Screen Print Edition | Basics - Page 6
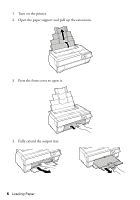
1. Turn on the printer. 2. Open the paper support and pull up the extensions. 3. Press the front cover to open it. 4. Fully extend the output tray. 6 Loading Paper - Epson SureColor P800 Screen Print Edition | Basics - Page 7
button on the edge guide and slide it against the paper (but not too tightly). Note: Always load paper short edge first, even for landscape printing. Load letterhead or pre-printed paper top edge first. If larger paper does not feed correctly, flip down the paper support edge guide as shown. Loading - Epson SureColor P800 Screen Print Edition | Basics - Page 8
You can print professional quality photos on these paper types using the manual feed tray: ■ Epson Cold Press Bright ■ Epson Cold Press Natural ■ Epson Exhibition Fiber Paper ■ Epson Exhibition Watercolor Paper Textured ■ Epson Hot Press Bright ■ Epson Hot Press Natural ■ Epson UltraSmooth® Fine - Epson SureColor P800 Screen Print Edition | Basics - Page 9
feed tray. 7. Press Load on the touch screen. The paper loads inside the printer. Note: If you are returned to the home screen, select Load Guide, and then follow the instructions on the LCD screen. 8. When you see a message on the screen, close the manual feed tray by pushing it in until it latches - Epson SureColor P800 Screen Print Edition | Basics - Page 10
press Yes to confirm. Loading Thick Media Use the manual feed tray to load media that is 1.2 to 1.5 mm thick. Note: Be sure to leave at least 17 inches (43 cm) of space behind the printer for the media to feed through. 1. Turn on the printer. 2. Remove any roll paper or paper loaded in the - Epson SureColor P800 Screen Print Edition | Basics - Page 11
open it, then push the center of the manual feed tray to extend it. 4. Insert a single sheet of thick media. Insert it short edge first with the printable side faceup. Note: Never try to load media from the rear, or you could damage the printer. 5. Feed the paper up to the line - Epson SureColor P800 Screen Print Edition | Basics - Page 12
6. Press Load on the touch screen. The paper loads inside the printer. Note: If you are returned to the home screen, select Load Guide, and then follow the instructions on the LCD screen. 7. When you see a message on the screen, close the manual feed tray by pushing it in until it latches. 8. Fully - Epson SureColor P800 Screen Print Edition | Basics - Page 13
) You can load 13-inch to 17-inch wide roll paper for printing large images, panoramic images, or multiple photos, with or without borders using the optional roll paper unit. Tip: It's a good idea to check the ink status and replace cartridges, if necessary, before printing a large print job. If you - Epson SureColor P800 Screen Print Edition | Basics - Page 14
inch core, you need to remove the roll media adapter from the flange to fit the core size of the roll canvas media. Note: Thin media (less than 250 gsm) is not supported that is fixed to the spindle. ■ For roll paper with a 3-inch core, you need to install the roll media adapter onto the flange to - Epson SureColor P800 Screen Print Edition | Basics - Page 15
Spindle 1. Remove any tape and protective paper from the end of the roll. Make sure the paper is cut straight across to avoid paper feeding problems. Note: Avoid touching the surface of your paper. With canvas media that you have previously loaded, it's a good idea to cut the edge straight each - Epson SureColor P800 Screen Print Edition | Basics - Page 16
3. Insert the spindle into the roll paper core so that the end of the roll paper is facing towards you. 4. Press the roll paper against the fixed flange so that there is no gap between the flange and the roll paper. 5. Press the black flange onto the spindle so that there is no gap between it and - Epson SureColor P800 Screen Print Edition | Basics - Page 17
Loading Roll Paper in the Printer 1. Press the front cover to open it. Note: If the manual feed tray is open, push the center of the tray to close it. 2. Only extend the first section of output tray. 3. Open the rear support; you do not need to extend it. Loading Paper 17 - Epson SureColor P800 Screen Print Edition | Basics - Page 18
media, leave slack in the roll as it feeds and prints for the best results. If you have trouble feeding canvas media, check that the edge is straight and see this screen, insert the roll paper further into the printer until the screen changes. 7. Press Load on the touch screen. The paper loads inside - Epson SureColor P800 Screen Print Edition | Basics - Page 19
, you see this screen: Select Cut to print a cut line and feed the paper. (If you select No Cut, you return to the main menu and your next print will be placed on the roll immediately following the last. If you send another print job without making a selection, the printer will continue in no - Epson SureColor P800 Screen Print Edition | Basics - Page 20
5. Hold both ends of the spindle and remove it from the roll paper unit. 6. Remove the black flange from the spindle. While holding the flange, press the edge of the spindle with your thumbs as shown. If it is difficult to remove, tap on the tip of the spindle on the black flange side. 7. Remove the - Epson SureColor P800 Screen Print Edition | Basics - Page 21
section describes basic printing from your Windows® or Mac computer. For detailed instructions, see the online User's Guide. Tip: It's a good idea to check for updates to your Epson SureColor P800 Series software. See "Checking for Software Updates" on page 44 for instructions. Printing in Windows - Epson SureColor P800 Screen Print Edition | Basics - Page 22
avoid changing black ink more often than necessary, set the printer to the type of black ink you usually use (see page 41). 4. For the Color setting, select Color for any type of photographic printing. To print photos in black-and-white, use Advanced B&W Photo mode. 22 Printing from Start to Finish - Epson SureColor P800 Screen Print Edition | Basics - Page 23
■ LEVEL 2 for everyday text and image printing. ■ LEVEL 3 for photos and graphics with good print quality and speed. ■ LEVEL 4 for photos and graphics with high print quality and good print speed. ■ LEVEL 5 for the best print quality and slowest print speed. Then select from the following additional - Epson SureColor P800 Screen Print Edition | Basics - Page 24
management in the printer driver. (The appropriate ICC profile must be selected in the imaging application.) Note: For color management instructions, see epson.com/proimaging/iccprofiles.html. For more information about print settings, click Help or see your online User's Guide. 7. Choose the paper - Epson SureColor P800 Screen Print Edition | Basics - Page 25
menu. Note: For roll paper, make sure the maximum width of your photo is 17 inches to fit in the width of your roll paper (set the margins to 0 in your application software). 9. If you're printing borderless photos, select Borderless, if available. To adjust the borderless expansion setting, click - Epson SureColor P800 Screen Print Edition | Basics - Page 26
photo or document in a printing program, then select the print command in your application. 2. Select your product as the Printer setting. Select your Epson product 3. Click Show Details. of your photo is set to 17 inches to fit in the width of your roll paper (set the margins to 0 in - Epson SureColor P800 Screen Print Edition | Basics - Page 27
that matches the paper you loaded (see page 29). Note: The ink type will change depending on the size and type of paper you select. To avoid changing black ink more often than necessary, set the printer to the type of black ink you usually use (see page 41). Printing from Start to Finish 27 - Epson SureColor P800 Screen Print Edition | Basics - Page 28
your source file was captured in Adobe RGB. Note: For color management instructions, see epson.com/proimaging/iccprofiles.html. For more information about print settings, click Help or see your online User's Guide. 10. Select an Output Resolution setting (available settings depend on selected media - Epson SureColor P800 Screen Print Edition | Basics - Page 29
Photo Luster * OS X: When printing with Photo Black ink, select the PK (Photo Black) option. ** For the best results on this paper, print using the premium ICC profile installed by the driver. For new media types, download the premium ICC profiles from Epson at epson.com/proimaging/iccprofiles.html - Epson SureColor P800 Screen Print Edition | Basics - Page 30
Natural Matte Exhibition Canvas Natural Matte Epson Hot Press Bright Hot Press Bright Epson Hot Press Natural Hot Press Natural Epson Cold Press Bright Cold Press Bright Epson Cold Press Natural Cold Press Natural * OS X: When printing with Matte Black ink, select the MK (Matte Black - Epson SureColor P800 Screen Print Edition | Basics - Page 31
to keep the Epson SureColor P800 Series working at its best: ■ "Checking and Cleaning the Print Head" below ■ "Checking and Aligning the Print Head" on page 33 ■ "Checking the Ink Cartridge Status" on page 34 ■ "Replacing Ink Cartridges" on page 36 ■ "Replacing Maintenance Cartridges" on page 39 - Epson SureColor P800 Screen Print Edition | Basics - Page 32
: You cannot clean the print head if an ink cartridge is expended, and may not be able to clean it when a cartridge is low. You must replace the cartridge first (see page 36). 1. Load a few sheets of letter-size plain paper. 2. Press the button or tap the printer's touch screen to open the main menu - Epson SureColor P800 Screen Print Edition | Basics - Page 33
align the print head. Note: Banding may also occur if your print head nozzles need cleaning (see page 31). 1. Load a few sheets of Epson Presentation Paper printer's touch screen to open the main menu. 3. Press the F button, select Maintenance, then select Head Alignment. 4. Press Print to print an - Epson SureColor P800 Screen Print Edition | Basics - Page 34
to print when ink is low. Click Accept or Decline. To disable checking for ink offers or updates from Epson, see the instructions in your online User's Guide. To check the ink cartridge status at any time, do one of the following: Control panel: 1. Press the button or tap the printer's touch screen - Epson SureColor P800 Screen Print Edition | Basics - Page 35
1. In the Apple menu or the Dock, select System Preferences. Select Printers & Scanners, Print & Fax or Print & Scan, select your product, and select Options & Supplies. Select Utility and select Open Printer Utility. 2. Select EPSON Status Monitor. You see this screen: Maintaining Your Printer 35 - Epson SureColor P800 Screen Print Edition | Basics - Page 36
the "replace cartridge" indicator comes on. The printer ships with full cartridges and part of the ink from the first cartridges is used for priming the printer. For best printing results, use up a cartridge within six months of opening the package. Caution: Do not open ink cartridge packages until - Epson SureColor P800 Screen Print Edition | Basics - Page 37
the old ones. 1. Press the button or tap the printer's touch screen to open the main menu. 2. Press the button. 3. Press Open ink cover. The ink cartridge cover lock releases. 4. Open the ink cartridge cover. Note: Do not try to open the ink cartridge cover until the lock is released. 5. Press the - Epson SureColor P800 Screen Print Edition | Basics - Page 38
out of the reach of children. 7. Remove the ink cartridge from the package and shake it as shown for about five seconds, but be careful not to touch the green chip on the cartridge. 8. Insert the new cartridge into the slot and push it in until it clicks into place. 38 Maintaining Your Printer - Epson SureColor P800 Screen Print Edition | Basics - Page 39
turn off the printer while ink is charging or you'll waste ink. Replacing Maintenance Cartridges The maintenance cartridge absorbs ink that is used in maintenance operations such as head cleaning and changing black ink. Replace the cartridge when you see a message on the touch screen. 1. Turn on the - Epson SureColor P800 Screen Print Edition | Basics - Page 40
on the maintenance cartridge and slide it out carefully so that it does not tilt. 5. Place the old maintenance cartridge in the bag supplied with the new cartridge, and then seal the bag. 6. Insert the new maintenance cartridge. 7. Close the maintenance cartridge cover. 40 Maintaining Your Printer - Epson SureColor P800 Screen Print Edition | Basics - Page 41
Switching Black Ink Types Your printer comes with Matte Black and Photo Black ink cartridges. Although both must be installed for the printer to work, the printer can use only one type of black ink at a time. The printer will switch ink automatically, depending on the type of media you load. This - Epson SureColor P800 Screen Print Edition | Basics - Page 42
. Because it consumes some of the new type of ink, you should not switch ink more often than necessary. 1. Press the button or tap the printer's touch screen to open the main menu. 2. Press the button. 3. Press Proceed to select the type of ink the printer will switch to. The time required for each - Epson SureColor P800 Screen Print Edition | Basics - Page 43
of matte paper. 1. Turn on the printer. 2. Open the paper support and output tray. 3. Load several sheets printer's touch screen to open the main menu. 5. Press the F button, select Maintenance, then select Paper Guide Cleaning. 6. Press Roller Cleaning to feed a sheet of paper through the printer - Epson SureColor P800 Screen Print Edition | Basics - Page 44
screens, depending on your version of Windows. With OS X, you can manually update the software by opening the Applications > Epson Software folder and selecting EPSON Software Updater. Problems and Solutions Check the solutions below if you're having trouble using your printer. Printing Problems - Epson SureColor P800 Screen Print Edition | Basics - Page 45
properly. See page 43 or your online User's Guide for cleaning instructions. ■ If you can't insert paper easily into the manual feed tray, make sure the paper is perfectly flat and not curled. ■ Make sure the manual feed tray is not extended if you're printing on roll paper or with the sheet feeder - Epson SureColor P800 Screen Print Edition | Basics - Page 46
Print Quality Problems ■ For the best print quality, use Epson papers and genuine Epson ink cartridges (see page 36). ■ Load the paper printable side up (usually the whiter, brighter, or glossy side). ■ Make sure your paper isn't damp or curled. ■ Some - Epson SureColor P800 Screen Print Edition | Basics - Page 47
online User's Guide for instructions on manually entering your wireless network name. ■ If your wireless router has security enabled, make sure you entered the WEP key or WPA passphrase correctly. ■ Reinstall your product software. The Wi-Fi icon appears on the LCD screen but you cannot print ■ Make - Epson SureColor P800 Screen Print Edition | Basics - Page 48
Visit your product's support website at epson.com/support/p800 (U.S.) or epson.ca/support/p800 (Canada) for solutions to common problems. You can download drivers, printer software, and utilities, view how-to videos, access the online User's Guide, get FAQs and troubleshooting advice, or e-mail - Epson SureColor P800 Screen Print Edition | Basics - Page 49
Important Safety Instructions Before using your Epson SureColor P800 Series printer, read and follow these safety instructions: ■ Be sure to follow all warnings and instructions marked on the printer. ■ Use only the type of power source indicated on the printer label. ■ Place the printer near a wall - Epson SureColor P800 Screen Print Edition | Basics - Page 50
only those controls that are covered by the operating instructions. ■ When storing or transporting the printer, do not tilt it, stand it on its side, or turn it upside down; otherwise ink may leak from the cartridges. Ink Cartridge Safety ■ Keep ink cartridges out of the reach of children and do not - Epson SureColor P800 Screen Print Edition | Basics - Page 51
least 9 inches (22 cm Problems: Should your Epson printer prove defective during the warranty period, please call the Epson ConnectionSM at (562) 276-7272 (U.S.) or (905) 709-2567 (Canada) for warranty repair instructions and return authorization. An Epson service damage, maintenance or service from - Epson SureColor P800 Screen Print Edition | Basics - Page 52
of prints or reimbursement of materials or services required for reprinting. This warranty does not cover damage to the Epson product caused by parts or supplies not manufactured, distributed or certified by Epson. This warranty does not cover ink cartridges, ink supply units, or ink packs. This - Epson SureColor P800 Screen Print Edition | Basics - Page 53
you, visit our website at: epson.com To find the Epson Customer Care Center nearest you, visit epson.com/support You can also write to: Epson America, Inc., P.O. Box 93012, that may cause undesired operation. Trade Name: Epson Type of Product: Ink jet printer Model: K141A Notices 53 - Epson SureColor P800 Screen Print Edition | Basics - Page 54
pursuant to Part 15 of the FCC Rules. These limits are designed to provide reasonable protection against harmful interference in a residential installation. and, if not installed and used in accordance with the instructions, may cause harmful interference to radio or television reception. However - Epson SureColor P800 Screen Print Edition | Basics - Page 55
comply with Seiko Epson Corporation's operating and maintenance instructions. Seiko Epson Corporation shall not be liable for any damages or problems arising from the use of any options or any consumable products other than those designated as Original Epson Products or Epson Approved Products by
-
 1
1 -
 2
2 -
 3
3 -
 4
4 -
 5
5 -
 6
6 -
 7
7 -
8
-
9
-
10
-
11
-
12
-
13
-
14
-
15
-
16
-
17
-
18
-
19
-
20
-
21
-
22
-
23
-
24
-
25
-
26
-
27
-
28
-
29
-
30
-
31
-
32
-
33
-
34
-
35
-
36
-
37
-
38
-
39
-
40
-
41
-
42
-
43
-
44
-
45
-
46
-
47
-
48
-
49
-
50
-
51
-
52
-
53
-
54
-
55
 |
 |

Epson SureColor P800 Series
Basics
®
®