Epson WorkForce 320 User Manual - Page 25
Replacing Ink Cartridges - installation
 |
View all Epson WorkForce 320 manuals
Add to My Manuals
Save this manual to your list of manuals |
Page 25 highlights
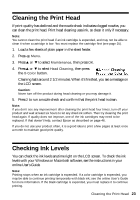
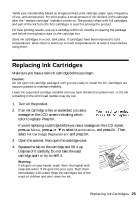
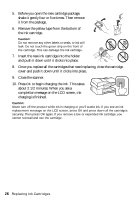
Yields vary considerably based on images printed, print settings, paper type, frequency of use, and temperature. For print quality, a small amount of ink remains in the cartridge after the "replace cartridge" indicator comes on. The product ships with full cartridges and part of the ink from the first cartridges is used for priming the product. For best printing results, use up a cartridge within six months of opening the package and before the expiration date on the cartridge box. Store ink cartridges in a cool, dark place. If cartridges have been exposed to cold temperatures, allow them to warm up to room temperature for at least 3 hours before using them. Replacing Ink Cartridges Make sure you have a new ink cartridge before you begin. Caution: Do not open ink cartridge packages until you are ready to install the ink. Cartridges are vacuum packed to maintain reliability. Leave the expended cartridge installed until you have obtained a replacement, or the ink remaining in the print head nozzles may dry out. 1. Turn on the product. 2. If an ink cartridge is low or expended, you see a message on the LCD screen indicating which color to replace. Press OK. If you're replacing a cartridge before you see a message on the LCD screen, press x Menu, press u or d to select Maintenance, and press OK. Then select Ink Cartridge Replacement and press OK. 3. Open the scanner, then open the cartridge cover. 4. Squeeze the tab on the cartridge and lift it up. Dispose of it carefully. Do not take the used cartridge apart or try to refill it. Warning: If ink gets on your hands, wash them thoroughly with soap and water. If ink gets into your eyes, flush them immediately with water. Keep ink cartridges out of the reach of children and don't drink the ink. Replacing Ink Cartridges 25
-
 1
1 -
2
-
3
-
4
-
5
-
6
-
7
-
8
-
9
-
10
-
11
-
12
-
13
-
14
-
15
-
16
-
17
-
18
-
19
-
 20
20 -
 21
21 -
 22
22 -
 23
23 -
 24
24 -
 25
25 -
 26
26 -
 27
27 -
 28
28 -
 29
29 -
 30
30 -
31
-
32
-
33
-
34
-
35
-
36
-
37
-
38
-
39
-
40
-
41
-
42
-
43
-
44
-
45
-
46
-
47
-
48
-
49
-
50
-
51
-
52
-
53
-
54
-
55
-
56
 |
 |