Epson WorkForce 320 User Manual - Page 26
cover and push it down until it clicks into place. - ink cartridges
 |
View all Epson WorkForce 320 manuals
Add to My Manuals
Save this manual to your list of manuals |
Page 26 highlights
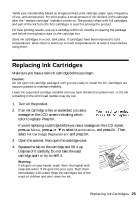
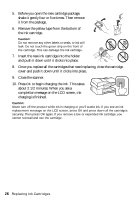
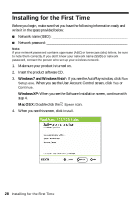
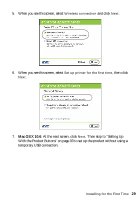
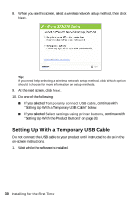
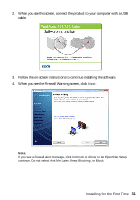
5. Before you open the new cartridge package, shake it gently four or five times. Then remove it from the package. 6. Remove the yellow tape from the bottom of the ink cartridge. Caution: Do not remove any other labels or seals, or ink will leak. Do not touch the green chip on the front of the cartridge. This can damage the ink cartridge. 7. Insert the new ink cartridge into the holder and push it down until it clicks into place. 8. Once you replace all the cartridges that need replacing, close the cartridge cover and push it down until it clicks into place. 9. Close the scanner. 10. Press OK to begin charging the ink. This takes about 2 1/2 minutes. When you see a completion message on the LCD screen, ink charging is finished. Caution: Never turn off the product while ink is charging or you'll waste ink. If you see an ink replacement message on the LCD screen, press OK and press down all the cartridges securely. Then press OK again. If you remove a low or expended ink cartridge, you cannot reinstall and use the cartridge. 26 Replacing Ink Cartridges
-
 1
1 -
2
-
3
-
4
-
5
-
6
-
7
-
8
-
9
-
10
-
11
-
12
-
13
-
14
-
15
-
16
-
17
-
18
-
19
-
20
-
 21
21 -
 22
22 -
 23
23 -
 24
24 -
 25
25 -
 26
26 -
 27
27 -
 28
28 -
 29
29 -
 30
30 -
 31
31 -
32
-
33
-
34
-
35
-
36
-
37
-
38
-
39
-
40
-
41
-
42
-
43
-
44
-
45
-
46
-
47
-
48
-
49
-
50
-
51
-
52
-
53
-
54
-
55
-
56
 |
 |
