Epson WorkForce 320 User Manual - Page 45
Faxing Problems, Print Quality Problems - ink cartridge
 |
View all Epson WorkForce 320 manuals
Add to My Manuals
Save this manual to your list of manuals |
Page 45 highlights
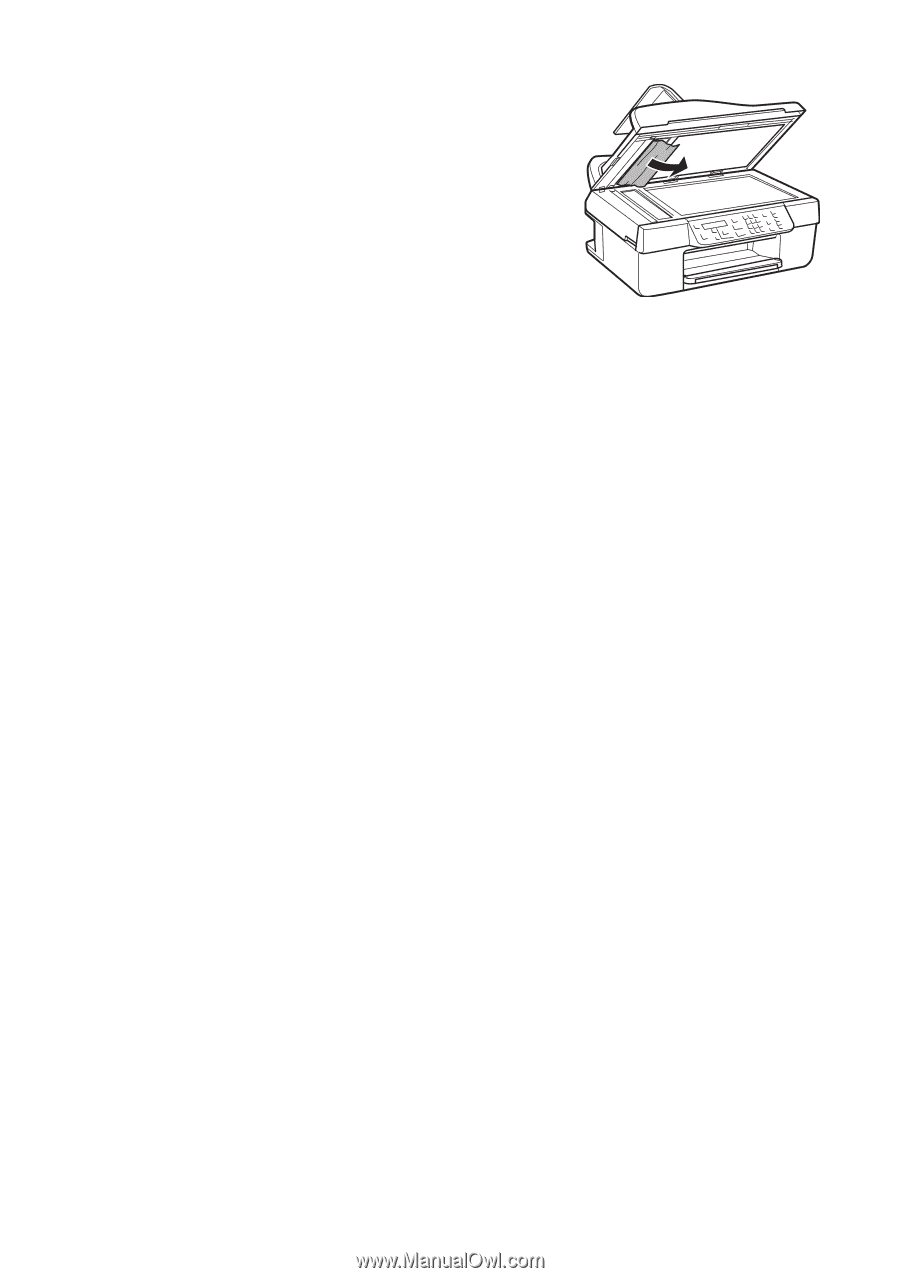
2. The message on the LCD screen asks if the paper has been removed. Press 1 to clear the message. 3. Lift the scanner cover, remove any jammed paper inside, and lower the scanner cover. 4. Close the ADF cover and reload the paper. Faxing Problems ■ Make sure the recipient's fax machine is turned on and working. ■ Make sure the LINE port on the product is connected to a telephone wall jack. Verify that the telephone wall jack works by connecting a phone to it. ■ Make sure the Auto Answer light is turned on to receive faxes automatically. ■ If your phone line includes voice mail answering services, calls or faxes may be inadvertently received by your voice mail service. ■ If the line has static, press r/K Copy/Fax, press x Menu, select Fax Settings, select Communication, and turn off the V.34 and ECM settings. ■ If the product is connected to a DSL phone line, you must have a DSL filter connected to the phone jack. Contact your DSL provider for the filter. ■ If you connected a telephone or answering machine, make sure it is connected to the EXT. port. Print Quality Problems ■ For the best print quality, use Epson papers (see page 5) and genuine Epson ink cartridges (see page 25). ■ If you notice light or dark bands across your printouts or they are too faint, run a nozzle check (see page 22) to see if the print head needs cleaning. ■ If you notice jagged vertical lines, you may need to align the print head. See the online User's Guide for instructions. ■ The ink cartridges may be low on ink. Check your cartridge levels (see page 23) and replace cartridges, if necessary (see page 25). ■ Clean the scanner glass with a soft, dry, lint-free cloth (paper towels are not recommended), or use a small amount of glass cleaner on a soft cloth, if necessary. Do not spray glass cleaner directly on the glass. Problems and Solutions 45
-
 1
1 -
2
-
3
-
4
-
5
-
6
-
7
-
8
-
9
-
10
-
11
-
12
-
13
-
14
-
15
-
16
-
17
-
18
-
19
-
20
-
21
-
22
-
23
-
24
-
25
-
26
-
27
-
28
-
29
-
30
-
31
-
32
-
33
-
34
-
35
-
36
-
37
-
38
-
39
-
 40
40 -
 41
41 -
 42
42 -
 43
43 -
 44
44 -
 45
45 -
 46
46 -
 47
47 -
 48
48 -
 49
49 -
 50
50 -
51
-
52
-
53
-
54
-
55
-
56
 |
 |