Epson WorkForce 630 User Manual - Page 50
Print a Network Status Sheet, For details, see the Epson Scan Help. - communication error
 |
View all Epson WorkForce 630 manuals
Add to My Manuals
Save this manual to your list of manuals |
Page 50 highlights
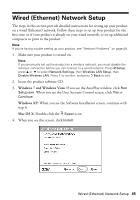
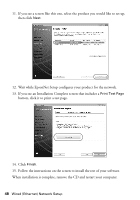
■ Make sure there aren't any access restrictions (such as MAC address filtering) set on the wireless router. If access restrictions are set, register the product's MAC address on the router. Print a Network Status Sheet (see page 50) to obtain the MAC address. Then see your router's manual for instructions. ■ If your wireless router has security enabled, make sure you entered the WEP key or WPA passphrase correctly. ■ Remove and reinsert the CD to reinstall your product software. (See page 31 if you need detailed instructions.) The product's WiFi light is on but you cannot print Your router might not be assigning IP addresses automatically using DHCP. If it isn't, you will need to set the product's IP address manually. Make sure it is set correctly for your network. Cannot scan over the network ■ Epson Scan is not available in Mac OS X 10.6; see page 25 for scanning instructions. ■ If you cannot scan from the product's control panel, make sure you restarted your computer after installing the product software. Make sure Epson Event Manager is not being blocked by your firewall or security software. ■ If you are scanning a large document at high resolution, a communication error may occur. If the scan did not complete, lower the resolution. ■ If network communication was interrupted while starting Epson Scan, exit Epson Scan, and restart it after a few seconds. If Epson Scan cannot restart, turn the product off and on, and then try again. Check the Timeout Setting in EPSON Scan Settings. For details, see the Epson Scan Help. Print a Network Status Sheet 1. Press F Setup. 2. Press u or d to select Network Settings, then press OK. 3. Press u or d to select Confirm Network Settings, then press OK. 4. Press the B&W or Color x Start button to print a network status sheet. 50 Problems and Solutions
-
 1
1 -
2
-
3
-
4
-
5
-
6
-
7
-
8
-
9
-
10
-
11
-
12
-
13
-
14
-
15
-
16
-
17
-
18
-
19
-
20
-
21
-
22
-
23
-
24
-
25
-
26
-
27
-
28
-
29
-
30
-
31
-
32
-
33
-
34
-
35
-
36
-
37
-
38
-
39
-
40
-
41
-
42
-
43
-
44
-
 45
45 -
 46
46 -
 47
47 -
 48
48 -
 49
49 -
 50
50 -
 51
51 -
 52
52 -
 53
53 -
 54
54 -
 55
55 -
56
-
57
-
58
-
59
-
60
-
61
-
62
-
63
-
64
 |
 |