Epson WorkForce 845 Quick Guide - Page 10
setting, select, image to fit your paper, or one of the specific sizes listed.
 |
View all Epson WorkForce 845 manuals
Add to My Manuals
Save this manual to your list of manuals |
Page 10 highlights
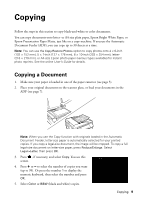
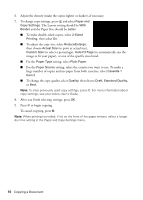
6. Adjust the density (make the copies lighter or darker), if necessary. 7. To change copy settings, press x and select Paper and Copy Settings. The Layout setting should be With Border and the Paper Size should be Letter. ■ To make double-sided copies, select 2-Sided Printing, then select On. ■ To adjust the copy size, select Reduce/Enlarge, then choose Actual Size (to print at actual size), Custom Size (to select a percentage), Auto Fit Page (to automatically size the image to fit your paper), or one of the specific sizes listed. ■ For the Paper Type setting, select Plain Paper. ■ For the Paper Source setting, select the cassette you want to use. To make a large number of copies and use paper from both cassettes, select Cassette 1 then 2. ■ To change the copy quality, select Quality, then choose Draft, Standard Quality, or Best. Note: To clear previously used copy settings, press C. For more information about copy settings, see your online User's Guide. 8. After you finish selecting settings, press OK. 9. Press x to begin copying. To cancel copying, press y. Note: When printing two-sided, if ink on the front of the paper smears, select a longer dry time setting in the Paper and Copy Settings menu. 10 Copying a Document
-
 1
1 -
2
-
3
-
4
-
 5
5 -
 6
6 -
 7
7 -
 8
8 -
 9
9 -
 10
10 -
 11
11 -
 12
12 -
 13
13 -
 14
14 -
 15
15 -
16
-
17
-
18
-
19
-
20
-
21
-
22
-
23
-
24
-
25
-
26
-
27
-
28
-
29
-
30
-
31
-
32
-
33
-
34
-
35
-
36
-
37
-
38
-
39
-
40
-
41
-
42
-
43
-
44
-
45
-
46
-
47
-
48
-
49
-
50
-
51
-
52
-
53
-
54
-
55
-
56
-
57
-
58
-
59
-
60
-
61
-
62
-
63
-
64
-
65
-
66
-
67
-
68
-
69
-
70
-
71
-
72
-
73
-
74
-
75
-
76
-
77
-
78
-
79
-
80
-
81
-
82
-
83
-
84
-
85
-
86
-
87
-
88
-
89
-
90
-
91
-
92
 |
 |