Epson XP-310 User Manual - Page 127
Options, Save File, Add Edit Close
 |
View all Epson XP-310 manuals
Add to My Manuals
Save this manual to your list of manuals |
Page 127 highlights
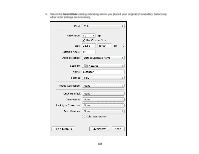
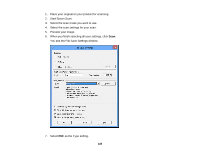
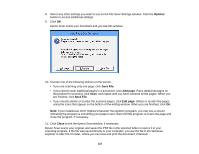
8. Select any other settings you want to use on the File Save Settings window. Click the Options button to access additional settings. 9. Click OK. Epson Scan scans your document and you see this window: 10. Choose one of the following options on the screen: • If you are scanning only one page, click Save File. • If you need to scan additional pages in a document, click Add page. Place additional pages on the product for scanning, click Scan, and repeat until you have scanned all the pages. When you are finished, click Save File. • If you need to delete or reorder the scanned pages, click Edit page. Delete or reorder the pages using the icons that appear on the bottom of the editing window. When you are finished, click OK. Note: If you installed an OCR (Optical Character Recognition) program, you may see a screen indicating the program is converting your page to text. Wait until the program re-scans the page and close the program, if necessary. 11. Click Close to exit the Epson Scan window, if necessary. Epson Scan scans your original, and saves the PDF file in the selected folder or opens it in your scanning program. If the file was saved directly to your computer, you see the file in the Windows Explorer or Mac OS X Finder, where you can view and print the document, if desired. 127
-
 1
1 -
2
-
3
-
4
-
5
-
6
-
7
-
8
-
9
-
10
-
11
-
12
-
13
-
14
-
15
-
16
-
17
-
18
-
19
-
20
-
21
-
22
-
23
-
24
-
25
-
26
-
27
-
28
-
29
-
30
-
31
-
32
-
33
-
34
-
35
-
36
-
37
-
38
-
39
-
40
-
41
-
42
-
43
-
44
-
45
-
46
-
47
-
48
-
49
-
50
-
51
-
52
-
53
-
54
-
55
-
56
-
57
-
58
-
59
-
60
-
61
-
62
-
63
-
64
-
65
-
66
-
67
-
68
-
69
-
70
-
71
-
72
-
73
-
74
-
75
-
76
-
77
-
78
-
79
-
80
-
81
-
82
-
83
-
84
-
85
-
86
-
87
-
88
-
89
-
90
-
91
-
92
-
93
-
94
-
95
-
96
-
97
-
98
-
99
-
100
-
101
-
102
-
103
-
104
-
105
-
106
-
107
-
108
-
109
-
110
-
111
-
112
-
113
-
114
-
115
-
116
-
117
-
118
-
119
-
120
-
121
-
 122
122 -
 123
123 -
 124
124 -
 125
125 -
 126
126 -
 127
127 -
 128
128 -
 129
129 -
 130
130 -
 131
131 -
 132
132 -
133
-
134
-
135
-
136
-
137
-
138
-
139
-
140
-
141
-
142
-
143
-
144
-
145
-
146
-
147
-
148
-
149
-
150
-
151
-
152
-
153
-
154
-
155
-
156
-
157
-
158
-
159
-
160
-
161
-
162
-
163
-
164
-
165
-
166
-
167
-
168
-
169
-
170
-
171
-
172
-
173
-
174
-
175
-
176
-
177
-
178
-
179
-
180
-
181
-
182
-
183
-
184
-
185
-
186
-
187
-
188
-
189
-
190
-
191
-
192
-
193
-
194
-
195
-
196
-
197
-
198
-
199
-
200
-
201
-
202
-
203
-
204
-
205
-
206
-
207
-
208
-
209
-
210
-
211
-
212
-
213
-
214
-
215
-
216
-
217
-
218
-
219
-
220
-
221
-
222
-
223
-
224
-
225
-
226
-
227
-
228
-
229
-
230
-
231
-
232
-
233
-
234
 |
 |
