Epson r-d1 User Manual - Addendum - firmware version 2.0 upgrade features.
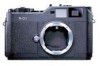
Epson r-d1 - Rangefinder Digital Camera Manual
 |
View all Epson r-d1 manuals
Add to My Manuals
Save this manual to your list of manuals |
Epson r-d1 manual content summary:
- Epson r-d1 | User Manual - Addendum - firmware version 2.0 upgrade features. - Page 1
User's Guide for cameras with firmware upgraded to version 2.0 - Epson r-d1 | User Manual - Addendum - firmware version 2.0 upgrade features. - Page 2
unauthorized modifications, repairs, or alterations to this product, or (excluding the U.S.) failure to strictly comply with Seiko Epson Corporation's operating and maintenance instructions. Seiko Epson Corporation shall not be liable for any damages or problems arising from the use of any options - Epson r-d1 | User Manual - Addendum - firmware version 2.0 upgrade features. - Page 3
2 Taking Photos Turning the Camera On and Off 18 Taking a Picture 18 Setting White Balance 19 Setting Image Quality 20 Setting ISO Sensitivity 21 Setting the Exposure 21 Setting the Shutter Speed Automatically 21 Setting the Shutter Speed Manually 22 Setting the Aperture 23 Using the Light - Epson r-d1 | User Manual - Addendum - firmware version 2.0 upgrade features. - Page 4
Opening a RAW Image 40 Using EPSON PhotoRAW 40 Using EPSON RAW Plug-In 40 Finding More Information 40 Chapter 6 Maintenance and Troubleshooting Setting the Time and Date 41 Calibrating the Status Gauge 42 Formatting the Memory Card 42 Cleaning the Camera Body 43 Cleaning the CCD Sensor 43 - Epson r-d1 | User Manual - Addendum - firmware version 2.0 upgrade features. - Page 5
are shooting with. Print optimized images The pictures you take using the R-D1 can be saved in unprocessed RAW format, which can be postprocessed for printing using the bundled software. We at Epson believe that photographic images, be they film-based or digital, are best expressed on printed media - Epson r-d1 | User Manual - Addendum - firmware version 2.0 upgrade features. - Page 6
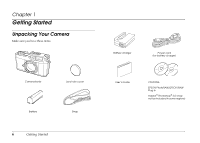
Chapter 1 Getting Started Unpacking Your Camera Make sure you have these items: Camera body Lens hole cover Battery 6 Getting Started Strap Battery charger Power cord (for battery charger) User's Guide CD-ROMs: EPSON PhotoRAW/EPSON RAW Plug-in Adobe® Photoshop® 2.0 (may not be included in - Epson r-d1 | User Manual - Addendum - firmware version 2.0 upgrade features. - Page 7
Camera Parts and Functions Front View 1 Rangefinder window 1 Images from this window are used to display the image superimposing field in the center of the finder frame. Bright-line frame illumination window 1 Receives light to illuminate bright-line frames in the viewfinder. Viewfinder - Epson r-d1 | User Manual - Addendum - firmware version 2.0 upgrade features. - Page 8
bottom of the viewfinder. Also used to recover from the power save mode. Dial-lock release button Unlocks the shutter speed dial from the AE position. Status gauge Displays the current settings: white balance, remaining battery power, the number of remaining shots, and image quality. (See "Status - Epson r-d1 | User Manual - Addendum - firmware version 2.0 upgrade features. - Page 9
Balance (WB) lever 1 Used to set image quality or white balance. (See "Setting Image Quality" and "Setting White Balance" on page 19 for details.) 1 Memory card access light Lights when a picture is being saved in the memory card. Flashes when there is an error or battery is low. 1 Memory - Epson r-d1 | User Manual - Addendum - firmware version 2.0 upgrade features. - Page 10
button Returns to the previous menu without making any settings. (USER) button Executes the preassigned function from the following: with the size of the memory card used. Image quality Indicates the image quality setting. (See "Setting Image Quality" on page 20 for details) R RAW/RAW+JPEG (High - Epson r-d1 | User Manual - Addendum - firmware version 2.0 upgrade features. - Page 11
to the other 1 side of the camera. 1 Using the Battery c 1 Caution: Only use the Epson lithium-ion battery (EU-85). Do not use any other make or model of battery under any circumstances. Charging the Battery 1 The camera comes with a lithium-ion battery (model EU 85). Be sure to 1 charge - Epson r-d1 | User Manual - Addendum - firmware version 2.0 upgrade features. - Page 12
1. Connect the power cord to the battery charger, then plug it into an electrical outlet. 2. Insert the battery into the battery charger with the terminal end first. The red indicator light on the charger lights up to indicate the battery is being charged. 12 Getting Started 3. When the - Epson r-d1 | User Manual - Addendum - firmware version 2.0 upgrade features. - Page 13
correctly. 1 ❏ If the memory card has been already formatted with a computer or another digital camera, you may not be able to save images on the card. If this happens, reformat the card using this camera. For instructions, see "Formatting the Memory Card" on page 42. 1 1 1 Getting Started 13 - Epson r-d1 | User Manual - Addendum - firmware version 2.0 upgrade features. - Page 14
Inserting a Memory Card 1. Make sure that the memory card is not locked. Slide the write protect switch to unlock the card if needed. Removing the Memory Card 1. Make sure the memory card access light is off, then open the memory card slot cover. Write protect switch 2. Make sure that the memory - Epson r-d1 | User Manual - Addendum - firmware version 2.0 upgrade features. - Page 15
.5 or the Elmar 50 mm F3.5 can be used with the camera as long as the lens barrel is not pushed into the camera body. Be very careful if using these types of lenses. ❏ Lenses that have an auxiliary viewfinder lens. These lenses cannot be used effectively because the baseline length is different from - Epson r-d1 | User Manual - Addendum - firmware version 2.0 upgrade features. - Page 16
you need an optional M-bayonet adapter ring. Attach the adapter ring to the lens, then install the lens on the camera as you would an M-mount lens. When you want to remove the lens, the procedure is the same as for 35 mm, or 50 mm to match the focal length of the lens being used. 16 Getting Started - Epson r-d1 | User Manual - Addendum - firmware version 2.0 upgrade features. - Page 17
Effective Focal Length The CCD sensor in this camera is an APS-C size, about 34% smaller than the area covered by 35 mm film. This effectively increases the working focal length of the attached lens by 1.53x to produce the equivalent 35 mm focal length. For example, if you use a 50 mm lens with - Epson r-d1 | User Manual - Addendum - firmware version 2.0 upgrade features. - Page 18
Chapter 2 Taking Photos Turning the Camera On and Off Turn on Turn off DUMMY Taking a Picture 1. Make sure the camera is turned on and a memory card is installed. 2. Before taking a picture, you may need to adjust the white balance, image quality setting, ISO sensitivity, exposure, and focus, - Epson r-d1 | User Manual - Addendum - firmware version 2.0 upgrade features. - Page 19
setting. sound that indicates the shutter release. 2 2 DUMMY 2 The selected setting is indicated on the status gauge: 2 Setting Description Setting the camera for different types of ambient light. You can either set automatically, or select the particular setting to suit the ambient light - Epson r-d1 | User Manual - Addendum - firmware version 2.0 upgrade features. - Page 20
, and the file size of image stored in a memory card. Select the image quality according to how you plan to use the image data. Image Format Images can be saved in RAW format, JPEG format, or both file types at the same time if RAW+JPG is selected as the Raw Setting in the Settings menu (see page - Epson r-d1 | User Manual - Addendum - firmware version 2.0 upgrade features. - Page 21
blurring, but it also amplifies any digital noises caught in an image, which can produce a picture with a grainy appearance. To set ISO sensitivity, pull up and rotate manual exposure, you have more control over how 2 your pictures will be exposed. Setting the Shutter Speed Automatically 2 Use - Epson r-d1 | User Manual - Addendum - firmware version 2.0 upgrade features. - Page 22
use automatic exposure, rotate the shutter speed dial to the AE position. Setting the Shutter Speed Manually You can specify the shutter speed from 1 to 1/2000 sec., or B (Bulb). To set blurring, set the shutter speed faster than "1/focal length (mm)." If using a slower shutter speed, the use of a - Epson r-d1 | User Manual - Addendum - firmware version 2.0 upgrade features. - Page 23
Meter 2 The camera has a built-in light meter that calculates the best shutter speed for the amount of light available through the lens. Press the shutter release button halfway to view the metered shutter speed (in red) at the bottom of the viewfinder, then adjust the exposure settings 2 as - Epson r-d1 | User Manual - Addendum - firmware version 2.0 upgrade features. - Page 24
indicate that it is a compensated value. Locking the Exposure Setting (AE-lock) You can lock the exposure setting at the metered value using the AE-lock button. This is useful, for example, when you create a single panoramic picture from a series of images, to make sure they all have the same level - Epson r-d1 | User Manual - Addendum - firmware version 2.0 upgrade features. - Page 25
camera's viewfinder has a magnification of 1.0x, which allows you to keep both eyes open when focusing on your subject. When focusing, keep your eye in the center of the rangefinder eyepiece for the best result. To focus on a subject, rotate the lens focusing ring until the double-image converges - Epson r-d1 | User Manual - Addendum - firmware version 2.0 upgrade features. - Page 26
and Managing Photos Opening the LCD Monitor 1. Pull open the rear panel using the notch at the bottom. 3. Push the panel back into place. DUMMY Notch 2. Gently rotate the panel clockwise until the LCD monitor faces outward. DUMMY c Caution: ❏ Do not pick up or handle the camera by the rear - Epson r-d1 | User Manual - Addendum - firmware version 2.0 upgrade features. - Page 27
camera returns to shooting mode: ❏ Press the (LCD) button ❏ Press the shutter release button ❏ Invert the LCD monitor 3 Monitor icons Current image/ total images position) clockwise or counterclockwise. Indicates you can scroll the image horizontally by rotating the jog dial (upper position). - Epson r-d1 | User Manual - Addendum - firmware version 2.0 upgrade features. - Page 28
steps to see more photo information: 1. Display an image on the LCD monitor. 2. Pull up the jog dial to the upper position, then rotate it to display the desired set of information about the image. Note: ❏ When the battery is running low, the the jog dial icon. (battery) icon appears above ❏ When - Epson r-d1 | User Manual - Addendum - firmware version 2.0 upgrade features. - Page 29
General Information File sequence number Image quality Indicates this image is locked Number of prints (if DPOF is set) Date and time this image was taken Exposure Histogram Shows the densities of shadow and highlight areas occupied in the image. Highlight Outlines and flashes highlight areas. - Epson r-d1 | User Manual - Addendum - firmware version 2.0 upgrade features. - Page 30
includes the following: ❏ File name (file number and format) ❏ Image size (image quality) ❏ Color (color/monochrome) setting. If monochrome is set, the color of the filter is also displayed. ❏ Shutter speed. If the image was taken using the AE feature, AE and the exposure compensation value (if - Epson r-d1 | User Manual - Addendum - firmware version 2.0 upgrade features. - Page 31
image back to the oldest one. The reverse 4. Select Delete 1 image or Delete all images using image, you can select an image Images" on page 32 for details. 3 ❏ If the memory card is locked, the message "Cannot delete. The SD card is write-protected" is displayed. Remove the card from the camera - Epson r-d1 | User Manual - Addendum - firmware version 2.0 upgrade features. - Page 32
be Printed (DPOF Setting) This feature allows you to specify the number of prints for the images you want to print from a printer, application, or photo lab that supports Digital Print Order Format (DPOF). Note: This feature is not available for images saved in RAW format. 1. Display an image on the - Epson r-d1 | User Manual - Addendum - firmware version 2.0 upgrade features. - Page 33
jog dial, then press the (ENTER) button. 4. Select Set DPOF for one for the displayed image, or Set DPOF for all for all the images using the jog dial (upper position), then press the (ENTER) button. Note: ❏ To select another image, rotate the jog dial in the lower position. ❏ To view the current - Epson r-d1 | User Manual - Addendum - firmware version 2.0 upgrade features. - Page 34
the LCD screen to adjust camera settings. Accessing the Settings Menu 1. Press (LCD) then (MENU) to display the main menu on the LCD monitor. Using the Jog Dial Rotate the jog dial clockwise or counterclockwise to display the previous or next menu or photo. The jog dial is used in either the raised - Epson r-d1 | User Manual - Addendum - firmware version 2.0 upgrade features. - Page 35
the convenience of viewing the JPEG image on most computers while retaining the RAW data for postprocessing, at an increase in image size and memory card access time. Setting (Film Setting) Description Allows you to quickly switch film profiles to best 4 suit the shooting subject or environment - Epson r-d1 | User Manual - Addendum - firmware version 2.0 upgrade features. - Page 36
, German, Italian, Spanish, Dutch, T (Traditional)-Chinese Setting Description Calibrate Needles Displays the Needle Calibration menu to adjust the status gauge needles: E (number of remaining shots), R (image quality), E (remaining battery power), and A (white balance). Dead Pixel Correction - Epson r-d1 | User Manual - Addendum - firmware version 2.0 upgrade features. - Page 37
Setting Assign USER Button Description You can assign one of the following functions to the (USER) button: Delete, Lock, Magnify, Print, and Film. By default, Delete is assigned to this button. Note: The (USER) button does not function in the tile display mode. Customizing the Settings 4 - Epson r-d1 | User Manual - Addendum - firmware version 2.0 upgrade features. - Page 38
included on the CD-ROM that came with your camera: ❏ EPSON PhotoRAW is a standalone application that can process multiple RAW images at one time using the batch feature. ❏ EPSON RAW Plug-In lets you process your images using Adobe Photoshop (versions 7, CS, CS2, and Elements 2 and 3). System - Epson r-d1 | User Manual - Addendum - firmware version 2.0 upgrade features. - Page 39
to uninstall the RAW Plug-in, follow the instructions below. Windows: Click Start, point to Settings, and select Control Panel, Add/Remove 5 Programs, and then click EPSON RAW Plug-In. Macintosh: 5 Delete the EPSON folder in the plug-in folder of Adobe Photoshop. 5 Opening RAW Images on Your - Epson r-d1 | User Manual - Addendum - firmware version 2.0 upgrade features. - Page 40
Opening a RAW Image Be sure to copy your RAW image files to your hard disk before trying to open and process them. Working with them while they are still on the memory card will take a very long time. Using EPSON PhotoRAW Click Start, point to All programs (or Programs), and select EPSON PhotoRAW, - Epson r-d1 | User Manual - Addendum - firmware version 2.0 upgrade features. - Page 41
time or date. 6 2. Select (Settings), (Basic Setup), then Time and Date using the jog dial, then press the (ENTER) button. Note: If you remove the battery from the camera, the date and time settings will be 6 lost after approximately two days. 6 6 6 6 Maintenance and Troubleshooting 41 - Epson r-d1 | User Manual - Addendum - firmware version 2.0 upgrade features. - Page 42
card has been formatted with a computer or another digital camera and you cannot save any images on the card. Follow these steps: 1. Press (LCD) then (MENU) to display the main menu on the LCD monitor. 2. Select (Settings) then (Format SD Card) using the jog dial, then press (ENTER). 3. Select Quick - Epson r-d1 | User Manual - Addendum - firmware version 2.0 upgrade features. - Page 43
. ❏ Do not use abrasive cleaners. ❏ If necessary, clean the battery contacts with a dry cloth. Cleaning the CCD Sensor If dark spots appear on the same place on all the pictures you take, there may be dust particles on the CCD image sensor inside the camera. To clean the CCD sensor, you need a hand - Epson r-d1 | User Manual - Addendum - firmware version 2.0 upgrade features. - Page 44
case. Do not store the camera in following conditions: ❏ Direct sunlight or bright light ❏ High humidity ❏ High heat ❏ Excessive dirt or dust ❏ Excessive vibrations ❏ Strong magnetic fields Troubleshooting Error Messages Message Remedy Cannot delete. The image is locked. Unlock the image using - Epson r-d1 | User Manual - Addendum - firmware version 2.0 upgrade features. - Page 45
common problems. You can download documentation, get FAQs and troubleshooting advice, or e-mail Epson with your questions. 6 Speak to a Support Representative Before you call Epson for support, please have the following 6 information ready: ❏ Product name (Epson Rangefinder Digital Camera R-D1 - Epson r-d1 | User Manual - Addendum - firmware version 2.0 upgrade features. - Page 46
Battery Charger Low Voltage Directive 73/23/EEC EMC Directive 89/336/EEC EN60950 EN55022 Class B EN55024 46 Appendix Specifications General Model type: Dimensions: Weight: Temperature: Humidity: (without condensation) External interfaces: Lens-interchangeable rangefinder digital camera - Epson r-d1 | User Manual - Addendum - firmware version 2.0 upgrade features. - Page 47
System Image sensor: Primary-color filter CCD (APS size: 23.7 × 15.6 mm) Pixels: 6.1 M Lens mount: EM mount (M-type bayonet mount; L-type screw mount with an optional adapter ring) Viewfinder: Real image range finder type see-through viewfinder Viewfinder magnification: 1.0x Rangefinder - Epson r-d1 | User Manual - Addendum - firmware version 2.0 upgrade features. - Page 48
nine more pictures at 30 second intervals before turning off the camera and removing the battery for 10 minutes and repeating this procedure, while using the flash - which is attached to the accessory shoe - on full for every second shot, with a shutter speed of 1/125, ISO of 200, image quality of - Epson r-d1 | User Manual - Addendum - firmware version 2.0 upgrade features. - Page 49
the affected area thoroughly with water and seek medical treatment. If a battery is swallowed, seek medical treatment immediately. ❏ Use only an Epson Li-ion battery for this camera, as specified in this manual. ❏ Do not use the battery that comes with this product for other devices. ❏ To protect - Epson r-d1 | User Manual - Addendum - firmware version 2.0 upgrade features. - Page 50
, overheating, or electric shock. These safety and operating instructions should be kept for future reference. ❏ Use only the Epson battery charger provided to charge the Epson Li-ion battery Model EU-85. Never attempt to charge other types of batteries in this charger as they may explode, leak - Epson r-d1 | User Manual - Addendum - firmware version 2.0 upgrade features. - Page 51
the cord's ampere rating. ❏ Never disassemble, modify, or attempt to repair the battery charger by yourself except as specifically explained in this guide. ❏ Do not use power outlets controlled by wall switches or automatic timers. ❏ Do not use power outlets on the same circuit as large motors or - Epson r-d1 | User Manual - Addendum - firmware version 2.0 upgrade features. - Page 52
comply with the limits for a Class B digital device, pursuant to Part 15 of the uses, and can radiate radio frequency energy and, if not installed and used in accordance with the instructions . It is the responsibility of the user to obtain and use a shielded equipment interface cable with this - Epson r-d1 | User Manual - Addendum - firmware version 2.0 upgrade features. - Page 53
B Personal Computers and Peripherals; and/or CPU Boards and Power Supplies used with Class B Personal Computers: We: Located at: EPSON AMERICA, INC. MS 3-13 3840 Kilroy Airport Way Long Beach, undesired operation. Trade Name: Type of Product: Model: EPSON Digital Still Camera G911A Appendix 53 - Epson r-d1 | User Manual - Addendum - firmware version 2.0 upgrade features. - Page 54
, 42 cleaning camera, 43 CCD sensor, 43 54 Index contacting Epson, 45 customer support, 45 D dial-lock release button, 8 display icons, 27 E EPSON PhotoRAW, 39 F flash, 23 focal length conversion scale, 9 focusing, 25 format memory card, 42 frame selector lever, 8 I icons, 27 image quality, 10
-
 1
1 -
 2
2 -
 3
3 -
 4
4 -
 5
5 -
 6
6 -
 7
7 -
8
-
9
-
10
-
11
-
12
-
13
-
14
-
15
-
16
-
17
-
18
-
19
-
20
-
21
-
22
-
23
-
24
-
25
-
26
-
27
-
28
-
29
-
30
-
31
-
32
-
33
-
34
-
35
-
36
-
37
-
38
-
39
-
40
-
41
-
42
-
43
-
44
-
45
-
46
-
47
-
48
-
49
-
50
-
51
-
52
-
53
-
54
 |
 |

User’s Guide
for cameras with firmware upgraded to version 2.0