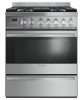
Fisher and Paykel OR30SDPWGX1 User Guide
Fisher and Paykel OR30SDPWGX1 Manual
 |
View all Fisher and Paykel OR30SDPWGX1 manuals
Add to My Manuals
Save this manual to your list of manuals |
Fisher and Paykel OR30SDPWGX1 manual content summary:
- Fisher and Paykel OR30SDPWGX1 | User Guide - Page 1
Freestanding range OR30SDPWGX model Cuiseur indépendant OR30SDPWGX model User guide Guide d'utilisation US CA - Fisher and Paykel OR30SDPWGX1 | User Guide - Page 2
-TIP DEVICE PACKED WITH COOKER • SEE INSTALLATION INSTRUCTIONS WARNING ! If the information in this manual is not followed exactly, a fire or instructions. • lf you cannot reach your gas supplier, call the fire department. - Installation and service must be performed by a qualified installer, service - Fisher and Paykel OR30SDPWGX1 | User Guide - Page 3
accessible. • The installer should leave these instructions with the consumer who should retain for current CSA C22.1 Canadian Electrical Codes Part 1 and/or local codes. INSTALLATION equipment should be made by a licensed plumber. A manual shutoff valve must be installed in an accessible location in - Fisher and Paykel OR30SDPWGX1 | User Guide - Page 4
- Fisher and Paykel OR30SDPWGX1 | User Guide - Page 5
risk from substances in fuel or from fuel combustion, make sure this appliance is installed, operated, and maintained according to the manufacturer's instructions. This appliance is designed and manufactured solely for the cooking of domestic (household) food and is not suitable for any non-domestic - Fisher and Paykel OR30SDPWGX1 | User Guide - Page 6
air. WARNING!! ELECTRICAL GROUNDING INSTRUCTIONS The cooker must be electrically parts are available from factory 9. Air Supply and Ventilation authorized parts distributors. Contact the nearest parts 12. When installing or removing the cooker for service, a rolling lift jack should be used. Do - Fisher and Paykel OR30SDPWGX1 | User Guide - Page 7
work should be carried out by qualified service personnel only. • Danger of burns! The use kitchen cloths and gloves when handling hot parts or utensils. • Stand away from the cooker can be used with no restriction. In that case follow the instructions in the chapter "How to use the top burners". - - Fisher and Paykel OR30SDPWGX1 | User Guide - Page 8
1 features 1 4 2 3 Fig. 1.1 GAS BURNERS 1. Rear left Semi-rapid burner (SR) - 8000 BTU/hr 2. Rear right Semi-rapid burner (SR) - 8000 BTU/hr 3. Front right Dual burner (D) - 17000 BTU/hr 4. Front left Dual burner (D) - 17000 BTU/hr Note: • The electric gas-lighting device is incorporated into - Fisher and Paykel OR30SDPWGX1 | User Guide - Page 9
10 12 11 1 9 7 6 5 1 2 3 4 8 Fig. 1.2 CONTROLS DESCRIPTION Gas cooking hob controls: 1. Front left burner (4) control dial 2. Rear left burner (1) control dial 3. Rear right burner (2) control dial 4. Front right burner (3) control dial Oven controls: 5. Function selector dial 6. - Fisher and Paykel OR30SDPWGX1 | User Guide - Page 10
2 OFF how to use the top burners GAS BURNERS (Semi-rapid) Gas flow to the burners is adjusted by turning the dials (illustrated in fig. 2.1) which control the valves. Turning the dial so that the symbols printed on the dial point to the mark on the bezel achieves the following functions: Dial - Fisher and Paykel OR30SDPWGX1 | User Guide - Page 11
LIGHTING GAS BURNERS FITTED WITH FLAME FAILURE SAFETY DEVICE (Semi-rapid burners) In order to light the burner, you must: 1. Push and turn the dial in an counter-clockwise direction up to the HI position (maxi- mum rate), push in and hold the dial until the flame has been lit (fig. 2.2). The sparks - Fisher and Paykel OR30SDPWGX1 | User Guide - Page 12
2 12 GAS BURNERS (Dual) The Dual Burner is a very flexible burner which allows different regulations for optimal cooking. It is composed by one inner and one outer crown; the flame of the inner crown can be regulated separately from the flames of the outer crown. The Dual Burner can be used: • As a - Fisher and Paykel OR30SDPWGX1 | User Guide - Page 13
LIGHTING GAS BURNERS FITTED WITH FLAME FAILURE SAFETY DEVICE (Dual burners) In order to light the burner, you must: 1. Push and turn the dial in an counter-clockwise direction up to the position (maximum rate of inner + outer crown); push in and hold the dial until the flame has been lit (fig. - Fisher and Paykel OR30SDPWGX1 | User Guide - Page 14
USE OF DUAL BURNER (Fig. 2.6a - 2.6b) The flat-bottomed pans are to be placed directly onto the pan-support. When using a WOK you need to place the supplied wok support on the pan supports for the burner to avoid any faulty operation of the Dual burner (Figs. 2.6a - 2.6b). IMPORTANT: The special - Fisher and Paykel OR30SDPWGX1 | User Guide - Page 15
steam. Do not use a towel or other bulky cloth in place of potholders. Do not let potholders touch hot heating element located in the upper part of the drawer. • Do not use aluminum foil to line the drawer. Foil is an excellent heat insulator and will trap heat beneath it. This - Fisher and Paykel OR30SDPWGX1 | User Guide - Page 16
3 Dial position LO (min) between LO (min) and HI (max) HI (max) °F 86 from 87 to 202 203 °C 30 from 31 to 94 95 TEMPERATURE SELECTOR The setting can be anywhere between LO (min) and HI (max) position. WARNING LIGHT The warning light is located above the control dial and turns "ON' when the - Fisher and Paykel OR30SDPWGX1 | User Guide - Page 17
how to use the self cleaning oven 4 GENERAL FEATURES The oven has special operating features. Five different functions can be used to satisfy all cooking needs; it also has a self cleaning function which can clean the oven cavity at high temperature, a defrost function and an oven light function. - Fisher and Paykel OR30SDPWGX1 | User Guide - Page 18
4 Fig. 4.1 SELECTING THE FUNCTIONS (figs. 4.1, 4.2a, 4.2b) The function is selected by turning the function selector dial and matching the marking on the dial with the reference mark on the bezel. IMPORTANT NOTE FOR THE COOKING FUNCTIONS: Once selecting the function and temperature (the - Fisher and Paykel OR30SDPWGX1 | User Guide - Page 19
4 (Traditional Convection Cooking) The upper and lower heating elements switch on. The heat is diffused by natural convection and the temperature must be set between 120°F (50°C) and 535°F (280°C). On selecting this function the electronic programmer starts cooking with a pre-heating temperature set - Fisher and Paykel OR30SDPWGX1 | User Guide - Page 20
from the electrical supply and contact the Service Centre. GENERAL INFORMATION • In this function the filtered by a special catalyst in the upper part of the appliance. • Smells and fumes produced problems are described in the following sections: - "HOW TO START THE SELF CLEANING CYCLE"; - "PROBLEMS - Fisher and Paykel OR30SDPWGX1 | User Guide - Page 21
SELECTING °F/°C ON THE DISPLAY 1 1. Turn the oven selector dial to a cooking function (i.e. ). 2. Press on the programmer (or use the temperature dial) to reduce the temperature until you reach the minimum value (120°F/50°C). 3. Press on the programmer. 4. Keep (the temperature flashes) until - Fisher and Paykel OR30SDPWGX1 | User Guide - Page 22
4 2 II I I I I I I I A I I 3 A A OFF 4 A HOW TO START THE SELF CLEANING CYCLE Important: The self cleaning cycle must only be performed with the oven empty; so, before starting the cycle take all the accessories (shelves, drip tray, ...) out of the oven cavity and dry any traces of overfl - Fisher and Paykel OR30SDPWGX1 | User Guide - Page 23
PROBLEMS ON STARTING AND DURING THE SELF CLEA- NING CYCLE 1. "door" • Repeat the operations to start the self cleaning cycle. • If after several attempts the message continues contact the Service Centre. Caution: It is advisable not to stop the self cleaning cycle and then start it again when it is - Fisher and Paykel OR30SDPWGX1 | User Guide - Page 24
4 HOW TO STOP THE SELF CLEANING CYCLE A 1. Turn the function selector to OFF (oven OFF). If the oven cavity temperature is higher than 570°F (300°C): • "Hot" appears on the programmer display. • When the oven cavity temperature drops below 570°F (300°C): - the door locked pilot light goes out; - - Fisher and Paykel OR30SDPWGX1 | User Guide - Page 25
4 ABNORMAL SITUATIONS AND/OR OPERATION PROBLEMS during cooking or the self cleaning cycle 1 A 1. "F000" or "F001" appear during cooking or self cleaning cycle Oven temperature sensor is broken or not working - Fisher and Paykel OR30SDPWGX1 | User Guide - Page 26
4 COOKING ADVICE It is advisable to handle the oven accessories using oven gloves. STERILIZATION Sterilization of foods to be conserved, in full and hermetically sealed jars, is done in the following way: a. Turn the switch to position (convection cooking with ventilation). b. Set the - Fisher and Paykel OR30SDPWGX1 | User Guide - Page 27
4 1ST STEP 2ND STEP 3RD STEP 4TH STEP 5TH STEP Fig. 4.3 BROILING Very important: the broil element must always be used with the oven door closed. • Position the broiling pan on the first or second level from the top (fig. 4.3). • Turn on the broil element, as explained in the preceding paragraphs - Fisher and Paykel OR30SDPWGX1 | User Guide - Page 28
programmer has an electronic clock (12 hours) with luminous figures which indicate hours and minutes. Note: It is not possible to set the time during a manual or automatic/semi-automatic cooking. 1. Press buttons and at the same time; the time will flash on the display 2. Press buttons or until the - Fisher and Paykel OR30SDPWGX1 | User Guide - Page 29
signal. IMPORTANT WARNING: This function is only an electronic alarm and does not switch OFF the oven. Remember to turn to OFF (oven OFF) manually the se- lector dial at the end of the countdown. 1 AUTOMATIC COOKING - Start cooking at the programmed time and switch the oven off automatically - Fisher and Paykel OR30SDPWGX1 | User Guide - Page 30
5 CANCELLING A SET PROGRAM To cancel any program just press the and at the same time for more than 3 seconds or turn the function selector dial to OFF (oven OFF). Note: If during a set program the function selector dial is turned to foods) or to another cooking function, the program is cancelled. - Fisher and Paykel OR30SDPWGX1 | User Guide - Page 31
that may cause injury. ENAMELLED PARTS • All the enamelled parts must be cleaned with a sponge correctly positioned - failure to do so can cause serious problems. • Check that the probe "T" (figs. 6.1, "S" (figs. 6.1, 6.3) is always clean to ensure trouble-free sparking. • Note: To avoid damage to the - Fisher and Paykel OR30SDPWGX1 | User Guide - Page 32
see figs. 6.1 and 6.2 ). Failure to do so can cause serious problems. CORRECT POSITION OF THE T DUAL BURNERS The Dual burner must be correctly positioned The inner flame spreader can be removed ONLY by an authorised service agent. Damage to the appliance will occur if not observing this condition - Fisher and Paykel OR30SDPWGX1 | User Guide - Page 33
burner does not function correctly and it is not possible to clean out any incrustations or dirt from the two holes, contact the After-Sales Service. Fig. 6.5 Fig. 6.7 Fig. 6.8 H Fixing screws Fig. 6.6 Inner flame spreader 33 - Fisher and Paykel OR30SDPWGX1 | User Guide - Page 34
the front fixing screw only. 4. Slide the side rack clear of the rear lock stud and remove. FITTING AND REMOVING THE SLIDING SHELF SUPPORTS When fitting the sliding shelf supports, make sure that you fit: - the side racks the slides to the top wire of a shelf position - both sides of each pair of - Fisher and Paykel OR30SDPWGX1 | User Guide - Page 35
in reverse order. Bigger guard rail Stop notch Fig. 6.9 Stop notch REPLACING THE OVEN LIGHT (fig. 6.10) Before any maintenance is started involving electrical parts of the appliance, it must be disconnected from the power supply. • Let the oven cavity and the heating elements cool down. • Switch - Fisher and Paykel OR30SDPWGX1 | User Guide - Page 36
is empty before removing. REMOVING THE WARMING DRAWER 1. Open the drawer completely (fig. 6.11) 2. Move down the lever of left guide (fig. 6.12) and up the lever of right guide (fig. 6.13). 3. Remove the drawer; the levers have to be keep moved (fig. 6.11). 2 3 2 Fig. 6.13 Fig. 6.12 Fig. 6.11 - Fisher and Paykel OR30SDPWGX1 | User Guide - Page 37
(fig. 6.15b). • Hold the door as shown in fig. 6.15. • Gently close the door (fig. 6.15c) until left and right hinge levers "A" are hooked to part "B" of the door (fig. 6.15b) • Withdraw the hinge hooks from their location following arrow "C" (fig. 6.15d). • Rest the door on a soft surface. REFITTING THE - Fisher and Paykel OR30SDPWGX1 | User Guide - Page 38
yourself. Refer to the installation instructions and your user guide and check that: 1 Your product is correctly installed. 2 You are familiar with its normal operation. If after checking these points you still need assistance or parts, please refer to the Service & Warranty book for warranty - Fisher and Paykel OR30SDPWGX1 | User Guide - Page 39
devrait être toujours accessible. • L'installateur doit confier ces instructions au consommateur qui les conservera pour l'usage de l'inspecteur local et par un technicien qualifié. Par mesure de sécurité et pour faciliter le service, un robinet d'arrêt de gaz manuel doit être installé dans le - Fisher and Paykel OR30SDPWGX1 | User Guide - Page 40
CUISINIÈRE • CONSULTEZ LES INSTRUCTIONS D'INSTALLATION MISE EN GARDE ! Le fait de ne pas suivre toutes les instructions de ce manuel peut S'il vous est impossible de joindre votre fournisseur de gaz, appelez le service d'incendie. - L'installation et l'entretien doivent être effectués par un - Fisher and Paykel OR30SDPWGX1 | User Guide - Page 41
Cher client, Nous vous remercions d'avoir acheté et préféré notre produit. Les mesures de sécurité et les recommandations ci-dessous sont pour votre propre sécurité et pour celle des autres. Elles permettront également de profiter au maximum des fonctions offertes par votre appareil. Veuillez ranger - Fisher and Paykel OR30SDPWGX1 | User Guide - Page 42
une cuisinière (plutôt que d'utiliser un timon rouleur) augmente également les risques de déformation des tiges ou des connecteurs de couplage internes. AVERTISSEMENT!! INSTRUCTIONS DE MISE À LA TERRE La cuisinière doit être mise à la terre conformément aux codes locaux ou, en l'absence de ceux-ci - Fisher and Paykel OR30SDPWGX1 | User Guide - Page 43
CONSIGNES ET RECOMMANDATIONS IMPORTANTES Après avoir déballé l'appareil, assurez-vous qu'il n'est pas endommagé. Si vous n'êtes pas certain, ne l'utilisez pas et consultez votre fournisseur ou un technicien professionnel qualifié. Les éléments d'emballage (sacs de plastique, mousse de polystyrène, - Fisher and Paykel OR30SDPWGX1 | User Guide - Page 44
1 caractéristiques 1 4 2 3 Fig. 1.1 SURFACE DE CUISSON 1. Brûleur semi-rapide (SR) arrière gauche - 8 000 BTU/h 2. Brûleur semi-rapide (SR) arrière droit - 8 000 BTU/h 3. Brûleur double (D) avant droit - 17 000 BTU/h 4. Brûleur double (D) avant gauche - 17 000 BTU/h Remarque : • Le dispositif - Fisher and Paykel OR30SDPWGX1 | User Guide - Page 45
10 12 11 1 9 7 6 5 1 2 3 4 8 Fig. 1.2 DESCRIPTION DES COMMANDES Commandes des brûleurs supérieurs: 1. Bouton de commande du brûleur avant gauche (4) 2. Bouton de commande du brûleur arrière gauche (1) 3. Bouton de commande du brûleur arrière droit (2) 4. Bouton de commande du brûleur - Fisher and Paykel OR30SDPWGX1 | User Guide - Page 46
2 comment utiliser les brûleurs supérieurs BRÛLEURS À GAZ (Semi-rapide) Vous pouvez ajuster l'alimentation en gaz des brûleurs en tournant les boutons (fig. 2.1) qui contrôlent les soupapes. En tournant le bouton de façon à ce que les symboles qui y sont imprimés pointent vers ceux imprimés sur la - Fisher and Paykel OR30SDPWGX1 | User Guide - Page 47
ALLUMAGE DES BRÛLEURS À GAZ MUNIS D'UN DISPOSITIF DE SÉCURITÉ EN CAS D'EXTINCTION DES FLAMMES (Brûleurs semi-rapides) Pour allumer le brûleur, vous devez procéder de la façon suivante : 1. Poussez et tournez le bouton dans le sens antihoraire jusqu'à la position HI (ou- verture maximale). Enfoncez - Fisher and Paykel OR30SDPWGX1 | User Guide - Page 48
2 48 BRÛLEURS À GAZ (Double) Le brûleur double est un brûleur très flexible qui comporte différents réglages et permet une cuisson optimale. Il est composé d'une couronne intérieure et d'une couronne extérieure; les flammes de la couronne intérieure peuvent être réglées indépendamment des flammes de - Fisher and Paykel OR30SDPWGX1 | User Guide - Page 49
ALLUMAGE DES BRÛLEURS À GAZ MUNIS D'UN DISPOSI- TIF DE SÉCURITÉ EN CAS D'EXTINCTION DES FLAMMES (Brûleurs doubles) Pour allumer le brûleur, vous devez procéder de la façon suivante : 1. Poussez et tournez le bouton dans le sens antihoraire jusqu'à la position (ouverture maximale). Enfoncez et - Fisher and Paykel OR30SDPWGX1 | User Guide - Page 50
éviter d'endommager le brûleur double (fig. 2.6a, 2.6b). IMPORTANT: La grille spéciale conçue pour les woks (fig. 2.6b) DOIT ÊTRE PLACÉE SEULEMENT sur le support de plat conçu pour le brûleur double. Fig. 2.6b 50 Assurez-vous que la poignée des ustensiles ne dépasse pas du rebord de la - Fisher and Paykel OR30SDPWGX1 | User Guide - Page 51
laissez-la en place lors du préchauffage. • Préchauffez un plat de service vide en même temps que vous préchauffez le tiroir. • Mettez les aliments cuits et chauds dans un ustensile de cuisson ou dans des plats de service qui résistent à la chaleur. • Les aliments peuvent être conservés au chaud - Fisher and Paykel OR30SDPWGX1 | User Guide - Page 52
3 Position du bouton LO (min) entre LO (min) et HI (max) HI (max) °F 86 de 87 à 202 203 °C 30 de 31 à 94 95 SÉLECTEUR DE TEMPÉRATURE Vous pouvez régler la température à n'importe quelle position entre LO (min) and HI (max). VOYANT AVERTISSEUR Le voyant avertisseur est situé au-dessus du bouton - Fisher and Paykel OR30SDPWGX1 | User Guide - Page 53
comment utiliser le four autonettoyant 4 CARACTÉRISTIQUES GÉNÉRALES Le four comporte des caractéristiques de fonctionnement spéciales. Cinq fonctions différentes sont mises à votre disposition pour satisfaire tous vos besoins de cuisson. La cuisinière comporte aussi une fonction autonettoyante qui - Fisher and Paykel OR30SDPWGX1 | User Guide - Page 54
de la fonction et de la température (la température clignote sur l'écran d'affichage du programmateur - fig. 4.2a), appuyez sur le bouton ("START", départ) du programmateur pour démarrer la cuisson (la température et le symbole appa- raissent en continu sur l'écran d'affichage du programmateur - Fisher and Paykel OR30SDPWGX1 | User Guide - Page 55
4 (Cuisson à Convection Classique) Les éléments chauffants supérieur et inférieur se mettent en marche. La chaleur est diffusée par convection naturelle et la température doit être réglée entre 120°F (50°C) et 535°F (280°C). Lorsque vous sélectionnez cette fonction, le programmateur électronique - Fisher and Paykel OR30SDPWGX1 | User Guide - Page 56
4 ATTENTION: Au cours de l'autonettoyage, les pièces accessibles peuvent devenir très chaudes. Tenez les enfants à l'écart. N'UTILISEZ JAMAIS LA CUISINIÈRE LORSQUE LE FOUR EST EN MODE AUTONETTOYAGE. NE FAITES PAS FONCTIONNER LES BRÛLEURS SUPÉRIEURS. IMPORTANT: NE FAITES PAS FONCTIONNER LE TIROIR DE - Fisher and Paykel OR30SDPWGX1 | User Guide - Page 57
SÉLECTION DE °F/°C SUR L'ÉCRAN D'AFFICHAGE 1 1. Tournez le bouton de sélection de fonction du four à une fonction de cuisson (ex. - Cuisson à Convection Classique). 2. Appuyez sur le bouton du programmateur (ou utilisez le bouton de réglage de la température) pour réduire la température jusqu'à - Fisher and Paykel OR30SDPWGX1 | User Guide - Page 58
4 2 II I I I I I I I A I I 3 A A OFF 4 A COMMENT DÉMARRER L'AUTONETTOYAGE Important : L'autonettoyage ne doit être effectué que lorsque le four est vide; donc, avant de démarrer le cycle, retirez tous les accessoires (grilles, lèchefrite, ...) de la cavité du four et essuyez toute trace - Fisher and Paykel OR30SDPWGX1 | User Guide - Page 59
PROBLÈMES DE DÉMARRAGE ET DE FONCTIONNEMENT DU CYCLE D'AUTONETTOYAGE 1. "door" (porte) clignote sur l'écran d'affichage du programmateur La porte du four était ouverte ou mal fermée lorsque le bouton de sélection de fonction a été tourné à la position d'autonettoyage. Ou la porte a été ouverte - Fisher and Paykel OR30SDPWGX1 | User Guide - Page 60
4 A I I I II I I I I I 1 I I I II A I I I I I I I COMMENT ARRÊTER L'AUTONETTOYAGE 1. Tournez le bouton de sélection de fonction à OFF (four ARRÊTÉ) Si la température de la cavité du four est supérieure à 570°F (300°C): • "Hot" (chaud) apparaît sur l'écran d'affichage du programmateur. • - Fisher and Paykel OR30SDPWGX1 | User Guide - Page 61
4 SITUATIONS ANORMALES ET/OU PROBLÈMES DE FONCTIONNEMENT - lors de la cuisson ou de l'autonettoyage 1 A 1. "F000" ou "F001" s'affiche lors de la cuisson ou de l'autonettoyage Le capteur de température du four est abîmé ou ne fonctionne pas convenable- ment. Le ventilateur de refroidissement - Fisher and Paykel OR30SDPWGX1 | User Guide - Page 62
4 CONSEILS DE CUISINE Il est recommandé d'utiliser des gants de cuisine pour manipuler les accessoires du four. STÉRILISATION La stérilisation des aliments à conserver dans des pots remplis et hermétiquement fermés se fait comme suit : a. Tournez le bouton à la position (cuisson par convection - Fisher and Paykel OR30SDPWGX1 | User Guide - Page 63
: Vous devez toujours fermer la porte du four lorsque vous utilisez l'élément du gril. • Positionnez la lèchefrite sur le premier ou le deuxième support à partir du haut (fig. 4.3). • Allumez l'élément du gril, tel qu'expliqué dans les paragraphes précédents, et laissez-le préchauffer pendant environ - Fisher and Paykel OR30SDPWGX1 | User Guide - Page 64
5 comment utiliser le programmateur électronique A 1 2345 6 Fig. 5.1 I III 1 II I I I I I I III I I I A II I I I I I I III 2 A OFF 64 Le programmateur électronique est un dispositif qui regroupe les fonctions suivantes: • Horloge sur 12 heures avec affichage lumineux. • Minuterie (jusqu - Fisher and Paykel OR30SDPWGX1 | User Guide - Page 65
MINUTERIE La fonction de minuterie n'est utilisée que pour compter le temps et n'affecte pas le fonctionnement du four ni tout autre programme réglé ou en cours. 1. Appuyez sur le bouton - "0:00" apparaît sur l'écran d'affichage du programmateur. 2. Appuyez sur les boutons et pour régler le temps - Fisher and Paykel OR30SDPWGX1 | User Guide - Page 66
5 ANNULATION D'UN PROGRAMME Pour annuler un programme appuyez simultanément sur les boutons et pour plus de 3 secondes ou tournez simplement le bouton de sélection de fonction à OFF (four ARRÊTÉ). Remarque: Si au cours d'un programme le bouton de sélection de fonction est tourné à (autonettoyage - Fisher and Paykel OR30SDPWGX1 | User Guide - Page 67
nettoyage et entretien 6 AVERTISSEMENT TRÈS IMPORTANT Avant toute opération d'entretien, déconnectez l'appareil de l'alimentation électrique. N'utilisez pas de nettoyants à jet de vapeur. L'humidité pourrait s'infiltrer à l'intérieur de l'appareil et le rendre dangereux. N'utilisez jamais de - Fisher and Paykel OR30SDPWGX1 | User Guide - Page 68
6 POSITION CORRECTE DES BRÛLEURS SEMI-RAPIDES Il est très important de vérifier que le diffuseur de flammes "B" et le chapeau "A" ont été correctement positionnés (fig. 6.1 et 6.2). Si vous ne respectez pas cette consigne, des problèmes graves pourraient survenir. POSITION CORRECTE DES BRÛLEURS - Fisher and Paykel OR30SDPWGX1 | User Guide - Page 69
le brûleur ne fonctionne pas correctement et s'il n'est pas possible de libérer les 2 fentes d'éventuelles incrustations ou saletés, il faut contacter le service Après-Vente. Fig. 6.5 Fig. 6.7 Fig. 6.8 H Vis de fixage Fig. 6.6 Répartiteur de flammes intérieur 69 - Fisher and Paykel OR30SDPWGX1 | User Guide - Page 70
les grille latérales claire de l'ergot de verrouillage arrière et les retirer. MONTAGE ET DÉMONTAGE DES ÉTAGÈRES SUPPORTS COULISSANTS TÉLESCOPIQUES. Lors du montage de la étagère coulissante supporte, assurez-vous que vous vous situez: - Les rails latéraux glisse sur le dessus d'une position de la - Fisher and Paykel OR30SDPWGX1 | User Guide - Page 71
four est munie d'un système de blocage (dispositif de sécurité) qui permet d'éviter qu'elle ne sorte accidentellement du four. - Faire glisser sur les guides la grille (fig. 6.9); mettre la grille de façon que le barrage de protection (le plus grand) soit tourné vers l'intérieur du four. - Assurez - Fisher and Paykel OR30SDPWGX1 | User Guide - Page 72
6 AVERTISSEMENT : • Ne retirez pas le tiroir lorsqu'il est chaud. • Ne retirez pas le tiroir lorsqu'il est en marche. • Assurez-vous que le tiroir est vide avant de le retirer. RETRAIT DU TIROIR DE MAINTIEN AU CHAUD 1. Ouvrez le tiroir complètement (fig. 6.11). 2. Abaissez le levier de la glissière - Fisher and Paykel OR30SDPWGX1 | User Guide - Page 73
6 Fig. 6.15 DÉPOSE DE LA PORTE DU FOUR Vous pouvez facilement enlever la porte du four en procédant comme suit : • Ouvrez complètement la porte du four (fig. 6.15a). • Ouvrez complètement le levier "A" sur les charnières gauche et droite (fig. 6.15b). • Tenez la porte tel qu'indiqué à la fig. 6.15. • - Fisher and Paykel OR30SDPWGX1 | User Guide - Page 74
Consultez les instructions d'installation et le guide de l' service et de garantie pour obtenir les détails sur la garantie et les coordonnées d'un réparateur autorisé ou de l'Assistance à la clientèle, ou contactez-nous par l'entremise de notre site Web, à l'adresse Pour nous contacter Un guide - Fisher and Paykel OR30SDPWGX1 | User Guide - Page 75
- Fisher and Paykel OR30SDPWGX1 | User Guide - Page 76
www.fisherpaykel.com US CA Copyright © Fisher & Paykel 2013. All rights reserved. The product specifications in this booklet apply to the specific products and models described at the date of issue. Under our policy of continuous product improvement, these specifications may change at any time.
-
 1
1 -
 2
2 -
 3
3 -
 4
4 -
 5
5 -
 6
6 -
 7
7 -
8
-
9
-
10
-
11
-
12
-
13
-
14
-
15
-
16
-
17
-
18
-
19
-
20
-
21
-
22
-
23
-
24
-
25
-
26
-
27
-
28
-
29
-
30
-
31
-
32
-
33
-
34
-
35
-
36
-
37
-
38
-
39
-
40
-
41
-
42
-
43
-
44
-
45
-
46
-
47
-
48
-
49
-
50
-
51
-
52
-
53
-
54
-
55
-
56
-
57
-
58
-
59
-
60
-
61
-
62
-
63
-
64
-
65
-
66
-
67
-
68
-
69
-
70
-
71
-
72
-
73
-
74
-
75
-
76
 |
 |

US CA
User guide
Guide d’utilisation
Freestanding range
Cuiseur indépendant
OR30SDPWGX model
OR30SDPWGX model