Fisher and Paykel RF170BRPUX6 N Installation Guide - Joiner Kit
Fisher and Paykel RF170BRPUX6 N Manual
 |
View all Fisher and Paykel RF170BRPUX6 N manuals
Add to My Manuals
Save this manual to your list of manuals |
Fisher and Paykel RF170BRPUX6 N manual content summary:
- Fisher and Paykel RF170BRPUX6 N | Installation Guide - Joiner Kit - Page 1
JOINER KIT RF135B, RF170B & RF170W models INSTALLATION GUIDE US CA - Fisher and Paykel RF170BRPUX6 N | Installation Guide - Joiner Kit - Page 2
high models and can be used to combine any variants of RF135B, RF170B and RF170W with handles. z We recommend you save this installation guide for future reference. Supplied ITEM Kit Joiner Silver AJ-RF17X PART NUMBER 819264 Rear bracket (1) PARTS Front lower bracket (1) Front Upper bracket - Fisher and Paykel RF170BRPUX6 N | Installation Guide - Joiner Kit - Page 3
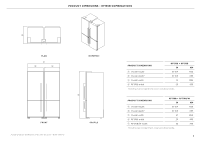
PRODUCT DIMENSIONS - RF135B COMBINATIONS B PLAN C D E ISOMETRIC A FRONT Actual product dimensions may vary by up to +3/16" (5 mm). PROFILE PRODUCT DIMENSIONS A Overall height B Overall depth* C Overall width D RF135B width RF135B + RF135B IN MM 67 3/4 1720 27 3/8 695 51 1295 25 - Fisher and Paykel RF170BRPUX6 N | Installation Guide - Joiner Kit - Page 4
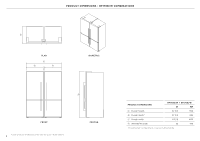
PRODUCT DIMENSIONS - RF170B/W COMBINATIONS B PLAN C D D ISOMETRIC A FRONT Actual product dimensions may vary by up to +3/16" (5 mm). 4 PROFILE PRODUCT DIMENSIONS RF170B/W + RF170B/W IN MM A Overall height 67 3/4 1720 B Overall depth* 27 3/8 695 C Overall width 63 1/8 1605 D - Fisher and Paykel RF170BRPUX6 N | Installation Guide - Joiner Kit - Page 5
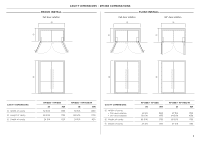
PROUD - FULL FLUSH - 90 PROUD INSTALL PROUD - FULL FLUSH - 90 Full door rotation a CAVITY DIMENSIOFLUNSHS- 9-0PRROFU1D3- FF5LUUBLSLHC- OFULML BINATIONS FLUSHF-LFUUSLHL - 90 FLUSH - 90PROUD - FFLUULSLH - FULL Full door rotation FLUSH INSTALL FLUSHF-LFUUSLHL - 90 90° door rotation a a C C C - Fisher and Paykel RF170BRPUX6 N | Installation Guide - Joiner Kit - Page 6
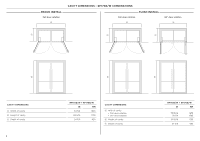
PROUD - FULL FLUSH - 90 PROUD INSTALL PROUD - FULL FLUSH - 90 Full door rotation a CAVITY DIMENSIOFNLUSSH-- 9R0 PFRO17UD0-FBFLUU/LSW LH - FCULOL MBINATIONS FLUSH -FFLUULSLH - 90 FLUSH - 90 PROUD -FFLUULSLH - FULL Full door rotation FLUSH INSTALL FLUSH -FFLUULSLH - 90 90° door rotation a a C - Fisher and Paykel RF170BRPUX6 N | Installation Guide - Joiner Kit - Page 7
PROUD - FULL FLUSH - 90 PROUD INSTALL PROUD - FULL FLUSH - 90 Full door rotation a a B FCLULSHE-A90RPARONUDC-FEFLUUSLSLH - FULL FLUSH -FFLUULSLH - 90 FLUSH - 90 PROUD -FFLUULSLH - FULL Full door rotation FLUSH INSTALL FLUSH -FFLUULSLH - 90 90° door rotation a a a a B C C C MINIMUM - Fisher and Paykel RF170BRPUX6 N | Installation Guide - Joiner Kit - Page 8
INSTALLATION Before you begin z Check cavity dimensions are correct for the type of dual installation you require. z Unpack appliances from packaging following guidance on individual cartons. z Ensure the floor is protected from damage during unpacking and installation. z Check that the Joiner - Fisher and Paykel RF170BRPUX6 N | Installation Guide - Joiner Kit - Page 9
the appliances carefully. Ensure both appliances are level and aligned before securing the second 9 appliance to the rear bracket using three 8x16 screws. !3 13 Open both doors for easy access to the center jo17in. Replace both rear compartment covers using a Phillips screwdriver. 9 - Fisher and Paykel RF170BRPUX6 N | Installation Guide - Joiner Kit - Page 10
!4111444 !5111555 !616 1166 1!77 10 INSTALLATION Locate the centre trim panel assembly to the tab on the lower bracket. 3 1 Position the centre trim panel under the upper bracket before re-tightening the six screws. ADJUSTING DOOR ALIGNMENT 2 22 Ensure front leveling feet are adjusted - Fisher and Paykel RF170BRPUX6 N | Installation Guide - Joiner Kit - Page 11
FISHERPAYKEL.COM © Fisher & Paykel Appliances 2022. All rights reserved. The models shown in this guide may not be available in all markets and are subject to change at any time. The product specifications in this guide apply to the specific products and models described at the date of issue. Under
-
 1
1 -
 2
2 -
 3
3 -
 4
4 -
 5
5 -
 6
6 -
 7
7 -
8
-
9
-
10
-
11
 |
 |

RF135B, RF170B & RF170W models
JOINER KIT
INSTALLATION GUIDE
US CA