Foxconn A6VMX Multi language Manual
Foxconn A6VMX Manual
 |
View all Foxconn A6VMX manuals
Add to My Manuals
Save this manual to your list of manuals |
Foxconn A6VMX manual content summary:
- Foxconn A6VMX | Multi language Manual - Page 1
Foxconn does not obligate itself to inform the user of these changes. Trademark: All trademarks are the property of their respective owners. Version: User's Manual V1.0 for A6VMX Series motherboard. local city office, your household waste disposal service or the shop where you purchased the product. - Foxconn A6VMX | Multi language Manual - Page 2
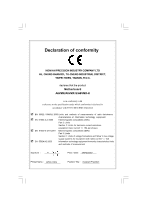
LTD 66 , CHUNG SHAN RD., TU-CHENG INDUSTRIAL DISTRICT, TAIPEI HSIEN, TAIWAN, R.O.C. declares that the product Motherboard A6VMX/A6VMX-S/A6VMX-K is in conformity with (reference to the specification under which conformity is declared in accordance with 89/336 EEC-EMC Directive) þ EN 55022: 1998/A2 - Foxconn A6VMX | Multi language Manual - Page 3
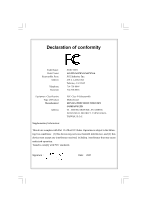
Party: Address: Telephone: Facsimile: FOXCONN A6VMX/A6VMX-S/A6VMX-K PCE Industry Inc. 458 E. Lambert Rd. Fullerton, CA 92835 714-738-8868 714-738-8838 Equipment Classification: Type of Product: Manufacturer: Address: FCC Class B Subassembly Motherboard HON HAI PRECISION INDUSTRY COMPANY LTD - Foxconn A6VMX | Multi language Manual - Page 4
Chapter 1 Main Features Specifications 2 Jumpers 18 Chapter 2 BIOS Description Enter BIOS Setup 21 Main menu 21 1. Standard CMOS Features 22 2. Central Control Unit 24 3. Advanced BIOS Features 25 4. Advanced Chipset Features 26 5. Integrated Peripherals 27 6. Power Management Setup 28 - Foxconn A6VMX | Multi language Manual - Page 5
given time in the future. Attention: The pictures of objects used in this manual are just for your reference. Please refer to the physical motherboard. Attention: Please visit the Foxconn global English website (http://www. foxconnchannel.com) to download the latest BIOS file and drivers for this - Foxconn A6VMX | Multi language Manual - Page 6
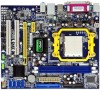
Foxconn's A6VMX Series motherboard. This series of motherboard is one of our new products, and offers superior performance, reliability and quality, at a reasonable price. This motherboard adopts the advanced AMD 690V+SB600 chipset, providing a computer platform with high integration, powerful - Foxconn A6VMX | Multi language Manual - Page 7
Chapter 1 Main Features Specifications - - English Size CPU ·Micro ATX form factor : 244mm x 208mm · Socket AM2 for AMD AthlonTM 64 X2 ,AthlonTM X2 ,AthlonTM 64 and SempronTM processors · Socket AM2+ for AMD PhenomTM processor ·Supports HyperTransportTM Technology Chipset ·Northbridge: AMD 690V - Foxconn A6VMX | Multi language Manual - Page 8
·1 x COM2 port header (optional) ·1 x Front Audio connector ·1 x 24-pin ATX Power Connector ·1 x 4-pin AUX Power Connector ·1 x IrDA header ·1 x CPU Fan connector ·1 x System Fan connector ·1 x NB Fan connector (optional) ·Front panel connector ·Driver ·Utility ·Specifications are subject to change - Foxconn A6VMX | Multi language Manual - Page 9
6 Realtek 8 ·支持 S/PDIF 输出,Jack-Sensing 功能, Intel® High Definition Audio ·Realtek Gigabit LAN Controller/ Realtek 10/100 Mb/s LAN Controller · 2 个 Ultra DMA 133/100/66设备 · 4 个 SATA 300MB/s 设备 · RAID 0,RAID1,RAID 10 ·1 个 PS/2 1 个 PS/2 1 COM1) ·1 1 个 VGA 接口 ·4 个 USB 2.0 接口 ·1 个 RJ45 6/8 4 - Foxconn A6VMX | Multi language Manual - Page 10
·2 个 USB 2.0 4 USB 2.0 4 个 SATA 接头 ·1 1 个 IDE 接口 ·1 1 个 CD_IN 接头 ·1 个 S/PDIF_OUT 1 个 TPM 1 个 TV_OUT 接头 ·1 个 COM2 1 1 个 24 针ATX 1 个 4 针 AUX 1 1 个 CPU 1 1 5 - Foxconn A6VMX | Multi language Manual - Page 11
-Geräte, 300 MB/s · RAID-Konfiguration 0, 1,10 I/O-Anschlüsse ·1 x PS/2-Mausanschluss an der Rückseite ·1 x PS/2-Tastaturanschluss ·1 x Seriellanschluss(COM1) ·1 x Parallelanschluss ·1 x VGA-Port ·4 x USB 2.0-Ports ·1 x RJ45-LAN-Port ·6/8-Kanal-Audio-Port (Fortsetzung auf der nächsten Seite) 6 - Foxconn A6VMX | Multi language Manual - Page 12
-Port-Anschluss(optional) ·1 x Front-Audio-Anschluss ·1 x ATX Power, 24-polig-Anschluss ·1 x AUX Power, 4-polig-Anschluss ·1 x IrDA-Anschluss ·1 x CPU-Lüfter-Anschluss ·1 x Systemlüfter-Anschlüsse ·1 x NB- Lعfter (optional) ·Frontbedienfeld-Anschluss Support-CD ·Treibe ·Dienstprogramme ·Angaben - Foxconn A6VMX | Multi language Manual - Page 13
300MB/s ·Configuración RAID 0, RAID 1, RAID 10 Panel de E/S trasero ·1 x Puerto de ratón PS/2 ·1 x Puerto de teclado PS/2 ·1 x Puerto Serie(COM1) ·1 x Puerto Paralelo ·1 x Puerto de VGA ·4 x Puertos USB 2.0 ·1 x Puerto LAN RJ45 ·Puerto de 6/8 canales Audio (continúa en la página siguiente) 8 - Foxconn A6VMX | Multi language Manual - Page 14
COM2 (opcional) ·1 x Conector de Audio frontal ·1 x Conector de 24-pin ATX Power ·1 x Conector de 4-pin AUX Power ·1 x Cabecera de IrDA ·1 x Cabecera de Ventilador de CPU ·1 x Conectora de Ventiladores Sistema ·1 x Ventilador NB(opcional) ·Conector de panel frontal CD de soporte ·Controlador - Foxconn A6VMX | Multi language Manual - Page 15
10/100 Mb/s LAN Controller Armazenamento ·2 dispositivos Ultra DMA 133/100/66 ·4 dispositivos SATA de 300 MB/s ·Configuração RAID 0, RAID1, RAID10 Entrada/Saída pelo painel traseiro ·1 x Porta para rato PS/2 ·1 x Porta para Teclado PS/2 ·1 x Porta série (COM1) ·1 x Porta paralela ·1 x Porta VGA - Foxconn A6VMX | Multi language Manual - Page 16
x Conector de alimentação ATX de 24 pinos ·1 x Conector de alimentação auxiliar de 4 pinos ·1 x Conector IrDA ·1 x Conector da ventoinha da CPU ·1 x Conector ventoinha do sistema ·1 x Ventoinha NB(opcional) ·Conector de painel frontal CD de suporte ·Controlador ·Utilitários ·As especificações est - Foxconn A6VMX | Multi language Manual - Page 17
Specifiche- -Italiano Dimensioni CPU Chipset Memoria Alloggi d'espansione Audio LAN Archivio Pannello posteriore I/O ·Formato micro ATX: 244 mm x 208 mm · Socket AM2 per processori AMD AthlonTM 64 X2, AthlonTM X2, AthlonTM 64 e SempronTM · Socket AM2+ per processor AMD PhenomTM · Supporto - Foxconn A6VMX | Multi language Manual - Page 18
(optional) ·1 x Connettore Audio frontale ·1 x Connettore potenza ATX 24 pin ·1 x Connettore potenza AUX 4 pin ·1 x Connettore IrDA ·1 x Connettore ventolina CPU ·1 x Connettore ventolina di sistema ·1 x Ventolina NB (optional) ·Connettore pannello frontale CD di supporto ·Driver ·Utilità ·Le - Foxconn A6VMX | Multi language Manual - Page 19
слота PCI Звук ·Realtek 6 Realtek 8 S/PDIF Intel® High Definition Audio ЛВС ·Realtek Gigabit ЛВС / Realtek ЛВС10/100 Мбит/с ·2 Ultra DMA 133, 100, 66 ·4 SATA 300 RAID 0,RAID 1, RAID10 ·1 PS/2 ·1 PS/2 ·1 COM1) ·1 1 Порт VGA ·4 Порты USB 2.0 ·1 RJ45 ·Порт 6, 8 14 - Foxconn A6VMX | Multi language Manual - Page 20
Глава 1 ·2 USB 2.0 4 USB 2.0) ·4 SATA ·1 1 IDE ·1 INTR) ·1 CD_IN ·1 S/PDIF_OUT 1 TPM 1 1 COM2 1 1 24 ATX ·1 4 AUX ·1 1 1 1 15 - Foxconn A6VMX | Multi language Manual - Page 21
Intel®High Definition Audio Realtek 10/100 Mb/s LAN Controller / Realtek Gigabit LAN l Controller 2 Ultra DMA 133/ 100/66 4 SATA 300MB/s RAID 0, RAID 1, RAID 10 1 PS/2 1 PS/2 1 COM1 1 1 VGA 4 USB 2.0 1 RJ45 16 - Foxconn A6VMX | Multi language Manual - Page 22
1 2 USB 2.0 4 USB 2.0 4 SATA 1 1 IDE 1 Intruder INTR 1 CD_IN 1 S/PDI F _OUT 1 TPM 1 TV_OUT 1 COM2 1 ATXء 24 1 4 × AUX 1 IrDA 1 1 NB1 17 - Foxconn A6VMX | Multi language Manual - Page 23
jumpers on the motherboard, pin 1 can be identified by the bold silkscreen next to it. And in this manual, pin 1 BIOS as below: Set "CMOS Setup"=>"Power Management Setup"=> "Wake on USB Devices" to "Enabled". 1 +5VSB 1 +5V (Default) USBPWR1 / USBPWR2 Note 1. USBPW R1 is for the rear USB connectors - Foxconn A6VMX | Multi language Manual - Page 24
wake up the computer from sleep modes when you press a key on the keyboard or click the mouse, and a corresponding setting must be set in BIOS as below: Set "CMOS Setup"=>"Power Management Setup"=> "Wake on PS2 Keyboard"and "W ake on PS2Mouse" to "Enabled". 1 +5V (Default) 1 +5VSB KB/MSPW R 19 - Foxconn A6VMX | Multi language Manual - Page 25
v Main Menu v Standard CMOS Features v Central Control Unit v Advanced BIOS Features v Advanced Chipset Features v Integrated Peripherals v Power Management Setup v PnP/PCI Configuration v PC Health Status v BIOS Security Features v Load Optimal Defaults v Save Changes and Exit v Discard Changes - Foxconn A6VMX | Multi language Manual - Page 26
on the computer, when the following message briefly appears at the bottom of the screen during the POST (Power On Self Test), press key to enter the BIOS CMOS Setup Utility. Press TAB to show POST Screen, DEL to enter SETUP. Note: W e do not suggest that you change the default parameters in - Foxconn A6VMX | Multi language Manual - Page 27
status of your PC. 9. BIOS Security Features BIOS Secutiry configuration can be setted through this item. 10. Load Optimal Defaults You can and exit setup. 1.Standard BIOS Features This sub-menu is used to set up the standard BIOS parameters, such as the date, time, floppy driver and so on. Select - Foxconn A6VMX | Multi language Manual - Page 28
After selecting the hard disk information into BIOS, use a disk utility, such as FDISK,to partition or Memory This item shows the system memory size. 1.6 Halt On This category determines whether or not the computer will stop if an error is detected during powering up. All Errors Whenever the BIOS - Foxconn A6VMX | Multi language Manual - Page 29
manually. 2.3 Current FSB Multiplier This item shows the current speed of the front side bus automatically. 2.4 Maximum FSB Multiplier This item tells you the maximum speed of the front side bus. 2.5 Current Memory Clock This item shows the current memory clock frequency automatically. 2.6 FOXCONN - Foxconn A6VMX | Multi language Manual - Page 30
may adjust the North Bridge volatge manually. 2.6.4 Smart Power LED Smart debug LED function within power LED. Enable this function, the power LED status can show the system status of POST process. If it detect the memory or graphics cards fail , the power LED will blink. 3.Advanced BIOS Features 25 - Foxconn A6VMX | Multi language Manual - Page 31
Press "Enter", you will see the CPU-related information that the BIOS automatically detects. 3.2 Boot Settings Configuration Press . Setting to "Enabled",the BIOS will search for floppy disk drive at boot time. 3.6 Bootup Num-Lock Use this item to select the power-on state for the Numlock.the - Foxconn A6VMX | Multi language Manual - Page 32
devices. Selecting "Legance IDE",the system will support SATA and IDE devices.The default value is "Native IDE". 5.3 OnBoard Devices This sub-menu allows you to enable or disbale the onbaord devices,such as onboard LAN,USB and Audio. 5.4 SuperIO Configuration This sub-menu allows you to configure - Foxconn A6VMX | Multi language Manual - Page 33
2 BIOS Description 6.Power Management Setup Power Management Setup Menu 6.1Cool 'N' Quiet Enable or disable AMD "Cool 'N' Quiet" technology. Cool'N'Quiet is a CPU speed throttling and power saving technology introduced by AMD with their Athlon 64 processor line. It works by reducing the processor - Foxconn A6VMX | Multi language Manual - Page 34
clear NVRAM(Non Volatile Random Access Memory) during System boot. 7.2 Plug & Play O/S When set to "NO",the BIOS will configure all devices in the to PCI VGA Select "Yes", BIOS assigns an IRQ to PCI VGA card,if the card requests. If you select "No", BIOS does not assign an IRQ to PCI VGA card even - Foxconn A6VMX | Multi language Manual - Page 35
Chapter 2 BIOS Description 7.9 DMA Channel 0/1/3/5/6/7 Use this item to specify DMA Channel for PCI/PnP devices to use. The default value is"Available". 7.10 Reserved Memory Size This item allows to reserve size of memory block for legacy ISA deices.W e advise to keep the default value unchanged.The - Foxconn A6VMX | Multi language Manual - Page 36
BIOS Description 9.1 Supervisor/User Password These items show supervisor/user password installed or not. 9.2 BIOS Write Protection Enable this item to protect system BIOS value is "Disabled". 10.Load Optimal Defaults This menu can let you load the optimal defaults set by BIOS, which have set the - Foxconn A6VMX | Multi language Manual - Page 37
Chapter 4 Driver CD Introduction 3 Chapter This chapter will introduce how to use attached software. This chapter provides the following information: v FOX ONE v FOX LiveUpdate v FOX LOGO v FOX DMI 32 - Foxconn A6VMX | Multi language Manual - Page 38
system performance settings such as bus speed, CPU voltage, fan speed, and other system performance options that are supported by the BIOS and you also can monitor hardware temperature, voltage, frequency and fan speed. Supported Operating Systems: -W indows 2000 -Windows XP (32-bit and 64-bit - Foxconn A6VMX | Multi language Manual - Page 39
Click this button to minimize the window. Configuration This function is used to FOXCONN motherboard website. 2. CPU Page - CPU Control This page is used to select and run the CPU frequency to determine the current performance level of the system. You can adjust manually or select "Auto Overclock - Foxconn A6VMX | Multi language Manual - Page 40
CPU temperature value Enable alert function when the CPU temperature is higher than high limit value Show current high limit value of CPU temperature Set high limit by dragging the lever 5. Voltage Page - Voltage Control This page allows you to set CPU, memory and North Bridge voltage manually - Foxconn A6VMX | Multi language Manual - Page 41
changes FOX LiveUpdate FOX LiveUpdate is a useful utility to backup and update the system BIOS online or locally.Drivers and utilities are aslo can be updated online. Supported Operating Systems: -W indows 2000 -W indows 2003 (32-bit and 64-bit) 36 -Windows XP (32-bit and 64-bit) -W indows Vista - Foxconn A6VMX | Multi language Manual - Page 42
. Link to website Exit Minimum Toolbar Show current BIOS information 2. Online Update This area lets you update your system BIOS,Drivers,Utilities and all of them from Internet. Click "start", it will search the new BIOS ,Drivers and Utilities from Internet. Then follow the wizard to finish - Foxconn A6VMX | Multi language Manual - Page 43
FOX LOGO is a simple and useful utility to backup, change and delete the boot Logo. The boot Logo is the image that appears on screen during the Power-On Self-Tests (POST). Supported Operating Systems: -W indows 2000 -W indows 2003 (32-bit and 64-bit) -Windows XP (32-bit and 64-bit) -W indows - Foxconn A6VMX | Multi language Manual - Page 44
of DMI Data format :Report , Data Fields and memory Dump. Supported Operating Systems: -W indows 2000 -W indows 2003 (32-bit and 64-bit) -Windows XP (32-bit and 64-bit) -W indows Vista (32-bit and 64-bit) Using FOX DMI: Please operate this utility as the comments shows . Click here to select
-
 1
1 -
 2
2 -
 3
3 -
 4
4 -
 5
5 -
 6
6 -
 7
7 -
8
-
9
-
10
-
11
-
12
-
13
-
14
-
15
-
16
-
17
-
18
-
19
-
20
-
21
-
22
-
23
-
24
-
25
-
26
-
27
-
28
-
29
-
30
-
31
-
32
-
33
-
34
-
35
-
36
-
37
-
38
-
39
-
40
-
41
-
42
-
43
-
44
 |
 |

Statement:
This manual is the intellectual property of Foxconn, Inc. Although the
information in this manual may be changed or modified at any time,
Foxconn does not obligate itself to inform the user of these changes.
Trademark:
All trademarks are the property of their respective owners.
Version:
User
’
s Manual V1.0 for A6VMX Series motherboard.
P/N: 3A220JS00-000-G
Symbol description:
Note:
refers to important information that can help you to use motherboard
better.
Attention:
indicates that it may damage hardware or cause data loss,
and tells you how to avoid such problems.
Warning:
means that a potential risk of property damage or physical
injury exists.
More information:
If you want more information about our products, please visit Foxconn
’
s
website: http://www.foxconnchannel.com
WEEE:
The use of the symbol indicates that this product may not be
treated as household waste. By ensuring this product is disposed of
correctly, you will help prevent potential negative consequences for the
environment and human health, which could otherwise be caused by
inappropriate waste handling of this product. For more detailed informa-
tion about recycling of this product, please contact your local city office,
your household waste disposal service or the shop where you pur-
chased the product.