Foxconn A88GA English Manual.
Foxconn A88GA Manual
 |
View all Foxconn A88GA manuals
Add to My Manuals
Save this manual to your list of manuals |
Foxconn A88GA manual content summary:
- Foxconn A88GA | English Manual. - Page 1
A88GA Series Motherboard User's Manual - Foxconn A88GA | English Manual. - Page 2
be changed or modified at any time, Foxconn does not obligate itself to inform the user of these changes. Trademark: All trademarks are the property of their respective owners. Version: User's Manual V1.0 for A88GA Series motherboard. P/N: 3A222GC00-000-G Symbol description: ! WARNING! Caution - Foxconn A88GA | English Manual. - Page 3
PRECISION INDUSTRY COMPANY LTD 66 , CHUNG SHAN RD., TU-CHENG INDUSTRIAL DISTRICT, TAIPEI HSIEN, TAIWAN, R.O.C. declares that the product Motherboard A88GA / A88GA-S is in conformity with (reference to the specification under which conformity is declared in accordance with 89/336 EEC-EMC Directive - Foxconn A88GA | English Manual. - Page 4
Trade Name: Model Name: Responsible Party: Address: Telephone: Facsimile: FOXCONN A88GA / A88GA-S PCE Industry Inc. 458 E. Lambert Rd. Fullerton, CA 92835 received, including interference that may cause undesired operation. Tested to comply with FCC standards. Signature : Date : 2010 - Foxconn A88GA | English Manual. - Page 5
fans in order to avoid damage to the motherboard and CPU due to high temperature. Never turn on the computer if the CPU fan is not properly installed. ■ We cannot guarantee any installation steps or have a problem related to the use of the product, please consult a certified computer technician. - Foxconn A88GA | English Manual. - Page 6
Back Panel Connectors 5 Chapter 2 Hardware Install Install the CPU and CPU Cooler 8 Install the Memory 10 Install an Expansion Card 12 Install other Internal Connectors 13 Jumpers 17 Install driver and utility 18 Chapter 3 BIOS Setup Enter BIOS Setup 21 Main Menu 21 System Information 23 - Foxconn A88GA | English Manual. - Page 7
Website : http://www.foxconnchannel.com Support Website : http://www.foxconnsupport.com Worldwide Online Contact Support : http://www.foxconnsupport.com/inquiry.aspx CPU Support List : http://www.foxconnsupport.com/cpusupportlist.aspx Memory, VGA Compatibility List : http://www.foxconnsupport - Foxconn A88GA | English Manual. - Page 8
for buying Foxconn A88GA Series motherboard. Foxconn products are engineered to maximize computing power, providing only what you need for break-through performance. With advanced overclocking capability and a range of connectivity features for today multi-media computing requirements, A88GA / A88GA - Foxconn A88GA | English Manual. - Page 9
Product Specifications CPU Support AM3 socket PhenomTM II processors, Max processor power up to 140W For the latest CPU information, please visit: http://www.foxconnsupport.com/cpusupportlist.aspx HyperTransport Up to 4400MT/s (HT3.0) for AM3 CPU Chipset North Bridge: AMD 880G South Bridge - Foxconn A88GA | English Manual. - Page 10
(Only for A88GA-S) 1 x RJ-45 LAN port 1 x eSATA Port 8-channel Audio ports Hardware Monitor System voltage detection CPU/System temperature detection CPU/System/NB fan speed detection CPU overheating warning CPU/System/NB fan speed control PCI Express x1 Gen2.0 Support 500MB/s (1GB - Foxconn A88GA | English Manual. - Page 11
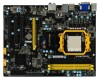
2. North Bridge: AMD 880G 3. NB_FAN Header 4. AMD SB710 12. Front USB 2.0 Connectors 13. Clear CMOS Jumper 14. Front Panel Connector 15. SYS_FAN Header 16. SATA Connectors 17. IDE Connector 18. Chassis intrusion alarm header (INTR) 19. 24-pin ATX Power Connector 20. DDR3 DIMM Slots 21. CPU Socket - Foxconn A88GA | English Manual. - Page 12
PS/2 port to connect a PS/2 keyboard. 2. USB 2.0 Ports These USB ports support the USB 2.0/1.1 specification. Use these ports for USB devices such as an USB USB flash drive and etc. 3. USB 3.0 Ports (Only for A88GA-S) To connect easily with next-generation components and peripherals, USB 3.0 - Foxconn A88GA | English Manual. - Page 13
1 7. Audio Ports For the definition of each audio port, please refer to the table below : Port 2-channel 4-channel 5.1-channel 7.1-channel Blue Line In Line In Line In Line In Green Line Out Front Speaker Out Front Speaker Out Front Speaker Out Pink Microphone In Microphone In - Foxconn A88GA | English Manual. - Page 14
Memory ■ Install an Expansion Card ■ Install other Internal Connectors ■ Jumpers ■ Install driver and utility Please visit the following website for more supporting information about your motherboard. CPU Support List: http://www.foxconnsupport.com/cpusupportlist.aspx Memory, VGA Compatibility List - Foxconn A88GA | English Manual. - Page 15
graphics card, memory, hard drive, etc. Install the CPU Locate the Pin-1 CPU triangle mark and the Pin-1 of the CPU socket. Pin-1 triangle marking of CPU Pin-1 corner of the CPU socket 1. Release the CPU socket lever. 2. Align Pin-1 of the CPU with the CPU socket, and gently put the CPU onto the - Foxconn A88GA | English Manual. - Page 16
seated, push the CPU socket lever back to its locked position. Install the CPU Cooler Follow the steps below to correctly install the CPU cooler. (The following procedures use Foxconn cooler as the example.) 1. Apply and spread an even thermal grease on the surface of CPU. 2. Buckle the heatsink - Foxconn A88GA | English Manual. - Page 17
Channel Memory Configuration This motherboard provides four DDR3 memory sockets and supports Dual Channel Technology. When memory is installed, the BIOS will automatically check the memory in your system. Four DDR3 memory sockets are divided into two channels : Channel 0 : DIMM1, DIMM3 Channel - Foxconn A88GA | English Manual. - Page 18
only fit in one direction. Follow the steps below to correctly install your memory modules into the sockets. Step 1: Spread the clips at both ends of the memory socket. Place the memory module onto the socket, then put your fingers on top edge of the module, and push it down firmly and seat - Foxconn A88GA | English Manual. - Page 19
Expansion Card ! ■ Make sure the motherboard supports the expansion card. Carefully read the manual that came with your expansion card. ■ computer. If necessary, go to BIOS Setup to make any required BIOS changes for your expansion card(s). 7. Install the driver provided with the expansion card in - Foxconn A88GA | English Manual. - Page 20
No. 24 20-Pin Power 8-pin ATX 12 V Power Connector : PWR2 Connect the 8-pin ATX 12V power supply to PWR2 and provides power to the CPU. 51 +12V GND 84 PWR2 Pin # 1 2 3 4 Definition GND GND GND GND Pin # 5 6 7 8 Definition +12V +12V +12V +12V 13 - Foxconn A88GA | English Manual. - Page 21
9 10 FP1 1 Serial ATA Connectors : SATA_1/2/3/4/5 GND The Serial ATA connector is used to connect with SATA TX+ TX- Hard Disk or CD devices which support this feature. The GND current Serial ATA II interface allows up to 300MB/s data RXRX+ transfer rate. GND SATA_1/2/3/4/5 14 - Foxconn A88GA | English Manual. - Page 22
standard audio connector, it can be connected to a CD/DVD-ROM drive through a CD/DVD audio cable. Audio Connector : F_AUDIO The audio connector supports HD Audio standard. It provides the Front Audio output choice. Speaker Connector : SPEAKER The speaker connector is used to connect speaker of the - Foxconn A88GA | English Manual. - Page 23
There are three main fan headers on this motherboard. The fan speed can be controlled and monitored in "PC Health Status" section of the BIOS Setup. These fans can be automatically turned off after the system enters S3, S4 and S5 sleeping states. S/PDIF OUT Connector : SPDIF_OUT The connector - Foxconn A88GA | English Manual. - Page 24
bold silkscreen next to it. However, in this manual, pin 1 is simply labeled as "1". 2. The can prevent hazardous ESD (Electrical Static Discharge) problem. Jumper 1 Diagram 1 1 Definition 1-2 your computer and turn it on. 5. Go to BIOS Setup to configure new system as described in next chapter - Foxconn A88GA | English Manual. - Page 25
your DVD-ROM drive, and the main menu will be displayed on your PC screen to guide you how to install. 1. Driver Use these options to install all the drivers for your system. You must click "AMD Chipset Driver" to install it first. After that, you can click "One Click Setup" and then choose the - Foxconn A88GA | English Manual. - Page 26
2 2. Utility Use these options to install additional software programs. And click "Utility Help" button to view the utility (FOX ONE, FOX LiveUpdate, FOX LOGO, FOX DMI) help manual. Click here 19 - Foxconn A88GA | English Manual. - Page 27
Changes and Exit ■ Discard Changes and Exit Since BIOS could be updated some other times, the BIOS information described in this manual is for reference only. We do not guarantee the content of this manual will remain consistent with the newly released BIOS at any given time in the future. Please - Foxconn A88GA | English Manual. - Page 28
and so on. They all can be viewed or set up through this menu. ► Advanced BIOS Features The advanced system features can be set up through this menu. There are boot up settings. ► Core Releaser (Enabled only if CPU supports) The Core Releaser function can be set up through this menu. [Auto]: some - Foxconn A88GA | English Manual. - Page 29
set up through this menu. ► PC Health Status This setup enables you to read/change Fan speeds, and displays temperatures and voltages of your CPU/System/NB. ► BIOS Security Features The Supervisor/User password can be set up through this menu to prevent unauthorized use of your computer. If you set - Foxconn A88GA | English Manual. - Page 30
the system Date. [Not Detected] [Not Detected] Halt On Keyboard Mouse [All Errors, But ...] [Disabled] [Disabled] Model Name BIOS ID BIOS Version Memory Size :A88GA-S :A35F1D07 :08.00.16 :1024MB Move Enter:Select +/-/:Value F10:Save ESC:Exit F1:General Help F9:Optimized Defaults - Foxconn A88GA | English Manual. - Page 31
discuss with the field service people if a BIOS upgrade is needed. specification by which PC manufacturers design and build CPU architecture systems with two or more processors. only if you are running an older operating system that only supports MPS 1.1. ► PCI Latency Timer This item is used to set - Foxconn A88GA | English Manual. - Page 32
latency times so if you start facing problems like stuttering sound or a less responsive While Enabled, this option allows BIOS to skip certain tests while booting, this will shorten : 4 Disabled Auto All Cores AMD Phenom(tm) II X4 945 L3 : 6MB Current CPU Speed : 3000MHz Move Enter - Foxconn A88GA | English Manual. - Page 33
Utility - Copyright (C) 1985-2006, American Megatrends, Inc. Fox Central Control Unit Super BIOS Protect Auto Detect PCI Clock ► Smart BIOS ► Fox Intelligent Stepping ► Voltage Options ► CPU Configuration [Disabled] Help Item [Disabled] [Press Enter] Options [Press Enter] [Press Enter - Foxconn A88GA | English Manual. - Page 34
American Megatrends, Inc. Smart BIOS Smart Power LED Smart your motherboard to indicate different states during Power On Self Test (POST). The LED is located at the front panel, Status Normal No Memory No Display Post Error Message No CPU Fan Power LED Status Always On Continue blinking On (1sec - Foxconn A88GA | English Manual. - Page 35
if your CPU is supporting this feature. ► CPU-NB HT Link Speed HT stands for HyperTransport bus. The CPUNB HT Speed option controls the physical speed of the CPU to Northbridge HT link. ► CPU-NB Multiplier Control This item is used to select CPU-NB Multiplier run as Auto or Manual mode. Select - Foxconn A88GA | English Manual. - Page 36
SPD value is selected. Select [Manual], then DRAM speed is manually selected according to the set value you to enable/disable GFX Engine Clock Override support. ► PCI Express Clock This option is used +25mV to +400mV. ► CPU Voltage Control This option is used to change the CPU voltage in a step of 25mV - Foxconn A88GA | English Manual. - Page 37
Logical Count : 4 _PPC, _PSS, and _PCT objects. AMD Athlon(tm) II X4 945 Processor Revision: C2 Cache L1 : 512KB Cache L2 : 2048KB Cache L3 : 6MB Current CPU Speed :300MHz Cool 'N' Quiet [Enabled] C1E Support [Disabled] Move Enter:Select +/-/:Value F10:Save - Foxconn A88GA | English Manual. - Page 38
memory to which the integrated graphics has access is a dynamically allocated partition of system memory. The size of the parition is selectable from within the BIOS. 31 - Foxconn A88GA | English Manual. - Page 39
-locked graphics memory is allocated during driver initialization. This fixed amount of memory (PCIe) graphics card, SurroundView is not supported. The integrated graphics processor (IGP) is automatically by default. Enabling SurroundView in the BIOS enables the integrated UMA graphics controller, - Foxconn A88GA | English Manual. - Page 40
independent 64-bit channels (both channels operate at the same frequency). ■ Reduce DRAM page conflicts - more concurrent open dram pages . ■ Better bus efficiency. Burst lengths supported When both DCTs are enabled in unganged mode, BIOS must initialize the frequency of each DCT in order. 33 - Foxconn A88GA | English Manual. - Page 41
► DRAM Timing Mode When both DCTs (DRAM controller) are enabled in unganged mode, BIOS must initialize the frequency of each DCT in order, you also can configure the timings manually. Settings are : [Auto], [DCT 0], [DCT 1], [Both]. Integrated Peripherals CMOS Setup Utility - Copyright (C) 1985 - Foxconn A88GA | English Manual. - Page 42
fair performance (only PATA, SATA level), or you can select AHCI to get its best performance. [Legacy IDE] - This configures the SATA ports to support legacy IDE mode which is running for old Windows system. ► SATA IDE Combined Mode [Disabled] : Disable SATA 5 and ESATA. [Enabled] : SATA 5 and ESATA - Foxconn A88GA | English Manual. - Page 43
USB 2.0. The available settings are : [High Speed] in 480Mbps; [Full Speed] in 12Mbps. ►BIOS EHCI Hand-Off This is a workround for OSes without EHCI hand-off support.The EHCI ownership change should claim by EHCI driver. ► USB 3.0 Controller This item is used to enable or disable USB 3.0 legacy - Foxconn A88GA | English Manual. - Page 44
. In this state, no system context is lost (CPU or chip set) and hardware maintains all system context. the lowest power, longest wake latency sleeping state supported by ACPI. In order to reduce power to allow for initial boot operations within the BIOS to distinguish whether or not the boot is - Foxconn A88GA | English Manual. - Page 45
3 computer before it entering STR will be saved in memory, and the computer can quickly return to previous state when the STR function wakes. ► Energy-using Products This item is used to enable/disable the EuP(Energy-using Products) feature. When enable, the suspend power of the chipset will be cut - Foxconn A88GA | English Manual. - Page 46
down automatically. This function works only when your operating system is supporting ACPI. ► Case Open Warning This item is used to enable or disable case open warning function. ► CPU/System/NB Temperature The CPU/System/NorthBridge temperature are automatically detected and displayed by the system - Foxconn A88GA | English Manual. - Page 47
settings of this motherboard. Always load the Optimal defaults after updating the BIOS or after clearing the CMOS values. Select this option and press Optimal Defaults? the optimal performance parameters to be set cannot be supported by your hardware devices (for example, too many expansion cards - Foxconn A88GA | English Manual. - Page 48
Save Changes and Exit When you select this option and press , a message will be displayed in the center of the screen: Select [OK] to save your changes to CMOS and exit the program, select [Cancel] or to return to the main menu. Save configuration changes and exit setup? [OK] [Cancel - Foxconn A88GA | English Manual. - Page 49
new RAID built as data storage. It includes the following information : ■ RAID Introduction ■ Install SATA Hard Disks ■ RAID Configuration ■ Create RAID Driver Disk ■ Install Windows OS The RAID BIOS Setup pictures shown in this chapter are for reference only, please refer to the practical screen. - Foxconn A88GA | English Manual. - Page 50
entire array. The disk array data capacity is equal to the number of drive members times the capacity of the smallest member. RAID 0 does not support fault tolerance. RAID 1 (Mirror) RAID 1 writes duplicate data onto a pair of drives and reads both sets of data in parallel. If one of the mirrored - Foxconn A88GA | English Manual. - Page 51
and SATA data cables. 4-3 RAID Configuration This motherboard supports RAID 0, RAID 1 and RAID10 functions. Hardware and motherboard driver CD ■ Several SATA hard disks ■ Windows XP or Vista Install CD RAID Enable in BIOS 1. Boot up your computer, enter the BIOS AMD Option ROM Utility. 44 - Foxconn A88GA | English Manual. - Page 52
4 Create RAID array Here we create RAID 0 as an example: 1. Press [2] in the main menu, "Define LD Menu" appears and the "LD 1" row is highlight, press [Enter], the scree is shown as below: Option ROM Utility (c) 2008 Advanced Micro Devices, Inc. [ Define LD Menu ] LD No RAID Mode Total Drv LD - Foxconn A88GA | English Manual. - Page 53
to CD:\Driver\AMD\RAID\ Driver Disk without entering OS: 1. Boot your computer, press [Del] during POST to enter BIOS. 2. Insert the driver driver disk when the prompt menu appears. 6. Insert a formatted floppy disk into the floppy disk drive, press [Enter] to continue. 7. Follow the instructions - Foxconn A88GA | English Manual. - Page 54
CD/DVD-ROM", save changes and exit BIOS. 4. When the screen shows "No driver were founded...", select "Load Driver". 5. Insert the floppy disk/USB disk specify the location of the driver. 6. Select "AMD AHCI Compatible RAID Controller" and press "Next". 7. After the driver is loaded, the RAID hard
-
 1
1 -
 2
2 -
 3
3 -
 4
4 -
 5
5 -
 6
6 -
 7
7 -
8
-
9
-
10
-
11
-
12
-
13
-
14
-
15
-
16
-
17
-
18
-
19
-
20
-
21
-
22
-
23
-
24
-
25
-
26
-
27
-
28
-
29
-
30
-
31
-
32
-
33
-
34
-
35
-
36
-
37
-
38
-
39
-
40
-
41
-
42
-
43
-
44
-
45
-
46
-
47
-
48
-
49
-
50
-
51
-
52
-
53
-
54
 |
 |

User’s Manual
A88GA Series Motherboard