Foxconn Bloodrage English Manual.
Foxconn Bloodrage Manual
 |
View all Foxconn Bloodrage manuals
Add to My Manuals
Save this manual to your list of manuals |
Foxconn Bloodrage manual content summary:
- Foxconn Bloodrage | English Manual. - Page 1
Bloodrage Motherboard User's Manual - Foxconn Bloodrage | English Manual. - Page 2
may be changed or modified at any time, Foxconn does not obligate itself to inform the user of these changes. Trademark: All trademarks are the property of their respective owners. Version: User's Manual V1.1 for Bloodrage motherboard. Symbol description: Caution: refers to important information - Foxconn Bloodrage | English Manual. - Page 3
., TU-CHENG INDUSTRIAL DISTRICT, TAIPEI HSIEN, TAIWAN, R.O.C. declares that the product Motherboard Bloodrage is in conformity with (reference to the specification under which conformity is declared in methods of measurement Signature : Printed Name : James Liang Place / Date : TAIPEI/2009 - Foxconn Bloodrage | English Manual. - Page 4
FOXCONN Bloodrage PCE Industry Inc. 458 E. Lambert Rd. Fullerton, CA 92835 714-738-8868 714-738-8838 Equipment Classification: Type of Product: Manufacturer: Address: FCC Class B Subassembly Motherboard operation. Tested to comply with FCC standards. Signature : Date : 2009 - Foxconn Bloodrage | English Manual. - Page 5
as a motherboard, CPU or memory. ■ Ensure that the DC power supply is turned off before installing or removing CPU, memory, expansion cards or other placed on the motherboard or within the computer casing. ■ If you are uncertain about any installation steps or have a problem related to the - Foxconn Bloodrage | English Manual. - Page 6
/PCI Configurations 43 PC Health Status 44 Quantum BIOS 46 Board Information 55 Load Optimized Defaults 56 Set Supervisor Password 56 Set User Password 56 Save & Exit Setup 56 Exit Without Saving 56 Chapter 4 CD Instruction Utility CD Introduction 58 AEGIS PANEL Main Panel 61 HW - Foxconn Bloodrage | English Manual. - Page 7
Driver Diskette 81 BIOS Configuration 83 Create RAID in BIOS 83 Install a New Windows XP 107 Existing Windows XP with RAID built as data storage 111 Appendix ATI® CrossFireXTM Technology 115 NVIDIA® SLITM Technology 117 Technical Support : Website : http://www.foxconnchannel.com Support - Foxconn Bloodrage | English Manual. - Page 8
Thank you for buying Bloodrage, a Foxconn Quantum Force series motherboard. Quantum Force products are Foxconn's high end enthusiast products engineered to maximize computing power, providing all you need for break-through performance. With advanced overclocking capabilities and a range of - Foxconn Bloodrage | English Manual. - Page 9
SATA Signal cables 2 X SATA Power and Signal cables right angle Accessory I/O Shield Water Block SONAR X-Fi Card Extreme Cooling Tube Thermal Peripheral Bag Application CD Foxconn motherboard support CD Documentation User's Manual Quick Installation Guide Registration Card CREATIVE Invite Card - Foxconn Bloodrage | English Manual. - Page 10
channel DDR3 1800(oc)/1600(oc)/1333/1066/800MHz (oc*: Overclocking) * The memory controller is integrated into the CoreTM i7 CPU, overclocking might vary from CPU to CPU. Intel officially only supports DDR3 1333 Audio SONAR X-Fi Xtreme Sound Card - 7.1 channel HD Audio with EAX4.0 & CMSS 3D - Foxconn Bloodrage | English Manual. - Page 11
SATA ports (Controlled by JMicron JMB363) Hardware Monitor System voltage detection CPU/System temperature detection CPU/System fan speed detection CPU/System overheating shutdown CPU/System fan speed control Onboard 1394a Supports hot plug Supports 400Mb/s transmission rate Supports - Foxconn Bloodrage | English Manual. - Page 12
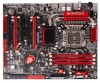
Debug LED 15. Power on Button 16. Reset Button 17. SATA Connectors 18. BIOS ROM 2 19. BIOS ROM 1 20. IDE Connector 21. BIOS_Select Jumper 22. FAN2 Intel® ICH10R 30. CPU Fan Header 31. LGA1366 CPU Socket 32. North Bridge: Intel® X58 Chipset Note : The above motherboard layout is for reference only - Foxconn Bloodrage | English Manual. - Page 13
port supports the USB 2.0/1.1 specification. Use this port for USB devices such as an USB keyboard/mouse, USB printer, USB flash drive and etc. 3. Clear CMOS Button Onboard Clear CMOS button is located directly on the motherboard PCB, so you can easily clear CMOS after failed overclocking attempts - Foxconn Bloodrage | English Manual. - Page 14
SATA device shall provide power by its own. 7. RJ-45 LAN Port Each Gigabit Ethernet LAN port provides Internet connection at up to 1Gb/s data rate. Both Gigabit Ethernet LAN ports can be combined in teaming mode to support LED 8. Audio Ports (SONAR X-Fi Card) For the definition of each audio port - Foxconn Bloodrage | English Manual. - Page 15
Card ■ Install other Internal Connectors ■ Illustration of the Optional Accessory ■ Jumpers ■ Onboard Button ■ Onboard LED ■ Onboard Debug LED Please visit the following website for further details on supported CPUs, Memory and VGAs for your motherboard : http://www.foxconnchannel.com/product - Foxconn Bloodrage | English Manual. - Page 16
before you begin to install the CPU : ■ Make sure that the motherboard supports the CPU. ■ Always turn off the computer and unplug the power cord from the power supply before installing the CPU to prevent hardware damage. ■ Unlock and open the CPU socket carefuly. ■ Remove the socket protection cap - Foxconn Bloodrage | English Manual. - Page 17
the power outlet to prevent damage to the CPU. 1. Release the CPU socket lever. 2. Lift the metal cover on the CPU socket. 3. Remove protective socket cover. 4. Check pin one marking (triangle) with the pin one corner of the CPU socket, align the CPU notches with the socket alignment keys and - Foxconn Bloodrage | English Manual. - Page 18
CPU cooler on the motherboard. The Foxconn QuantumForce BloodRage comes equipped with socket 1366 and socket 775 mounting holes to support 2 1 4. Attach the 4-wire CPU cooler connector to the CPU fan socket on the motherboard . Release bolts of CPU cooler from motherboard : 1. Turning the push pin ( - Foxconn Bloodrage | English Manual. - Page 19
thermal grease may stick it to the CPU. If the Heatsink is stuck slightly twist it left and right until you can remove it. Be patient and do not Configuration This motherboard provides three DDR3 memory sockets and supports Triple Channel Technology. When memory is installed, the BIOS will - Foxconn Bloodrage | English Manual. - Page 20
computer and unplug the power cord from the power outlet to prevent damage to the memory module. Be sure to install DDR3 DIMMs on this motherboard. Notch If you take a look at front side of memory module, it has asymmetric pin counts on both sides separated by a notch in the middle - Foxconn Bloodrage | English Manual. - Page 21
2-3 Install an Expansion Card ! ■ Make sure the motherboard supports the expansion card. Carefully read the manual that came with your expansion card. ■ Always turn off the computer and unplug the power cord from the power outlet before installing an expansion card to prevent hardware damage - Foxconn Bloodrage | English Manual. - Page 22
a Graphics Card: Gently insert the graphics card into the PCI Express x16 slot. Make sure the graphics card is lockedby the latch at the end of the PCI Express x16 slot. • Removing the Card: Push the latch at the end of the PCI Express x16 slot to release the card and then pull the card straight up - Foxconn Bloodrage | English Manual. - Page 23
PWR2 is the ATX power supply connector. Make sure that the power supply cable and pins are properly aligned with the connector on the motherboard. Firmly plug the power supply cable into the connector and make sure it is secure. Pin # Definition Pin # Definition 1 3.3V 13 3.3V 2 3.3V 14 - Foxconn Bloodrage | English Manual. - Page 24
: PWR1 The 8-pin ATX 12V power supply connects to PWR1 and provides power to the CPU. +12V 51 Pin # 1 GND 2 3 84 4 PWR1 Definition GND GND GND GND Disk Drive Connector : FLOPPY1 This motherboard includes a standard floppy disk drive(FDD) connector, supporting 360KB, 720KB, 1.2MB, 1. - Foxconn Bloodrage | English Manual. - Page 25
2 Front Panel Connector : FP1 This motherboard includes one connector for connecting the front rear panel, this product also provides two 10-pin USB connectors on its motherboard. By connecting through USB cables with them, user can quickly expand another four USB ports on the front panel . 9 10 - Foxconn Bloodrage | English Manual. - Page 26
: SATA_1-2, SATA_3-4, SATA_5-6, The Serial ATA connector supports SATA Hard Disks, SSDs and optical Drives. The current Serial ATA II interface allows Foxconn QuantumForce OC Panel, which can be installed in any standard 5.25" optical drive bay. It can be used to display the Port80 Debug codes - Foxconn Bloodrage | English Manual. - Page 27
quality and overclocking capability we created an add in SONAR X-Fi Xtreme Sound Card (included in the package) to prevent signal noises of the PWM and Audio circuits from influencing each other. This header is used to connect the SONAR X-Fi Xtreme Sound Card to the Motherboard. SONAR X-Fi Card 12 - Foxconn Bloodrage | English Manual. - Page 28
the Optional Accessory 1. Thermal Peripheral Bag The Foxconn QuantumForce BloodRage is equipped with the second generation 4in1 Heatsink which features much improved aircooling, a full size copper waterblock, and full modularity with a copper base plate with support for third party and custom made - Foxconn Bloodrage | English Manual. - Page 29
corner of the Heatsink. Note: FOXCONN do not guarantee the reliability of testing before installing the waterblocks on the CPU, chipset, VGA etc. Pull both one. Remove the 4 screws holding the Northbridge Heatsink in place, remove the allows extreme overclockers to use Dry Ice or Liquid Nitrogen as a - Foxconn Bloodrage | English Manual. - Page 30
2 Note: Please do the waterproof solution appropriately when you use this tube with LN2. 23 - Foxconn Bloodrage | English Manual. - Page 31
Users should read the following content carefully prior to modifying any jumper setting. Description of Jumpers 1. For any jumper on this motherboard, pin 1 can be identified by the bold silkscreen next to it. However, in this manual Electrical Static Discharge) problem. Jumper 1 to removing the - Foxconn Bloodrage | English Manual. - Page 32
Set Pin 3 and Pin 4 closed Set Pin 5 and Pin 6 closed Set Pin 7 and Pin 8 closed Function Force BIOS ROM 1 Force BIOS ROM 2 BIOS select, default is BIOS ROM 1 BIOS select, default is BIOS ROM 2 Button_En Jumper: BUTTON_EN The jumper is used to set whether to enable Clear_CMOS button on the back - Foxconn Bloodrage | English Manual. - Page 33
will light whenever the power supply that connected to the motherboard is switched on. DIMM3 SPD Detect LED: The Normal status is on. When the DDR in DIMM3 is not support SPD address in DIMM3, the LED will turn off. WARNING! Do not remove or plug in any device when the onboard LED - Foxconn Bloodrage | English Manual. - Page 34
2 2-9 Onboard Debug LED 2-digital LED displays show the current hardware status and display Port80 and Intel MRC codes during Bootup to enable quick and easy system debugging. ! when you read the LED, make sure the small point is in the lower right of each section. . CAUTION 27 - Foxconn Bloodrage | English Manual. - Page 35
the BIOS will be updated in future, the BIOS information described in this manual is for reference only. We can not guarantee that the content of this manual to remain 100% consistent with the latest released BIOS at any given time in the future. Please visit our support website for updated manuals - Foxconn Bloodrage | English Manual. - Page 36
allows you to select from a list of setup functions together with two Utility ► Standard CMOS Features ► Quantum BIOS ► Advanced BIOS User Password ► PnP/PCI Configurations Save & Exit Setup ► PC Health Status Exit Without Saving Esc : Quit F10 : Save & Exit Setup Select Item Time, Date - Foxconn Bloodrage | English Manual. - Page 37
...etc.), still, it may cause problem if you have more memory or I/O cards installed. It means, if your system loading is heavy, set to optimal default may sometimes come out an unstable system. What you need now is to adjust BIOS setting one by one, trial and error, to find out the best setting - Foxconn Bloodrage | English Manual. - Page 38
Help F5:Previous Values F7:Optimized Defaults ► Date - format Day-weekday from Sun. to Sat., automatically displayed by BIOS (Read Only). Month-month from 1 to 12. Date-date from 1st to 31st. Year-year, set up by users. Use , keys to select a field - Foxconn Bloodrage | English Manual. - Page 39
Channel information will not be displayed if "SATA Mode" is set to [AHCI] or [RAID]. In these two modes, the hard disk information can be found by getting into Intel® Matrix Storage Manager option ROM utility (or RAID BIOS). We will discuss RAID BIOS later. ► Drive A This option allows you to select - Foxconn Bloodrage | English Manual. - Page 40
Utility Advanced BIOS Features ► Removable Code Control Press Enter Item Help Press Enter Hard Disk Menu Level ► CD-ROM Removble Select Removable ), it will appear an error message. Disabling this function, option is set to Fast, the motherboard chipset controls the operation of Gate A20 - Foxconn Bloodrage | English Manual. - Page 41
motherboards as it specifies the version of the MPS that the motherboard to enable MPS 1.4 support if you need to make use of the secondary PCI bus on a motherboard that doesn't come with screen show. ► Debug Code Control This item allows you to select debug code control mode. Select "LPC", - Foxconn Bloodrage | English Manual. - Page 42
CMOS Setup Utility Advanced Chipset Features System BIOS Cacheable PCI BIOS Cacheable Select "Enabled" to allow caching of the system BIOS which may improve performance. If any other program writes to this memory area, a system error and the home. VT-d support on Intel platforms provides the - Foxconn Bloodrage | English Manual. - Page 43
3 Integrated Peripherals Phoenix - AwardBIOS CMOS Setup Utility Integrated Peripherals ► OnChip IDE Device ► OnBoard Device ► USB Device Setting OnBoard FDC Controller Press Enter Item Help Press Enter Press Enter Menu Level ► Enabled Move - Foxconn Bloodrage | English Manual. - Page 44
Setting options: [IDE]; [RAID]; [AHCI]. The SATA interface is controlled by Intel® south bridge chip ICH10R. ► Legacy Mode Support There are Native IDE and Legacy (or compatible) IDE modes. Legacy mode supports OS through legacy IDE driver. Most SATA functions are not supported in Legacy mode, like - Foxconn Bloodrage | English Manual. - Page 45
3 OnBoard Device Phoenix - AwardBIOS CMOS Setup Utility OnBoard Device HD Audio Controller OnBoard 1394 Controller OnBoard LAN 1 Controller OnBoard LAN 2 Controller OnBoard LAN Boot ROM Enabled Item Help Enabled Enabled Menu Level ► - Foxconn Bloodrage | English Manual. - Page 46
3 USB Device Setting Phoenix - AwardBIOS CMOS Setup Utility USB Device Setting USB 1.0 Controller Enabled Item Help operating system (such as DOS). ► ***USB Mass Storage Device Boot Setting*** BIOS auto detects the presence of USB Mass Storage Devices, you can configure the Boot setting mode - Foxconn Bloodrage | English Manual. - Page 47
Utility Power Management Setup ► Power-On Function ACPI Function ACPI Suspend Type Soft-Off by PWR-BTTN Resume by Alarm x Date(of Month) Alarm x Time(hh:mm:ss) Alarm HPET Support and the BIOS. In other this state, no system context is lost (CPU or chip set) and hardware maintains all - Foxconn Bloodrage | English Manual. - Page 48
you push the power button in less than 4 Second then release. If set to [Instant-Off], the PC powers off the PC power source must not be turned off. ► Date (of Month) Alarm When Resume by Alarm is set to This item is used to enable or disable the HPET Support. ► HPET Mode This item is used to set the - Foxconn Bloodrage | English Manual. - Page 49
3 Power-On Function Phoenix - AwardBIOS CMOS Setup Utility Power-On Function Wake-Up by PCI Card Enabled Item Help USB KB/MS Wake-Up From S3 Disabled Power-On Function Button Only Menu Level ► x KB Power-On Password Enter x Hot Key - Foxconn Bloodrage | English Manual. - Page 50
Phoenix - AwardBIOS CMOS Setup Utility PnP/PCI Configurations Init Display cards you use support PnP, then select [Auto] and the BIOS will automatically distribute interruption resources. If the PCI cards you installed need special IRQ resources, you will need to select [Manual] and manually - Foxconn Bloodrage | English Manual. - Page 51
3 PC Health Status Phoenix - AwardBIOS CMOS Setup Utility PC Health Status Shutdown Temperature Current CPU Temperature Current NB Temperature Current System Temperature Smart CPU Fan Function X Smart CPU Fan Duty Cycle Smart CPU Fan Speed Smart NB Fan Function X Smart NB Fan Duty - Foxconn Bloodrage | English Manual. - Page 52
shows the Current Fan 1 speed detected by the system. ► Smart Fan2 Controlled by It allows you to set the smart Fan 2 function. The options are: [CPU Fan Control] , [NB Fan Control] and [Sys Fan Control]. ► Current Fan2 Speed This item shows the Current Fan 2 speed detected by the system. ► Current - Foxconn Bloodrage | English Manual. - Page 53
AwardBIOS CMOS Setup Utility Quantum BIOS ► CPU Feature Press Enter Item Help ► Memory Timing Config Press Enter ► All Voltage Control Press Enter Menu Level ► ► OC Gear Press Enter Over Clock Phase Select O.C. Disabled ******* Ratio and Clock Setting ******* x CPU Clock Ratio - Foxconn Bloodrage | English Manual. - Page 54
3 ► Over Clock Recovery When this feature is enabled, once system failed after overclocking, it will load the previous CMOS settings (before overclocking) back, so the system can always work. 47 - Foxconn Bloodrage | English Manual. - Page 55
motherboard, BIOS and operation system. Please refer to Intel Website for more information. ► Turbo Mode Function This item is used to enable Intel Turbo mode. ► CxE Function CxE represents Enhanced HALT State. It is a feature which Intel CPU uses to reduce power consumption when in halt state. User - Foxconn Bloodrage | English Manual. - Page 56
physical compute system can function as multiple "virtual" systems. Vanderpool Technology can help improve future virtualization solutions. This item will be displayed only when the CPU is supporting this feature and the setting is used to enable/disable it. ► TDC Enable This item is used to enable - Foxconn Bloodrage | English Manual. - Page 57
3 Memory Timing Config Phoenix - AwardBIOS CMOS Setup Utility Memory Timing Config ******** Memory Controller Setting ******** Item Help Memory Parameter Setting Disabled x Memory Control Setting Channel for Original Menu Level ► x Channel Interleave Setting 6 way x Rank - Foxconn Bloodrage | English Manual. - Page 58
3 All Voltage Control Phoenix - AwardBIOS CMOS Setup Utility All Voltage Control Affect CPU MHz Item Help x CPU Voltage Setting Default CPU Target Voltage 1.15625 Menu Level ► CPU Current Voltage 1.23200 CPU Default Voltage 1.15625 x CPU VTT Voltage Setting Default x QPI PLL - Foxconn Bloodrage | English Manual. - Page 59
3 Warning: Adjusting the voltage beyond the IOH default 1.506 VCCA voltage could result in damage to the IOH. ► SB Voltage Setting This item is used to set SB Voltage. The default voltage is 1.500V. ► IOH Core Voltage Setting Isolated power for ICH core voltage, default voltage is 1.506V. Warning: - Foxconn Bloodrage | English Manual. - Page 60
24/7 OverClock]; [Tweaked Stock Speed]. ► Store / Restore / Clear My Setting This item allows you to Store/Restore/Clear the BIOS settings. See the help string in "Item Help" table for detail. ********Foxconn Function Software Item Selecting When BIOS_SELECT jumper, which is on the motherboard, is - Foxconn Bloodrage | English Manual. - Page 61
System Status Normal No Memory No Display Post Error Message No CPU Fan Power LED Status Always On Continue blinking On ( used to allow the system to supply the PCI slot bus clock if system detect a PCI card on the slot. ► Spread Spectrum If you enabled this function, it can significantly reduce the - Foxconn Bloodrage | English Manual. - Page 62
Setup Utility Board Information Model Name BLOODRAGE Item Help BIOS ID X58A01.F1 BIOS Version D05 Menu Level ► BIOS Build Date 10/27/2008 OnBoard LAN 2 MAC Address 00-1C-25-3B-D1-FE Genuine Intel (R) CPU 000 @ 3.20GHz EM64T CPU Hyper-Threading Technology CPU (HT - Foxconn Bloodrage | English Manual. - Page 63
of system to improve the performances of system com- ponents. But if the optimized performance parameters to be set cannot be supported by your hardware devices, the system may fail to work. It may happen on when you installed too many add-on cards on your system, or overloaded the hardware until - Foxconn Bloodrage | English Manual. - Page 64
CD that came with the motherboard contains useful software and several utility drivers that enhance the motherboard features. This chapter includes the following information : ■ Utility CD Introduction ■ AEGIS PANEL ■ FOX LiveUpdate ■ FOX LOGO ■ FOX DMI Note : Because each module is independent - Foxconn Bloodrage | English Manual. - Page 65
can enjoy CREATIVE X-Fi features, please install Realtek HDA audio driver first, and then install SB X-Fi audio driver. Realtek 811X LAN Driver Use it to install Realtek LAN driver. Intel RAID Driver Installing this driver needs "SATA Mode" in BIOS to be set to [AHCI] or [RAID]. This restriction 58 - Foxconn Bloodrage | English Manual. - Page 66
Use it to install SB X-Fi audio driver. AEGIS PANEL Foxconn new utility software for monitoring system information. See "AEGIS PANEL" for details. Fox LiveUpdate The Fox LiveUpdate allows you to backup or update the system BIOS, drivers and utilities in Windows® environment. See "Fox LiveUpdate" for - Foxconn Bloodrage | English Manual. - Page 67
Norton® Internet Security to protect your PC from being affected by viruses. Intel RAID Utility Use it to install Intel RAID utility. Marvell SAS Utility Use it to install Marvell SAS utility. 3. Foxconn WebSite Click it to visit Foxconn's Website. 4. Browse CD Click it to browse the CD content. 60 - Foxconn Bloodrage | English Manual. - Page 68
Force Overclock Panel) OC Gear Supported Operating Systems : -Windows XP (32-bit and 64-bit) -Windows Vista (32-bit and 64-bit) Using AEGIS PANEL: 1. Main Panel When AEGIS Panel is running, a main menu appears at the right hand side of the screen. This menu will disappear if you remove the mouse - Foxconn Bloodrage | English Manual. - Page 69
4 2. HW Monitor Click on "HW Monitor" icon , its panel appears. By moving the mouse on the voltage icon, it will display voltage information. Move the mouse on fan or temperature icon will show relative information accordingly. Voltage icon Fan icon Temperature icon 2.1 HW Monitor - Voltage - Foxconn Bloodrage | English Manual. - Page 70
setting menu. It allows you to set the low/high limits of the CPU, NB and System fan speeds, and to enable the alert function. If the temperature setting menu. It allows you to set the low/high limits of CPU tem- perature, System temperature and NB temperature, and to enable the alert function. - Foxconn Bloodrage | English Manual. - Page 71
voltage and so on. With several buttons located on its front panel, user can easily set the BCLK, adjust CPU, QPI, DRAM, IOH and VTT voltages and change fan speeds. For detailed descriptions, please refer to related QF OC Panel manual. Click "QF OC Panel" icon to open its panel. This panel will - Foxconn Bloodrage | English Manual. - Page 72
dialog. It is support to read OC Gear from BIOS setting to file and support to write OC Gear setting from file to BIOS. Benefits: the user only adjust overclocking once and save it in OC Gear function under BIOS setup utility (click "DEL" key to enter BIOS setup utility when boot and select - Foxconn Bloodrage | English Manual. - Page 73
FOX LiveUpdate FOX LiveUpdate is a useful utility to backup and update your system BIOS, drivers and utilities by local or online. Supporting Operating Systems : ■ Windows 2000 ■ Windows XP (32-bit and 64-bit) ■ Windows 2003 (32-bit and 64-bit) ■ Windows Vista (32-bit and 64-bit) 4 - Foxconn Bloodrage | English Manual. - Page 74
. Key in a BIOS name Click here 1-3 Local Update - Update This page helps you to update your BIOS from a local file. After click "Update", An alert message will be displayed to ensure if you really want to continue, click "Yes" to confirm. A setup wizard will guide you to load a local BIOS file to - Foxconn Bloodrage | English Manual. - Page 75
the wizard to finish the update operation. Click here 4 Current information Select BIOS to update Search new BIOS from Internet Browse detailed information Update BIOS Close the window 2-2 Online Update - Update Driver This page lets you update your system drivers from Internet. Click "start - Foxconn Bloodrage | English Manual. - Page 76
the selected driver Close the window 2-3 Online Update - Update Utility This page lets you update utilities from Internet. Click "start", it will search the new utilities from Internet. Then follow the wizard to finish the update operation. Click here 4 Select the utility to update 69 Current - Foxconn Bloodrage | English Manual. - Page 77
All This page lets you update your system drivers from Internet. Click "start", it will search all new BIOS/drivers/utilities from Internet. Then follow the wizard to finish the update operation. Click here Current information Search all new BIOS/ drivers/utilities from Internet Close the window - Foxconn Bloodrage | English Manual. - Page 78
3. Configure 3-1 Configure - option This page lets you set auto search options. After you enable the auto search function, FOX LiveUpdate will start its searching from Internet and if any qualified item found, it will pop out a message on the task bar to inform you to do the next step. Click here - Foxconn Bloodrage | English Manual. - Page 79
- System This page lets you set the backup BIOS location and change different skin of the FOX LiveUpdate utility. Click here Determine if the FOX LiveUpdate can auto run when the system starts up Set the location of download files or auto backup BIOS Select different skin of the software Reset to - Foxconn Bloodrage | English Manual. - Page 80
protective, and you must make sure the flash process is continuous and without any interruption. Click here Select which BIOS ROM to flash(Only available to motherboard with backup BIOS ROM ) Select to flash Boot Block Select to clear CMOS Apply the changes Reset to default value ! We recommend - Foxconn Bloodrage | English Manual. - Page 81
and useful utility to backup will be displayed if you enable the BIOS "Full Screen Logo Show" setting in "Advanced BIOS Features" menu. Supporting Operating Systems : ■ Windows 2000 ■ BIOS file automatically. During this time, please DO NOT shut down the application and the system, or the motherboard - Foxconn Bloodrage | English Manual. - Page 82
three DMI data formats : Report, Data Fields and Memory Dump. With DMI information, system maker can easily analyze and troubleshoot your motherboard if there is any problem occurred. Supporting Operating Systems : ■ Windows 2000 ■ Windows XP (32-bit and 64-bit) ■ Windows 2003 (32-bit and 64-bit - Foxconn Bloodrage | English Manual. - Page 83
Configuration Introduction ■ Intel® Matrix Storage Manager ■ Create a RAID Driver Diskette ■ BIOS Configuration ■ Create RAID in BIOS ■ Install a New Windows XP ■ Existing Windows XP with RAID built as data storage The RAID BIOS Setup pictures shown in this chapter are for reference only, please - Foxconn Bloodrage | English Manual. - Page 84
Follow 5-3 to create RAID in BIOS. 4. Follow 5-4 to Install Windows Operating System. What kinds of hardware and software you need here : 1. A floppy drive. 2. A CD-ROM drive. 3. Several SATA hard disks. 4. A RAID driver diskette. 5. A motherboard driver CD. (To create RAID driver diskette if it is - Foxconn Bloodrage | English Manual. - Page 85
The following RAID configurations are provided for users. There are three major key concepts in RAID: 1. Mirroring : The copying of data to more than one disk; 2. Striping : The splitting of data across more than one disk; 3. Error correction : Where redundant data is stored to allow problems to be - Foxconn Bloodrage | English Manual. - Page 86
block size can be set from 4KB to 128KB. RAID 0 does not support fault tolerance. RAID 1 (Mirror) RAID 1 writes duplicate data onto a pair of drives drives in the array. RAID 5 (Parity) RAID 5 provides data striping at the byte level and also stripes error correction information. This results - Foxconn Bloodrage | English Manual. - Page 87
2. Connect one end of the SATA cable to motherboard's SATA connector, and the other end to SATA hard disk. 3. Connect SATA power cable to the power connector of SATA hard disk. WARNING! ■ Both AHCI and RAID modes need to install Intel® Matrix Storage driver. ■ Set SATA mode in BIOS to AHCI, you can - Foxconn Bloodrage | English Manual. - Page 88
a brand new Windows XP on a AHCI or RAID system, you need to configure the SATA Mode in BIOS to either AHCI or RAID first. You also need to create a RAID driver diskette for use in installing your Windows XP system. Windows Vista has native RAID driver in itself, you can skip these steps. 1. Find - Foxconn Bloodrage | English Manual. - Page 89
of installing Windows XP in your RAID system, it will ask you to use this floppy diskette to provide driver for additional specific devices, for example, a RAID device. 10. Install Serial ATA Hard Disks : 10-1. Shut down your computer. 10-2. Install SATA hard disks into the drive bays, connect - Foxconn Bloodrage | English Manual. - Page 90
Utility OnChip IDE Device SATA Mode Legacy Mode Support x Turbo Memory Support OnBoard IDE and eSATA Chip OnBoard SAS Chip RAID Help F5:Previous Values F7:Optimized Defaults 5-3 Create RAID in BIOS Enter RAID BIOS Setup When BIOS is restarted, it will display a message asking you - Foxconn Bloodrage | English Manual. - Page 91
input a device name for the RAID0 system and press to apply it. Here, we name it as TryRAID0 to replace the default Volume0. 3. In "RAID Level" item, you can use Up or Down arrow key to make a selection from one of RAID0, 1, 5, 10 items. Select RAID0 (Stripe) and press - Foxconn Bloodrage | English Manual. - Page 92
Disk Non-RAID Disk Non-RAID Disk Non-RAID Disk Select 2 to 6 disks to use in creating the volume [↑↓]-Prev/Next [SPACE]-SelectDisk [ENTER]-Done 5 Cr[↑e↓a]-CtihnanggeRA[TIDAB]1-Next [ESC]-Previous Menu [ENTER]-Select 5. From the hard drive list, use Up or Down arrow key to reach the hard disks - Foxconn Bloodrage | English Manual. - Page 93
ICH190RRwwRRAAIDID55 CCooppyyrriigghhtt((CC)) 22000033--0084 IInntteell CCoorrppoorraattiioonn. AAll lRl RigihgthstsRReseesrevrevde.d. [ CREATE VOLUME MENU ] Name: TryRAID0 RAID Level: RAID0(Stripe) Disks: Select Disks Strip Size: 128KB Capacity: 465.8 GB Create Volume [ HELP - Foxconn Bloodrage | English Manual. - Page 94
0084 IInntteell CCoorrppoorraattiioonn. AAll lRl RigihgthstsRReseesrevrevde.d. [ MAIN MENU ] 1. Create RAID Volume 3. Reset Disks to Non-RAID 2. Delete RAID Volume 4. Exit [ DISK/VOLUME INFORMATION ] RAID Volume : ID Name Level Stripe Size 0 TryRAID0 RAID0(Stripe - Foxconn Bloodrage | English Manual. - Page 95
is 16 characters or less. 5 [↑↓]-Change [TAB]-Next [ESC]-Previous Menu [ENTER]-Select 2. In "Name" item, we name it as TryRAID0-1 for second volume. 3. In "RAID Level" item, you can use Up or Down arrow key to make a selection, only RAID0, 1 can be selected. Select RAID0 (Stripe) and press - Foxconn Bloodrage | English Manual. - Page 96
Non-RAID Disk Select 2 to 6 disks to use in creating the volume [↑↓]-Prev/Next [SPACE]-SelectDisk [ENTER]-Done Cr[↑e↓a]-CtihnanggeRA[TIDAB]1-Next [ESC]-Previous Menu [ENTER]-Select 5 5. From the hard disk list, select the previously configured RAID0 hard disks, and press key to select - Foxconn Bloodrage | English Manual. - Page 97
ICH190RRwwRRAAIDID55 CCooppyyrriigghhtt((CC)) 22000033--0084 IInntteell CCoorrppoorraattiioonn. AAll lRl RigihgthstsRReseesrevrevde.d. [ CREATE VOLUME MENU ] Name: TryRAID0-1 RAID Level: RAID0(Stripe) Disks: Select Disks Strip Size: 128KB Capacity: 265.8 GB Create Volume [ HELP - Foxconn Bloodrage | English Manual. - Page 98
0084 IInntteell CCoorrppoorraattiioonn. AAll lRl RigihgthstsRReseesrevrevde.d. [ MAIN MENU ] 1. Create RAID Volume 3. Reset Disks to Non-RAID 2. Delete RAID Volume 4. Exit [ DISK/VOLUME INFORMATION ] RAID Volume : ID Name Level Stripe Size 0 TryRAID0 RAID0(Stripe - Foxconn Bloodrage | English Manual. - Page 99
] Enter a unique volume name that has no special characters and is 16 characters or less. 5 [↑↓]-Change [TAB]-Next [ESC]-Previous Menu [ENTER]-Select 3. In "RAID Level" item, you can use Up or Down arrow key to make a selection from one of RAID0, 1, 5, 10 items. Select RAID1 (Mirror) and press - Foxconn Bloodrage | English Manual. - Page 100
Disk Non-RAID Disk Non-RAID Disk Non-RAID Disk Select 2 to 6 disks to use in creating the volume [↑↓]-Prev/Next [SPACE]-SelectDisk [ENTER]-Done 5 [↑↓]-Change [TAB]-Next [ESC]-Previous Menu [ENTER]-Select 5. From the hard drive list, use Up or Down arrow key to reach the hard disks you want to - Foxconn Bloodrage | English Manual. - Page 101
ICH190RRwwRRAAIDID55 CCooppyyrriigghhtt((CC)) 22000033--0084 IInntteell CCoorrppoorraattiioonn. AAll lRl RigihgthstsRReseesrevrevde.d. [ CREATE VOLUME MENU ] Name: TryRAID0 RAID Level: RAID0(Stripe) Disks: Select Disks Strip Size: N/A Capacity: 426352.89 GB Create Volume [ HELP - Foxconn Bloodrage | English Manual. - Page 102
HELP ] Enter a unique volume name that has no special characters and is 16 characters or less. [↑↓]-Change [TAB]-Next [ESC]-Previous Menu [ENTER]-Select 3. In "RAID Level" item, you can use Up or Down arrow key to make a selection from one of RAID0, 1, 5, 10 items. Select RAID10(RAID0+1) and press - Foxconn Bloodrage | English Manual. - Page 103
ICH190RRwwRRAAIDID55 CCooppyyrriigghhtt((CC)) 22000033--0084 IInntteell CCoorrppoorraattiioonn. AAll lRl RigihgthstsRReseesrevrevde.d. [ CREATE VOLUME MENU ] Name: TryRAID10 RAID Level: RAID10(RAID0+1) Disks: Select Disks Strip Size: 64KB Capacity: 465.8 GB Create Volume [ HELP - Foxconn Bloodrage | English Manual. - Page 104
] Enter a unique volume name that has no special characters and is 16 characters or less. 5 [↑↓]-Change [TAB]-Next [ESC]-Previous Menu [ENTER]-Select 3. In "RAID Level" item, you can use Up or Down arrow key to make a selection from one of RAID0, 1, 5, 10 items. Select RAID5(Parity) and press - Foxconn Bloodrage | English Manual. - Page 105
Disk Non-RAID Disk Non-RAID Disk Non-RAID Disk Select 2 to 6 disks to use in creating the volume [↑↓]-Prev/Next [SPACE]-SelectDisk [ENTER]-Done 5 Cr[↑e↓a]-CtihnanggeRA[TIDAB]1-Next [ESC]-Previous Menu [ENTER]-Select 5. From the hard drive list, use Up or Down arrow key to reach the hard disks - Foxconn Bloodrage | English Manual. - Page 106
0084 IInntteell CCoorrppoorraattiioonn. AAll lRl RigihgthstsRReseesrevrevde.d. [ MAIN MENU ] 1. Create RAID Volume 3. Reset Disks to Non-RAID 2. Delete RAID Volume 4. Exit [ DISK/VOLUME INFORMATION ] RAID Volume : ID Name Level Stripe Size 0 TryRAID5 RAID5(Parity - Foxconn Bloodrage | English Manual. - Page 107
WD-WCANKC865380 2 Maxtor 6L250S0 L50SKP4G 4 ST3320620SV 9QF4YJGQ 5 ST3300831AS 3NF02XH2 Size 232.9GB 232.9GB 298.1GB 279.5GB Type/Status(Vol ID) Non-RAID Disk Member Disk(0) Member Disk(0) Member Disk(0) [↑↓]-Select [ESC]-Exit [ENTER]-Select Menu 2. Use Up or Down arrow key to select the - Foxconn Bloodrage | English Manual. - Page 108
THEEDLPD]ISKS WILL BE LOST! Are you sure you want to delete "TryRAID5"? (Y/N) : Deleting a volume will reset the disks to non-RAID. WARNING: ALL DISK DATA WILL BE DELETED. [↑↓]-Select [ESC]-Previous Menu [DEL]-Delete Volume 4. Return to Main Menu. IInntteell((RR)) MMaattrriixx SSttoorraaggee - Foxconn Bloodrage | English Manual. - Page 109
® Matrix Storage Manager utility, because the utility will ask you which RAID Volume 3. Reset Disks to Non-RAID 3. Delete RAID Volume [ RESET RAID DA4T.AE]xit Resetting RAID disk will remove its RAID structures and revert it to a non-RAID disk. [ DISK/VOLUME INFORMATION ] RAID - Foxconn Bloodrage | English Manual. - Page 110
.d. [ MAIN MENU ] 1. Create RAID Volume 3. Reset Disks to Non-RAID 3. Delete RAID Volume [ RESET RAID DA4T.AE]xit Resetting RAID disk will remove its RAID structures and revert it to a non-RAID disk. [ DISK/VOLUME INFORMATION ] RAID VolumWeA: RNING: Res etting a dis - Foxconn Bloodrage | English Manual. - Page 111
.d. [ MAIN MENU ] 1. Create RAID Volume 3. Reset Disks to Non-RAID 3. Delete RAID Volume [ RESET RAID DA4T.AE]xit Resetting RAID disk will remove its RAID structures and revert it to a non-RAID disk. [ DISK/VOLUME INFORMATION ] RAID VolumWeA: RNING: Re setting a dis - Foxconn Bloodrage | English Manual. - Page 112
4 ST3320620SV 9QF4YJGQ 5 ST3300831AS 3NF02XH2 Size 232.9GB 232.9GB 298.1GB 279.5GB Type/Status(Vol ID) Member Disk(0) Member Disk(0) Non-RAID Disk Member Disk(0) Volume with "Rebuild" status will be rebuilt within the operating system. [↑↓]-Select [ESC]-Exit [ENTER]-Select Menu 105 - Foxconn Bloodrage | English Manual. - Page 113
Exit RAID BIOS 1. Take TryRAID5 as an example, select "4. Exit" in main menu and press . The system will reboot. 3. Shut down the computer, remove WD hard disk, and we will continue for Windows OS installation. If you do not remove irrelevant WD hard disk, Windows may detect it during the - Foxconn Bloodrage | English Manual. - Page 114
SATA Mode in BIOS to either AHCI or RAID, you need to follow these steps to install your Windows XP system. 1. Press to enter BIOS BIOS setup. Phoenix - AwardBIOS CMOS Setup Utility Advanced BIOS Features ► Removable Screen Show Debug Code Control Press Enter Item RAID driver. 107 - Foxconn Bloodrage | English Manual. - Page 115
storage devices installed in your system, or you have chosen to manually specify an adapter. Currently, Setup will load support for the following mass storage device(s): * To specify additional SCSI adapters, CD-ROM drivers, or special disk controllers for use with Windows, including those - Foxconn Bloodrage | English Manual. - Page 116
we wanted. Press to continue. Windows Setup Setup will load support for the following mass storage device(s): Intel(R) ICH8R/ICH9R/ICH10R SATA RAID Controller * To specify additional SCSI adapters, CD-ROM drivers, or special disk controllers for use with Windows, including those for which - Foxconn Bloodrage | English Manual. - Page 117
ad DOWN ARROW keys to select an item in the list. ● To set up Windows XP on the selected item Install C=Create Partition F3=Quit 10. You must always keep RAID diskette in the floppy drive during Windows XP installation, otherwise driver into drive A: * Press ENTER when ready F3=Quit ENTER= - Foxconn Bloodrage | English Manual. - Page 118
CD drive users. The correct steps are : 1. In current Windows XP system (no matter what SATA or IDE CD drive you have), browse the CD, copy the whole directory of Intel® Matrix Storage Manager setup program to your desktop. For example, drag and copy directory "\Driver\Intel\RAID\ Utility" to your - Foxconn Bloodrage | English Manual. - Page 119
power on computer again. Press key, get into BIOS, set "SATA Mode" to [RAID], press to save and exit BIOS. PC will reboot. Phoenix - AwardBIOS CMOS Setup Utility OnChip IDE Device SATA Mode Legacy Mode Support x Turbo Memory Support OnBoard IDE and eSATA Chip OnBoard SAS Chip - Foxconn Bloodrage | English Manual. - Page 120
5 5. Use Explorer to get into the Intel® driver directory which was previously copied to the desktop. 6. Click on Setup.exe to install Intel® Matrix Storage Manager driver. 113 - Foxconn Bloodrage | English Manual. - Page 121
5 7. Install complete. 8. In Windows Explorer, right click on My Computer, click on Manage, then click on Disk Management to format these new RAID disks. Follow the Wizard to finish the job. 114 - Foxconn Bloodrage | English Manual. - Page 122
motherboard, such as Foxconn's Bloodrage. ■ 2, 3 or 4 CrossFireXTM graphics cards For the detailed CrossFireXTM Graphic Card support list on this motherboard, please visit the website: http://www.foxconnchannel.com Using CrossFireXTM Technology 1. Please uninstall any existing graphics card drivers - Foxconn Bloodrage | English Manual. - Page 123
7. Install Microsoft's .NET Framework Version 1.1. Without it, The ATI CatalystTM Control Center can not launch properly. 8. Install the ATI graphics card drivers and restart your computer. Then you will find "ATI Catalyst Control Center" on your desktop. 9. Double-click on the ATI Catalyst Control - Foxconn Bloodrage | English Manual. - Page 124
® Vista operating system only. ■ For the detailed Graphics Card support list on this motherboard, please visit the website: http://www.foxconnchannel.com 2. Graphics card configuration 2-1 Installing dual SLI-ready graphics cards 1. Install one graphics card into the PCI-E1_16X slot, the other into - Foxconn Bloodrage | English Manual. - Page 125
3. Connect power extension cable from the power supply to the graphics card power connector separately. Appendix Appendix 4. Connect a monitor DVI-I cable to the graphics card. 2-2 Installing the graphics cards drivers 1. Power on your computer and boot into Operating System. 2. Install the - Foxconn Bloodrage | English Manual. - Page 126
" from the dialog box. Select the NVIDIA GeForce tab, then click "Start the NVIDIA Control Panel". Appendix 2. When using two graphics cards: Select "Set SLI Configuration", then click "Enable 2-way NVIDIA SLI", when done, click Apply to enable it. Select the "3D Setting - Foxconn Bloodrage | English Manual. - Page 127
3-way and 2-way graphics card Speed Table: Card Numbers 3-way 2-way Slot PCI-E1_16X PCI-E2_8X / PCI-E1_8X PCI-E2_16X PCI-E1_16X PCI-E2_16X Speed Mode x8 x8 x8 x16 x16 Appendix 120
-
 1
1 -
 2
2 -
 3
3 -
 4
4 -
 5
5 -
 6
6 -
 7
7 -
8
-
9
-
10
-
11
-
12
-
13
-
14
-
15
-
16
-
17
-
18
-
19
-
20
-
21
-
22
-
23
-
24
-
25
-
26
-
27
-
28
-
29
-
30
-
31
-
32
-
33
-
34
-
35
-
36
-
37
-
38
-
39
-
40
-
41
-
42
-
43
-
44
-
45
-
46
-
47
-
48
-
49
-
50
-
51
-
52
-
53
-
54
-
55
-
56
-
57
-
58
-
59
-
60
-
61
-
62
-
63
-
64
-
65
-
66
-
67
-
68
-
69
-
70
-
71
-
72
-
73
-
74
-
75
-
76
-
77
-
78
-
79
-
80
-
81
-
82
-
83
-
84
-
85
-
86
-
87
-
88
-
89
-
90
-
91
-
92
-
93
-
94
-
95
-
96
-
97
-
98
-
99
-
100
-
101
-
102
-
103
-
104
-
105
-
106
-
107
-
108
-
109
-
110
-
111
-
112
-
113
-
114
-
115
-
116
-
117
-
118
-
119
-
120
-
121
-
122
-
123
-
124
-
125
-
126
-
127
 |
 |

Bloodrage Motherboard
User’s Manual