Frigidaire AEQ6700FS Installation Instructions
Frigidaire AEQ6700FS - 27" Electric Dryer Manual
 |
UPC - 012505377839
View all Frigidaire AEQ6700FS manuals
Add to My Manuals
Save this manual to your list of manuals |
Frigidaire AEQ6700FS manual content summary:
- Frigidaire AEQ6700FS | Installation Instructions - Page 1
of Your Dryer 3 Rough-In Dimensions 4 Mobile Home Installation 5 Unpacking 5 Reversing Door Swing 6 Electrical Installation 7 Grounding Requirements 7 Electrical Connections-3-wire 7 Electrical Connections-4-wire 8 Gas Connection 8 General Installation 8 Replacement Parts 8 Espanõl 9-15 - Frigidaire AEQ6700FS | Installation Instructions - Page 2
(Gas). 9. Plastic knife. ELECTRICAL REQUIREMENTS ELECTRIC Dryer CIRCUIT - Individual 30 amp. branch circuit fused with 30 amp. time delay fuses or circuit breaker. Use separately fused circuits for washers and dryers, and DO NOT operate a washer and a dryer on the same circuit. POWER SUPPLY - 3 wire - Frigidaire AEQ6700FS | Installation Instructions - Page 3
or the bottom of the dryer. On gas dryers, exhausting can be to the right side of the cabinet or the bottom of the dryer. Directional exhausting can be accomplished by installing Exhaust Kit, P/N 131456800, available through your parts distributor. Follow the instructions supplied with the kit - Frigidaire AEQ6700FS | Installation Instructions - Page 4
(61.91) 15/8" (4.13) Electrical supply on rear of unit 13½" (34.29) To rear and base exhausts 23/8" (6.03) Gas supply pipe on rear of unit 27" (68.58) 35" (88.90) 34" (86.36) 2.25" (5.72) inches (cm) 27" (68.58) Stacked Dryer Installation Dimensions 27" (68.58) T2T2T2T5i8839oooon..".275c - Frigidaire AEQ6700FS | Installation Instructions - Page 5
MOBILE HOME INSTALLATION 1. Dryer MUST be exhausted outside (outdoors, not beneath the mobile home) using metal ducting that will not support combustion. Metal ducting must be 4 inches (10.16 cm) in diameter with no obstructions. Rigid metal duct is preferred. 2. If dryer is exhausted through the - Frigidaire AEQ6700FS | Installation Instructions - Page 6
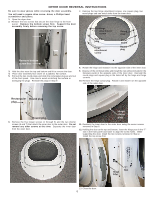
INSTRUCTIONS Be sure to wear gloves while reversing the door assembly. You will need a square drive screw- driver, a Phillips head screwdriver and pliers. 1. Open the dryer door. 2. Remove the two screws that secure the door hinge to the front panel. Remove the bottom screw first. Support the door - Frigidaire AEQ6700FS | Installation Instructions - Page 7
ELECTRICAL INSTALLATION ELECTRIC Dryer ALL GAS Dryers The following are specific requirements for proper and safe electrical installation of your dryer. Failure to follow these instructions can create electrical shock and/or a fire hazard. This appliance MUST be properly grounded. Electrical shock - Frigidaire AEQ6700FS | Installation Instructions - Page 8
before making another attempt to light. 6. If your dryer does not operate, please review the "Avoid Service Checklist" located in your Use and Care Guide before calling for service. 7. Place these instructions in a location near the dryer for future reference. NOTE: A wiring diagram/tech sheet is in - Frigidaire AEQ6700FS | Installation Instructions - Page 9
rement l'évent extérieur et enlever toute accumulation de charpie autour de l'évent et dans flujo de aire. Riesgo de explosión. No instale la secadora donde se guarda gasolina u otros (Preferido) NEMA 10-30R NEMA 14-30R Secadoras a GAS CIRCUITO - Circuito individual derivado de 15 amp, con - Frigidaire AEQ6700FS | Installation Instructions - Page 10
la secadora a Gas. 3. La secadora necesita espacio a su alrededor para una ventilación adecuada. NO instale la secadora en de la puerta es aceptable. DESPEJES MÍNIMOS DE INSTALACIÓN - Pulgadas (cm) Parte Parte Parte Lados Trasera Superior Delantera Alcoba 0 (0 cm) 0 (0 cm) 0 (0 cm - Frigidaire AEQ6700FS | Installation Instructions - Page 11
5¼" (13.97) 29¾" (75.57) 13½" (34.29) A los extractores de la parte posterior y de la base 5" (12.70) 23/8" (6.03) Pipe de la fuente de gas en la parte posterior de la unidad 27" (68.58) 35" (88.90) 34" (86.36) 2.25 11 Fuente eléctrica en la parte posterior de la unidad - Frigidaire AEQ6700FS | Installation Instructions - Page 12
secadora DEBE ser instalado hacia el exterior (El escape debe colocarse en la parte exterior y no debajo de la casa móvil.) Debe usarse ducto de contra de la estructura de la casa móvil. 3. Al instalar una secadora de gas en una casa móvil, hay que instalar una provisión de aire fresco suplementario - Frigidaire AEQ6700FS | Installation Instructions - Page 13
ñar los tapones. Vuelva a instalar los tapones en el Paso 9. 8. Gire la bisagra y vuelva a engancharla a la parte opuesta de la contrapuerta. 9. Deseche el viejo percutor de metal e instale uno nuevo (incluido en el paquete de documentación) en el lado opuesto de la contrapuerta. Vuelva a instalar - Frigidaire AEQ6700FS | Installation Instructions - Page 14
de instalación preliminares indicados en este manual para el cordón eléctrico que debe la esquina superior de la parte trasera de la secadora. 2. Instale un anclaje de cable aprobado parte trasera de la secadora con dos tornillos. Apriete firmemente los tornillos. TODAS las secadoras a GAS - Frigidaire AEQ6700FS | Installation Instructions - Page 15
superior en la parte trasera de la secadora. 2. Instale un anclaje SI HAY FUGAS DE GAS. GENERAL INSTALACIÓN 1. Frigidaire más cercana usted. Cuando se reparan los controles, marque todos los cables con etiquetas antes de desconectarlos. Cualquier error incluidas en este manual y en el resto
-
 1
1 -
 2
2 -
 3
3 -
 4
4 -
 5
5 -
 6
6 -
 7
7 -
8
-
9
-
10
-
11
-
12
-
13
-
14
-
15
 |
 |

P/N134759900 (0605)
Pre-Installation Requirements
.................................................................
2
Electrical Requirements
...........................................................................
2
Exhaust System Requirements
....................................................
2-3
Gas Supply Requirements
........................................................................
3
Location of Your Dryer
.............................................................................
3
Rough-In Dimensions
...............................................................................
4
Mobile Home Installation
.........................................................................
5
Unpacking
..........................................................................................
5
Reversing Door Swing
.............................................................................
6
Electrical Installation
........................................................................
7
Grounding Requirements
................................................................
7
Electrical Connections—3-wire
...............................................................
7
Electrical Connections—4-wire
..............................................................
8
Gas Connection
......................................................................................
8
General Installation
.................................................................................
8
Replacement Parts
..................................................................................
8
Espanõl
..................................................................
9-15
Requerimientos de instalación preliminares
.............................................
9
Requerimientos eléctricos
........................................................................
9
Requerimientos del sistema de escape
.............................................
9-10
Requerimientos del suministro de gas
.....................................................
10
Ubicación de su secadora
.......................................................................
10
Dimensiones para la instalación
..........................................................
11
Instalación en casas móviles
.............................................................
12
Desembalaje
..............................................................................
12
Puerta reversible
........................................................................
13
Instalación eléctrica
.......................................................................
14
Requerimientos para la puesta a tierra
..........................................
14
Conexiónes eléctricas - trifilares
................................................
14
Conexiónes eléctricas - tetrafilares
...............................................
15
Conexión del gas
...........................................................................
15
General Instalación
............................................................................
15
Piezas de recambio
.......................................................................
15
Installation
Instructions
Gas & Electric Dryer
Before beginning installation, carefully read these instructions. This will simplify the installation and ensure the dryer is installed correctly
and safely. Leave these instructions near the Dryer after installation for future reference.
NOTE:
The electrical service to the Dryer must conform with local codes and ordinances and the latest edition of the National Electrical Code, ANSI/NFPA
70, or in Canada, the Canadian electrical code C22.1 part 1.
NOTE:
The gas service to the Dryer must conform with local codes and ordinances and the latest edition of the National Fuel Gas Code ANSI Z223.1, or
in Canada, CAN/ACG
B149.1-2000
NOTE:
The Dryer is designed under ANSI Z 21.5.1
or ANSI/UL 2158 - CAN/CSA C22.2 No. 112 (latest editions) for
HOME USE only
. This Dryer is not
recommended for commercial applications such as restaurants or beauty salons, etc.
Antes de comenzar la instalación, lea cuidadosamente estas instrucciones. Esto simplificará la instalación y asegurará que la secadora se
instale correctamente y de manera segura. Después de completar la instalación, coloque estas instrucciones cerca de la secadora para
referencia futura.
NOTA:
La alimentación eléctrica para la secadora deberá cumplir con los códigos y reglamentos locales y con la última edición del Código Eléctrico Nacional,
ANSI/NFPA 70.
NOTA:
La alimentación de gas para la secadora deberá cumplir con los códigos y reglamentos locales y con la última edición del Código Nacional para Gases
Combustibles, ANSI Z223.1.
NOTA:
La secadora está clasificada para
USO DOMESTICO solamente
, de acuerdo con la norma ANSI Z 21.5.1 o ANSI/UL 2158 - CAN/CSA C22.2 (las últimas
ediciónes). Esta secadora no se recomienda para uso commercial tal como en restaurantes, salones de belleza, etc.
For your safety the information in this manual must be followed to minimize the risk of fire or explosion or to prevent property damage,
personal injury or loss of life.
-
Do not store or use gasoline or other flammable vapors and liquid in the vicinity of this or any other appliance.
-
WHAT TO DO IF YOU SMELL GAS
·
Do not try to light any appliance.
·
Do not touch any electrical switch; do not use any phone in your building.
·
Clear the room, building or area of all occupants.
·
Immediately call your gas supplier from a neighbor’s phone. Follow the gas supplier's instructions.
·
If you cannot reach your gas supplier, call the fire department.
Installation and service must be performed by a qualified installer, service agency or the gas supplier.
Printed in U.S.A.
Instrucciones
para la
Instalación
Secadora a gas y
eléctrica
Para su seguridad, siga las instrucciones contenidas en este manual a fin de reducir a un mínimo los riesgos de incendio o explosión o
para evitar daños materiales, lesiones personales o la muerte.
-
No almacene ni utilice gasolina u otros vapores y líquidos inflamables en la proximidad de éste o de cualquier otro artefacto eléctrico.
-
QUE DEBE HACER SI PERCIBE OLOR A GAS
·
No trate de encender ningún artefacto eléctrico.
·
No toque ningún interruptor eléctrico; no use ningún teléfono en su edificio.
·
Haga salir a todos los ocupantes de la habitación, del edificio y del lugar.
·
Llame a su proveedor de gas desde el teléfono de un vecino. Siga las instrucciones del proveedor de gas.
·
Si no logra comunicarse con su proveedor de gas, llame al departamento de bomberos.
La instalación y el servicio de mantenimiento debe de realizarlos un instalador calificado, la agencia de servicios o el proveedor de gas.