Frigidaire FAS255P2A Installation Instructions
Frigidaire FAS255P2A - Heavy Duty Room Air Conditioner Manual
 |
View all Frigidaire FAS255P2A manuals
Add to My Manuals
Save this manual to your list of manuals |
Frigidaire FAS255P2A manual content summary:
- Frigidaire FAS255P2A | Installation Instructions - Page 1
have the outlet installed by a qualified electrician before installing unit. Preliminary Instructions Do the following before starting to install unit. See illustrations below. 1. Check window opening size - the mounting parts furnished with this air conditioner are made to install in a wooden sill - Frigidaire FAS255P2A | Installation Instructions - Page 2
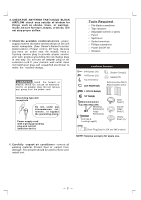
service - power supply must be the same as that shown on the unit serial nameplate. (See Owner's Guide models) NOTE: Surplus screw(s) for spare use. 6. Carefully unpack air conditioner - remove all packing material. Protect floor or carpet from damage. Two people should be used to move and install - Frigidaire FAS255P2A | Installation Instructions - Page 3
to manipulate. Inadequate support on control side of the unit can result in personal injury and damage to your unit and property. Therefore, it is recommended to have someone assist you during the installation of this unit. 1. Select the Best Location A. Your room air conditioner was designed to - Frigidaire FAS255P2A | Installation Instructions - Page 4
the slide-out chassis and carefully slide the air conditioner out of the cabinet. See (Fig. 2). NOTE: Avoid touching coil in case of injury or damage.. 3. Assemble of the top channel to the cabinet Stick the double sided seal to the top channel, and then Install it to the cabinet as shown in - Frigidaire FAS255P2A | Installation Instructions - Page 5
depth of the bracket assembly, depending on the depth of your window sill. See (Fig. 6).Install the two leveling screws into the 90 support brackets. Test the bracket assembly in the window before cabinet installation. If the leveling screws are distanced too far away from the wall to provide - Frigidaire FAS255P2A | Installation Instructions - Page 6
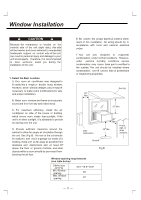
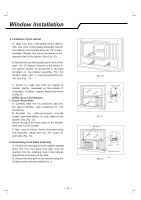
Window Installation 6. Installation of the cabinet A. Align one hole in the bottom of the the outside. If necessary, re-adjust support bracket as shown in (Fig. 6). NOTE: Secure all hardware. 7. Secure Accordions A. Carefully slide the air conditioner back into the cabinet. (Please seek assistance - Frigidaire FAS255P2A | Installation Instructions - Page 7
of the inside and outside window. See (Fig. 13). B. Some installations may require additional sealing around the window and air conditioner. Check for any air leaks and seal where necessary. C. For 25K and 28K models, the condensed water will maybe overflow the unit in highly humid areas. You may - Frigidaire FAS255P2A | Installation Instructions - Page 8
, or a qualified carpenter. Select Wall Location This air conditioner has a slide-out chassis, so it can be installed through an outside wall up to 12'' thick. IMPORTANT: Side louvers must never be blocked. NOTE: All parts needed for Wall Installation are provided, except a wood frame, shims, and - Frigidaire FAS255P2A | Installation Instructions - Page 9
is 8-1/2'' or more, add aluminum flashing over bottom of frame opening to assure no water can enter area between inner and outer wall. CAULK AS REQUIRED 4. OPTIONAL: Support brackets may be used. Installation brackets are recommended for walls under 5'' thick. Refer to Step 4 of Window Mounting for - Frigidaire FAS255P2A | Installation Instructions - Page 10
RECOMENDED: Caulking and installation of trim on interior wall may be done. You can buy wood from your local lumber or This way gives very good louver clearance on either side of cabinet. 3. Install a lintel to support masonry wall above cabinet. Existing holes in cabinet can be used and/or
-
 1
1 -
 2
2 -
 3
3 -
 4
4 -
 5
5 -
 6
6 -
 7
7 -
8
-
9
-
10
 |
 |

Installation Instructions
for Heavy duty
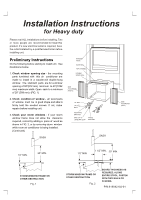
Please real ALL installations before installing. Two
or
more
people
are
recommended to install this
product. If a new electrical outlet is required, have
the outlet installed by a qualified electrician
before
installing unit.
Preliminary Instructions
Do the following before starting to install unit.
See
illustrations below.
1.
Check
window
opening size
-
the
mounting
parts
furnished
with
this
air
conditioner
are
made
to
install
in
a
wooden sill
double-hung
window.
The
standard
parts
are for a window
opening of 32''(812 mm)
minimum
to 43''(1092
mm) maximum width. Open
sash to a minimum
of 20'' (508 mm). (FIG. 1)
2.
Check
condition of
window
-
all
wood parts
of
window
must
be
in good shape and able to
firmly
hold
the
needed
screws.
If
not,
make
repairs before installing unit.
3.
Check
your
storm
windows
-
if
your
storm
window
frame
does
not
allow
the
clearance
required, correct by adding a
piece of
wood as
shown in FIG. 2, or by removing storm
window
while room air conditioner is being installed.
(Continued)
P/N:819042102-01
SASH
20
”
MIN.
1/2”
MIN.
STORM WINDOW FRAME OR
OTHER OBSTRUCTION
Fig. 1
SASH
20
”
MIN.
1/2”
MIN.
STORM WINDOW FRAME OR
OTHER OBSTRUCTION
Fig. 2
BOARD THICKNESS AS
REQUIRED, ALONG
ENTIRE STOOL. FASTEN
WITH TWO NAILS OR
SCREWS.
1 1/2”
MIN.
SIDE
ACCORDION
(LEFT)
SIDE
ACCORDION
(RIGHT)
DOUBLE
SIDED SEAL
TOP CHANNEL
MOUNTING
BRACKET
END CAP &
LEVELING LEGS
ANGLE
BRACKET
1/4” NUT
1/4”X1
”
BOLT
SASH SEAL
WINDOW
FOAM
1
2
/