Frigidaire FASE7021NW Installation Instructions (All Languages)
Frigidaire FASE7021NW Manual
 |
View all Frigidaire FASE7021NW manuals
Add to My Manuals
Save this manual to your list of manuals |
Frigidaire FASE7021NW manual content summary:
- Frigidaire FASE7021NW | Installation Instructions (All Languages) - Page 1
All about the Installation of your Dryer TABLE OF CONTENTS Important Safety Instructions 2-3 Reversing Door 20-23 Installation Requirements 4-10 Accessories 24 Installed Dryer Dimensions 11 Español 25 Installation Instructions 12-19 137442700A (1104) - Frigidaire FASE7021NW | Installation Instructions (All Languages) - Page 2
instructions and local codes. • The electrical service to the dryer must conform with local codes and ordinances and the latest edition of the National Electrical Code, ANSI/NFPA 70, or in Canada, the Canadian electrical code C22.1 part 1. • The gas service to the dryer must conform with local codes - Frigidaire FASE7021NW | Installation Instructions (All Languages) - Page 3
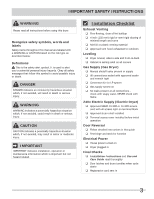
with flame 240v Electric Supply (Electric Dryer) ‰ Approved NEMA 10-30R or 14-30R service cord with all screws tight on terminal block ‰ Approved strain relief installed ‰ Terminal access cover installed before initial operation Door Reversal ‰ Follow detailed instructions in this guide ‰ Test hinge - Frigidaire FASE7021NW | Installation Instructions (All Languages) - Page 4
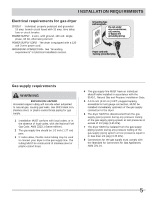
(3) recreational vehicles, and (4) areas where local codes do not permit grounding through the neutral. OUTLET dryers. For 3-wire cord connection instructions see ELECTRICAL CONNECTIONS FOR A 3-WIRE SYSTEM. 4-WIRE POWER SUPPLY CORD KIT (not supplied) 4-wire receptacle (NEMA type 14-30R) The dryer - Frigidaire FASE7021NW | Installation Instructions (All Languages) - Page 5
The dryer is equipped with a 120 volt 3-wire power cord. GROUNDING CONNECTION - See "Grounding requirements" in Electrical Installation gas supply. 1 Installation MUST conform with local codes, or in the absence of local codes, with the National Fuel Gas Code, ANSI Z223.1 (latest edition). 2 The - Frigidaire FASE7021NW | Installation Instructions (All Languages) - Page 6
obstruction. WARNING FIRE HAZARD Failure to follow these instructions can create excessive drying times and fire hazards. The following are specific requirements for proper and safe operation of your dryer. WARNING FIRE HAZARD Do not install a clothes dryer with flexible plastic or metal foil venting - Frigidaire FASE7021NW | Installation Instructions (All Languages) - Page 7
area of the home can create a health and fire hazard. The dryer must be connected to an exhaust outdoors. Regularly inspect the outdoor exhaust , clogging the duct work and creating a fire hazard as well as increasing drying times. Use an approved vent hood to terminate the duct outdoors, and seal - Frigidaire FASE7021NW | Installation Instructions (All Languages) - Page 8
Exhaust direction Directional exhausting can be accomplished by installing a quick-turn 90° dryer vent elbow directly to exhaust outlet of dryer. Dryer vent elbows are available through your local parts distributor or hardware store. CORRECT INCORRECT In installations where the exhaust system is - Frigidaire FASE7021NW | Installation Instructions (All Languages) - Page 9
air. This provision is to be not less than twice the area of the dryer exhaust outlet. 6 Installer MUST anchor this (1) dryer or (2) dryer mounted on pedestal to the floor with approved Mobile Home Installation Kit - P/N 137067200. Clearance requirements WARNING EXPLOSION HAZARD Do not install the - Frigidaire FASE7021NW | Installation Instructions (All Languages) - Page 10
outdoors. 2 No other fuel burning appliance shall be installed in the same closet as the gas dryer. 3 Your dryer needs the space around it for proper ventilation. DO NOT install your dryer in a closet with a solid door. 4 Closet door ventilation required: A minimum of 120 square inches (774.2 cm - Frigidaire FASE7021NW | Installation Instructions (All Languages) - Page 11
pedestal-mounted dryer adds approximately 2.25 in. (5.7 cm) to installation depth. 51.4" (131cm) to clear open door 30.3" (77cm)* to front of closed door gas supply pipe on rear of gas unit 1.6" (4cm) 16.9" (43cm) 3.75" (9.5cm) 13.50" (34.5cm) to center of rear vent 27.0" (68.5cm) electrical - Frigidaire FASE7021NW | Installation Instructions (All Languages) - Page 12
Electrical shock can result if the dryer is not properly grounded. Follow the instructions in this manual for proper grounding. • Do not use an extension cord with this dryer is properly installed and grounded in accordance with all local codes and ordinances. If in doubt, call a licensed electrician - Frigidaire FASE7021NW | Installation Instructions (All Languages) - Page 13
INSTRUCTIONS Grounding requirements - Electric dryer (Canada) WARNING ELECTRICAL SHOCK HAZARD Improper connection of the equipment grounding conductor can result in a risk of electrical properly installed and grounded in accordance with all local codes and ordinances. If in doubt, call a licensed - Frigidaire FASE7021NW | Installation Instructions (All Languages) - Page 14
INSTRUCTIONS Gas connection 1 Remove the shipping cap from gas pipe at the rear of the dryer. IMPORTANT DO NOT connect the dryer to L.P. gas service without converting the gas valve. An L.P. conversion kit approved manual shutoff valve. This valve should be located in the same room as the dryer and - Frigidaire FASE7021NW | Installation Instructions (All Languages) - Page 15
INSTALLATION INSTRUCTIONS Water connection (Steam Model only) WATER SUPPLY REQUIREMENTS Cold water faucet MUST be installed within 42 inches (107 cm) of your dryer's any contaminants in the line. 4 Remove hose kit from dryer drum and inspect hose couplings for proper placement of rubber washers. RUBBER - Frigidaire FASE7021NW | Installation Instructions (All Languages) - Page 16
INSTRUCTIONS Water connection, continued (Steam Model pliers. 9 Connect the straight end of the long hose from the kit to the other outlet on the "Y" connector and snug it by hand inlet on the back of the dryer and snug it by hand. Tighten each connection of the dryer inlet hose another 2/3 turn with - Frigidaire FASE7021NW | Installation Instructions (All Languages) - Page 17
INSTRUCTIONS Electrical connection (non-Canada) - 3 wire cord 3-wire receptacle (NEMA type 10-30R) WARNING ELECTRICAL SHOCK HAZARD Failure to disconnect power source before servicing in a 3-wire system!! Neutral terminal IMPORTANT If moving dryer from a 4-wire system and installing it in a 3- - Frigidaire FASE7021NW | Installation Instructions (All Languages) - Page 18
INSTRUCTIONS Electrical connection (non-Canada) - 4 wire cord 4-wire receptacle (NEMA type 14-30R) WARNING ELECTRICAL SHOCK HAZARD Failure to disconnect power source before servicing screw. Tighten the screw securely. 7 Move the internal dryer harness ground (BLACK) wire to the terminal block and - Frigidaire FASE7021NW | Installation Instructions (All Languages) - Page 19
time and money. 6 If you have any questions during initial operation, please review the "Avoid Service Checklist" in your Use & Care Guide before calling for service. 7 Place these instructions in a location near the dryer for future reference. Í NOTE A wiring diagram and technical data sheet are - Frigidaire FASE7021NW | Installation Instructions (All Languages) - Page 20
then upper screw. 4 Gently place dryer door face down on flat, covered work surface. 5 Locate the 5 indented head screws (no. 1-5) in the small, circular recesses (at 11, 1, 4, 6, and 8 o'clock positions) of the inner door. Remove and save these 5 screws. 3 Supporting door with both hands, squarely - Frigidaire FASE7021NW | Installation Instructions (All Languages) - Page 21
Reversing the hinge 1 Carefully pull out the 2 small round hole plugs from the front panel and save. Remove and save the square "T" slot cover by sliding it up and pulling it out. Move all 3 plugs to the opposite side of the front panel and insert. ROUND PLUG REVERSING DOOR 4 From the back side of - Frigidaire FASE7021NW | Installation Instructions (All Languages) - Page 22
no. 1-5 no. 6-7 2 Rest the opening of the inner door at a 90 degree angle on the supports for the hinge cutout cover. Pivot the inner door down onto the outer door. 5 Locate new metal strike supplied with dryer manuals. Grip new strike with pliers as shown below. Firmly insert the strike so it is - Frigidaire FASE7021NW | Installation Instructions (All Languages) - Page 23
holes. "T" POST ON DOOR HINGE "T" SLOT IN FRONT PANEL REVERSING DOOR 3 Close the door and test operation of hinge, strike and latch. 2 While supporting the door, install the upper pan head screw first and then the lower one. Í NOTE Correctly installed hinge screws will press hinge flush to front - Frigidaire FASE7021NW | Installation Instructions (All Languages) - Page 24
dryer. Replacement parts: If replacements parts are needed for your washer, contact the source where you purchased your washer or refer to your Use and Care Guide for more information. 24 WARNING ELECTRICAL SHOCK HAZARD Label all wires prior to disconnection when servicing controls. Wiring errors - Frigidaire FASE7021NW | Installation Instructions (All Languages) - Page 25
Instrucciones de instalación 36-43 Requisitos de instalación 28-34 Inversión de la puerta 44-47 Dimensiones de la secadora instalada 35 Accesorios 48 www.frigidaire.com UEES.AU1U-8.10-08-0904-49-4940-494044 wwwww.fwrig.firdigaidrea.icrea.caCanCaadnaad1á-810-08-0206-52-6853-582352 25 - Frigidaire FASE7021NW | Installation Instructions (All Languages) - Page 26
National Electrical Code), el ANSI/NFPA 70, o bien en Canadá, el CSA C22.1 del Código Eléctrico de Canadá (Canadian Electrical Code) Parte 1. Conducto de escape de metal rígido o semirígido de 4 pulgadas (102 mm) • Kit de cables de alimentación trifilar o tetrafilar de 240 voltios (secadora eléctrica) - Frigidaire FASE7021NW | Installation Instructions (All Languages) - Page 27
palabras y avisos de seguridad Las indicaciones de seguridad incluidas en este manual aparecen precedidas de un aviso titulado "ADVERTENCIA" o "PRECAUCIÓN", de selladas con un sellante aprobado y bien apretadas con una llave ‰ Kit de conversión para el sistema de gas LP ‰ Suministro de gas - Frigidaire FASE7021NW | Installation Instructions (All Languages) - Page 28
REQUISITOS DE INSTALACIÓN Í NOTA Debido a posibles variaciones en el voltaje, no se recomienda utilizar esta secadora con electricidad generada a partir de generadores a gas, solares, eólicos ni de ninguna otra clase que no sean los empleados por su empresa de electricidad local. Requisitos elé - Frigidaire FASE7021NW | Installation Instructions (All Languages) - Page 29
de gas. 1 La instalación DEBE realizarse de acuerdo con los códigos locales o, en ausencia de ellos, con el Código de Gas Nacional (National Fuel Gas Code), ANSI Z223.1 (última edición). 2 La línea de suministro de gas debe ser un tubo de 1,27 cm (1/2 pulgada). 3 Si los códigos lo permiten, se puede - Frigidaire FASE7021NW | Installation Instructions (All Languages) - Page 30
REQUISITOS DE INSTALACIÓN Requisitos del sistema de escape Utilice solo un conducto de metal flexible o rígido de 102 mm (4 pulgadas) de diámetro (mínimo) y una capucha de ventilación aprobada que tenga uno o más reguladores de tiro que se abran cuando la secadora esté en funcionamiento. Cuando la - Frigidaire FASE7021NW | Installation Instructions (All Languages) - Page 31
de incendio. • No bloquee los extremos de escape del sistema de ventilación, ni utilice tornillos, remaches ni otros sujetadores que se extiendan hacia la parte interna del conducto para ensamblarlo. Es posible que la pelusa quede atrapada en el filtro, los tornillos o los remaches, lo que puede - Frigidaire FASE7021NW | Installation Instructions (All Languages) - Page 32
REQUISITOS DE INSTALACIÓN Requisitos del sistema de escape (continuación) Instale los accesorios macho en la dirección correcta: Dirección del escape El escape direccional se puede lograr mediante la instalación de un codo de ventilación de giro rápido de 90° directamente en la salida de la - Frigidaire FASE7021NW | Installation Instructions (All Languages) - Page 33
de Seguridad y Construcción de Casas Rodantes, título 24 CFR, Parte 32-80 (que anteriormente se conocía como la Norma Federal de de instalación DEBE anclar esta secadora (1) o secadora sobre pedestal (2) al piso usando un kit de instalación para casas rodantes, pieza número 137067200. Requisitos - Frigidaire FASE7021NW | Installation Instructions (All Languages) - Page 34
ventilación distribuidas uniformemente en toda la superficie. ESPACIOS MÍNIMOS PARA LA INSTALACIÓN: cm (pulgadas) LATERALES PARTE TRASERA PARTE PARTE SUPERIOR DELANTERA Alcôve 0 cm (0") 0 cm (0") 0 cm (0") n/d Sous le comptoir 0 cm (0") 0 cm (0") 0 cm (0") n/d Placard 0 cm (0") 0 cm - Frigidaire FASE7021NW | Installation Instructions (All Languages) - Page 35
independiente sobre el piso línea del piso 51.25" (130cm) tubería de suministro de gas en la parte trasera de la unidad de gas 1.6" (4cm) secadora colocada sobre pedestal opcional línea del piso * Para obtener estas dimensiones mínimas de profundidad, la secadora debe ser ventilada derecho - Frigidaire FASE7021NW | Installation Instructions (All Languages) - Page 36
INSTRUCCIONES DE INSTALACIÓN Instalación eléctrica Los siguientes son requisitos necesarios para la instalación eléctrica segura y correcta de su secadora. El no seguir estas instrucciones puede producir una descarga eléctrica y/o incendio. ADVERTENCIA PELIGRO DE DESCARGA ELÉCTRICA • Este - Frigidaire FASE7021NW | Installation Instructions (All Languages) - Page 37
INSTRUCCIONES DE INSTALACIÓN Requisitos de conexión a tierra: secadora eléctrica (Canadá) ADVERTENCIA PELIGRO DE DESCARGA ELÉCTRICA Una conexión incorrecta del conductor de conexión a tierra del equipo puede provocar un peligro de descarga eléctrica. Si no está seguro de haber realizado - Frigidaire FASE7021NW | Installation Instructions (All Languages) - Page 38
de gas en la parte trasera de la secadora. IMPORTANTE NO conecte la secadora al servicio de gas LP sin convertir la válvula de gas. El kit de conversión a gas de cierre manual Conector doble Conector doble Cerrado Conector Abierto Conector flexible Tubo de admisión en la parte posterior de la - Frigidaire FASE7021NW | Installation Instructions (All Languages) - Page 39
suministro de agua FRÍA y deje correr el agua en un balde o recipiente para limpiar cualquier contaminante que esté presente en la tubería. 4 Retire el kit de manguera del tambor de la secadora e inspeccione los accesorios de la manguera para asegurarse de que las arandelas de goma estén en su lugar - Frigidaire FASE7021NW | Installation Instructions (All Languages) - Page 40
2/3 de vuelta más usando alicates 9 Conecte el extremo recto de la manguera larga del kit a la otra salida del conector en "Y" y apriételo a mano. Conecte el codo 90° de la manguera a la admisión de agua de latón en la parte trasera de la secadora y apriételo a mano. Apriete todas las conexiones de - Frigidaire FASE7021NW | Installation Instructions (All Languages) - Page 41
del tomacorriente. 2 Extraiga el tornillo que sujeta la cubierta de acceso del bloque terminal que se encuentra en la esquina inferior de la parte trasera de la secadora. 3 Instale un dispositivo de liberación de tensión aprobado por U.L., de acuerdo con las instrucciones relativas al cable de - Frigidaire FASE7021NW | Installation Instructions (All Languages) - Page 42
del tomacorriente. 2 Extraiga el tornillo que sujeta la cubierta de acceso del bloque terminal que se encuentra en la esquina inferior de la parte trasera de la secadora. 3 Instale un dispositivo de liberación de tensión aprobado por U.L., de acuerdo con las instrucciones relativas al cable de - Frigidaire FASE7021NW | Installation Instructions (All Languages) - Page 43
cuidadosamente. Ajuste una o varias de las patas de la secadora hasta que se encuentre firme sobre las cuatro patas. Coloque un nivel en la parte superior A de la secadora. La secadora DEBE estar nivelada y firme sobre las cuatro patas. Presione las distintas esquinas para asegurarse de que la - Frigidaire FASE7021NW | Installation Instructions (All Languages) - Page 44
INVERSIÓN DE LA PUERTA Cómo extraer la puerta 1 Proteja las superficies de trabajo planas, como la parte superior de la secadora o el piso cerca de ésta utilizando un paño o toalla suave. 2 Abra la puerta de la secadora y retire los dos tornillos de - Frigidaire FASE7021NW | Installation Instructions (All Languages) - Page 45
de ella para retirarla. Mueva los 3 tapones al lado opuesto del panel delantero. TAPÓN REDONDO TAPÓN CUADRADO INVERSIÓN DE LA PUERTA 4 Desde la parte trasera de la puerta interior, presione las lengüetas de retención del tapón de plástico cuadrado para liberarlo. Guarde el tapón cuadrado para - Frigidaire FASE7021NW | Installation Instructions (All Languages) - Page 46
de la cubierta de la bisagra. Gire la puerta interior hacia abajo sobre la puerta exterior. 5 Ubique el nuevo pestillo de metal proporcionado con los manuales de la secadora. Sostenga el pestillo nuevo con alicates como se muestra abajo. Inserte firmemente el pestillo de manera que quede en posici - Frigidaire FASE7021NW | Installation Instructions (All Languages) - Page 47
Reinstalación de la puerta 1 Mientras sostiene la puerta con ambas manos, introduzca la pieza en forma de "T" que se encuentra en la parte trasera de la bisagra en la ranura en forma de "T" del panel delantero y baje la puerta para alinear los agujeros de instalación. PIEZA EN FORMA - Frigidaire FASE7021NW | Installation Instructions (All Languages) - Page 48
para elevar la secadora y facilitar su uso. Dicho pedestal agregará aproximadamente 38,1 cm (15 pulgadas) a la contacto con el distribuidor donde adquirió la secadora. KIT DE SECADORA PARA CENTRO DE LAVADO Pieza No. STACKIT4X cables antes de desconectarlos. Los errores de cableado pueden producir un - Frigidaire FASE7021NW | Installation Instructions (All Languages) - Page 49
- Frigidaire FASE7021NW | Installation Instructions (All Languages) - Page 50
- Frigidaire FASE7021NW | Installation Instructions (All Languages) - Page 51
- Frigidaire FASE7021NW | Installation Instructions (All Languages) - Page 52
-
 1
1 -
 2
2 -
 3
3 -
 4
4 -
 5
5 -
 6
6 -
 7
7 -
8
-
9
-
10
-
11
-
12
-
13
-
14
-
15
-
16
-
17
-
18
-
19
-
20
-
21
-
22
-
23
-
24
-
25
-
26
-
27
-
28
-
29
-
30
-
31
-
32
-
33
-
34
-
35
-
36
-
37
-
38
-
39
-
40
-
41
-
42
-
43
-
44
-
45
-
46
-
47
-
48
-
49
-
50
-
51
-
52
 |
 |

All about the
Installation
of your
Dryer
137442700A (1104)
TABLE OF CONTENTS
Important Safety Instructions
..............................
2-3
Installation Requirements
.................................
4-10
Installed Dryer Dimensions
..................................
11
Installation Instructions
..................................
12-19
Reversing Door
..............................................
20-23
Accessories
.........................................................
24
Español
..............................................................
25