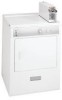
Frigidaire FCGD3000ES Use and Care Manual
Frigidaire FCGD3000ES - 27 Inch Coin Operated Gas Dryer Manual
 |
UPC - 012505375019
View all Frigidaire FCGD3000ES manuals
Add to My Manuals
Save this manual to your list of manuals |
Frigidaire FCGD3000ES manual content summary:
- Frigidaire FCGD3000ES | Use and Care Manual - Page 1
Door Swing 5 Location of Your Dryer 6 Electrical Installation 7 Grounding Requirements 7 Electrical Connections-3-wire 8 Electrical Connections-4-wire 8 Installation 9 Lint Blade Retaining Pin Location 9 Meter case instructions 9-12 Replacement Parts 12 Parts lists 13-14 Warranty 15 - Frigidaire FCGD3000ES | Use and Care Manual - Page 2
to contact a Frigidaire Service Center, call 1-866-738-1640 If you need SERVICE or PARTS for your Frigidaire coin-operated Instructions / Use & Care Guide and on your appliance. Always read and obey all safety messages. • The instructions in this manual and other literature included with this dryer - Frigidaire FCGD3000ES | Use and Care Manual - Page 3
and safe operation of your dryer. Failure to follow these instructions can create excessive drying times and fire hazards. • Do not install a clothes dryer with flexible plastic venting materials. If your present system is made up of plastic duct or metal foil duct, replace it with a rigid or semi - Frigidaire FCGD3000ES | Use and Care Manual - Page 4
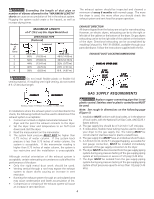
can be to the right side of the cabinet or the bottom of the dryer. Directional exhausting can be accomplished by installing Exhaust Kit, P/N 131456800, available through your parts distributor. Follow the instructions supplied with the kit. EXHAUST DUCT LOCATING DIMENSIONS SAME AS OTHER SIDE - Frigidaire FCGD3000ES | Use and Care Manual - Page 5
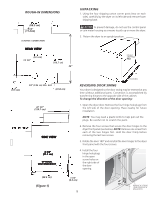
cm) 47 1/2" (120.7 cm) SIDE VIEW 4 3/8" (11.1 cm) OPTIONAL VENT KNOCKOUT PACKING REVERSING DOOR SWING Your dryer is designed so the door swing may be reversed at any time without additional parts. Conversion is accomplished by transferring hinges to the opposite side of the cabinet. To change the - Frigidaire FCGD3000ES | Use and Care Manual - Page 6
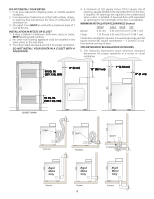
, recess or closet, MUST be exhausted outdoors. 2. No other fuel burning appliance shall be installed in the same closet as the Gas dryer. 3. Your dryer needs the space around it for proper ventilation. DO NOT INSTALL YOUR DRYER IN A CLOSET WITH A SOLID DOOR. 4. A minimum of 120 square inches (774 - Frigidaire FCGD3000ES | Use and Care Manual - Page 7
reduce the risk of electrical shock by a path of least resistance for electrical current. This appliance MUST be properly grounded. Electrical shock can result if the dryer is not properly grounded. Follow the instructions in this manual for proper grounding. Do not use an extension cord with this - Frigidaire FCGD3000ES | Use and Care Manual - Page 8
silver-colored center terminal on the terminal block. Tighten the screw 6. Reattach the strain relief mounting bracket to the back of securely. the dryer with two screws. Tighten screws securely. 7. Attach the red and black power cord conductors to the outer 7. Tighten the screws securing the - Frigidaire FCGD3000ES | Use and Care Manual - Page 9
dryers only) a. Remove the shipping cap from gas pipe at the rear of the dryer. NOTE: DO NOT connect the dryer to L.P. gas service dryer is resting solid on all four legs. Place a level on top of the dryer. THE DRYER MUST BE LEVEL AND RESTING SOLID ON ALL FOUR LEGS. METER CASE INSTRUCTIONS replaced - Frigidaire FCGD3000ES | Use and Care Manual - Page 10
or personal injury. A. Remove meter-case service door: 1. Loosen two screws securing timer INSERTED 25.7 22.5 20 18 16.3 15 INSTRUCTIONS FOR CHANGING VEND PRICE TOOLS NEEDED • Medium sized Narrow Ratchet Blade Hub Drive Tooth Down Lug FIGURE 3 C. Replace new timing cam: 1. Be sure drive lug is in - Frigidaire FCGD3000ES | Use and Care Manual - Page 11
FIGURE 4 STEP 4 Turn coin slide upside down and remove screw that holds coin receiver block (see FIGURE 5). (1) Receiver Block Screw FIGURE 5 Spare Parts Compartment and Screw STEP 5 Remove coin receiver block from coin slide (see FIGURE 6): • Turn coin slide right side up. Keep coin receiver - Frigidaire FCGD3000ES | Use and Care Manual - Page 12
PARTS If replacement parts are needed for your dryer, contact the source where you purchased your dryer, or call Frigidaire at 1-866-738-1640. For coin box parts, call 1-800-221-0982, Greenwald Industries. FIGURE 10 Coin Sizing Block Label all wires prior to disconnection when servicing - Frigidaire FCGD3000ES | Use and Care Manual - Page 13
Meter Case Parts List Parts List For Greenwald Dryer Timers Timer Assembly Model 50-1232-9 Timer Assembly Model 50-1223-10 ITEM 1 2 3 *Additional cams that are available. Cams pull off and push on for replacement. PART NUMBER 50-61-13-2 51-161-4 00-6164 51-161-1 51-161-2 51-161-3 51-161-5 51-161 - Frigidaire FCGD3000ES | Use and Care Manual - Page 14
List 20-3020 20-3000 V8 Parts List DESCRIPTION REQ. 20-3020 20-3000 1 SCREW (METRIC) 2 00-9724 00-7924 2 SCREW (METRIC) 2 00-7938 00-7938 3 TOP HOUSING 1 20-3019 20-3002 4 - Frigidaire FCGD3000ES | Use and Care Manual - Page 15
NEW VEND PRICE Order required parts using this tear-off. Block-out keys will be Order Form To change vend price, detach and mail the lower portion to: shipped to you at no charge. Follow product information instructions. Customer Service Department Greenwald Industries Inc. Quantity 212 - Frigidaire FCGD3000ES | Use and Care Manual - Page 16
of your appliance or to instruct you how to use your appliance. 11. Expenses for making the appliance accessible for servicing, such as removal of trim, cupboards, shelves, etc., which are not a part of the appliance when it is shipped from the factory. 12. Service calls to replace appliance light
-
 1
1 -
 2
2 -
 3
3 -
 4
4 -
 5
5 -
 6
6 -
 7
7 -
8
-
9
-
10
-
11
-
12
-
13
-
14
-
15
-
16
 |
 |
Coin- Operated
Commercial Dryer
Installation Instructions and
Use and Care Guide
P/N 134589900E (0903)
Printed in USA
SUBJECT
P
AGE
Important Safety Instruction
.........................................
2
Pre-Installation Requirements
.......................................
3
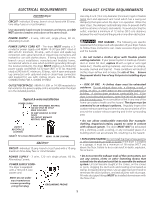
Electrical Requirements
................................................
3
Exhaust System Requirements
..................................
3-4
Gas Supply Requirements
.............................................
4
Rough-In Dimensions
....................................................
5
Unpacking
....................................................................
5
Reversing Door Swing
...................................................
5
Location of Your Dryer
..................................................
6
Electrical Installation
.....................................................
7
Grounding Requirements
..............................................
7
Electrical Connections—3-wire
....................................
8
Electrical Connections—4-wire
....................................
8
Installation
.....................................................................
9
Lint Blade Retaining Pin Location
.................................
9
Meter case
instructions
..........................................
9-12
Replacement Parts
.....................................................
12
Parts lists
................................................................
13-14
Warranty
....................................................................
15
Back Cover
.................................................................
16
Contents