Frigidaire FFEF4017LB Complete Owner's Guide (English)
Frigidaire FFEF4017LB Manual
 |
UPC - 057112104669
View all Frigidaire FFEF4017LB manuals
Add to My Manuals
Save this manual to your list of manuals |
Frigidaire FFEF4017LB manual content summary:
- Frigidaire FFEF4017LB | Complete Owner's Guide (English) - Page 1
Care of your Range 318200715 (January 2011) Rev. B TABLE OF CONTENTS Welcome & Congratulations 2 Setting Main Oven Controls 14 Important Safety Instructions 3 Setting Auxiliary 13 Major Appliance Warranty 36 www.frigidaire.com USA 1-800-944-9044 www.frigidaire.ca Canada 1-800-265-8352 - Frigidaire FFEF4017LB | Complete Owner's Guide (English) - Page 2
of our product and are completely committed to providing you with the best service possible. Your satisfaction is our number one priority. We know you THESE INSTRUCTIONS This Use & Care Manual contains general operating instructions for your appliance and feature information for several models. Your - Frigidaire FFEF4017LB | Complete Owner's Guide (English) - Page 3
PART 1-latest edition and local code requirements. Install only per installation instructions provided in the literature package for this range. Ask your dealer to recommend a qualified technician and an authorized repair service. Know how to disconnect the electrical not remove model/serial number - Frigidaire FFEF4017LB | Complete Owner's Guide (English) - Page 4
it to the power supply. IMPORTANT INSTRUCTIONS FOR USING YOUR COOKTOP • Know which foil to line oven bottom or any other part of the appliance. Only use aluminum as aluminum foil may result in a risk of electric shock or fire or a short circuit. are suitable for cooktop service without breaking due - Frigidaire FFEF4017LB | Complete Owner's Guide (English) - Page 5
replacing the bulb. IMPORTANT SAFETY INSTRUCTIONS FOR CLEANING YOUR OVEN • Clean the appliance regularly to keep all parts free of grease that could • Clean in the self-cleaning cycle only the parts of the appliance listed in this Owner's Guide. Before using the self-cleaning cycle of the appliance - Frigidaire FFEF4017LB | Complete Owner's Guide (English) - Page 6
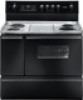
- MODEL A 1 2 6 Your Range Features: removable cover. 11. Adjustable interior oven rack(s). 12. Manual cleaning oven interior. 13. 1-piece handle. 14. . 18. 8" left rear coil element. 19. 6" right rear coil element. 20. 6" left front coil element. 21. 8" right front coil element 14 13 3 4 - Frigidaire FFEF4017LB | Complete Owner's Guide (English) - Page 7
MODEL B - FEATURES AT A GLANCE 1 2 3 4 5 9 Your Range clean door latch. 12. Broil element. 13. Manual cleaning oven interior. 14. Self-cleaning oven 22. 8" left rear coil element. 23. 6" right rear coil element. 24. 6" left front coil element. 25. 8" right front coil element. 12 13 16 17 - Frigidaire FFEF4017LB | Complete Owner's Guide (English) - Page 8
MODEL C 7 8 1 2 3 4 5 6 10 9 11 Your Range Features clean door latch. 14. Broil element. 15. Manual cleaning oven interior. 16. Self-cleaning oven 24. 8" left rear coil element. 25. 6" right rear coil element. 26. 6" left front coil element. 27. 8" right front coil element 28. Griddle. - Frigidaire FFEF4017LB | Complete Owner's Guide (English) - Page 9
BEFORE SETTING SURFACE CONTROLS Using proper cookware The size and type of cookware used will influence the setting needed for best cooking results. Be sure to follow the recommendations for using proper cookware as illustrated in Figures 1 & 2. Cookware should have flat bottoms that make good - Frigidaire FFEF4017LB | Complete Owner's Guide (English) - Page 10
To Operate the Coil Surface Elements be set exactly on a particular mark. Use the marks as a guide and adjust the control knob as needed. 3. When cooking is completed of cookware used will influence the setting needed for best cooking results. Recommended Settings for Surface Elements Setting Type - Frigidaire FFEF4017LB | Complete Owner's Guide (English) - Page 11
SETTING SURFACE CONTROLS To Operate the Griddle (model C only) Foods can be placed directly on the griddle hands at the end opposite the terminals and using the middle rod at the terminal end as a guide, push the griddle into place. 1. Push in and turn the griddle control in either direction to the - Frigidaire FFEF4017LB | Complete Owner's Guide (English) - Page 12
onto the guides on the oven walls. Tilt the front of the rack upward and slide the rack back into place. Figure 1 CAUTION Some models are equipped oven. If using multiple racks (Figure 3), stagger cookware as shown. For best air circulation and baking results allow 2-4" (5-10 cm) around the cookware - Frigidaire FFEF4017LB | Complete Owner's Guide (English) - Page 13
of the oven as described below. Detailed instructions for each feature and function follow later in this Use & Care Guide. 1 7 2 3 4 5 6 When the appliance is first plugged in, or when the power supply to the range has been interrupted, the display will flash "12:00". 1. Press CLOCK pad - Frigidaire FFEF4017LB | Complete Owner's Guide (English) - Page 14
SETTING MAIN OVEN CONTROLS - MODEL A TO SET OR CHANGE THE also adjust the oven temperature downward in 5°F (1°C) increments with each press of the DOWN ARROW pad (total range of -35°F to +35°F (-18°C to +18°C). 3. If you do not want to keep the damage and contact an authorized servicer. 14 - Frigidaire FFEF4017LB | Complete Owner's Guide (English) - Page 15
use of your oven, become familiar with the various features and functions of the oven as described below. Detailed instructions for each feature and function follow later in this Use & Care Guide. NOTE The oven function will not work if the time of day clock is not set. 12 8 6 79 34 - Frigidaire FFEF4017LB | Complete Owner's Guide (English) - Page 16
SETTING MAIN OVEN CONTROLS - MODEL B & C NOTE The oven function will not work if the time of day clock is not set. TO SET THE CLOCK When the range is first plugged in, or when the power supply to the appliance has been interrupted, the display will flash "12:00". 1. Push CLOCK pad. 2. Within - Frigidaire FFEF4017LB | Complete Owner's Guide (English) - Page 17
MODEL B & C - SETTING MAIN OVEN CONTROLS TO SET OR CHANGE THE TEMPERATURE FOR allows the dripping grease to be kept away from the high heat of the broil element (see Figure 1). • For best broiling results, broil with the oven door in the broil stop position (see Figure 3). • If using a Searing - Frigidaire FFEF4017LB | Complete Owner's Guide (English) - Page 18
SETTING MAIN OVEN CONTROLS - MODEL B & C TO SET THE BAKE TIME FEATURE The BAKE TIME and START TIME controls operate the Timed Bake Feature. The automatic timer will turn the oven - Frigidaire FFEF4017LB | Complete Owner's Guide (English) - Page 19
MODEL B & C - SETTING MAIN OVEN CONTROLS SELF-CLEANING A self-cleaning oven cleans itself with another well-ventilated room. DO NOT line the oven walls, racks, bottom or any other part of the range with aluminum foil. Doing so will destroy heat distribution, produce poor baking results and cause - Frigidaire FFEF4017LB | Complete Owner's Guide (English) - Page 20
SETTING MAIN OVEN CONTROLS - MODEL B & C SELF-CLEANING To Start the Self-Clean Cycle *We recommend a 2 hour self-clean cycle for light soils, and a 3 hour cycle Reprogram the oven. If fault recurs, push CLEAR OFF pad, disconnect the appliance to prevent damage and contact an authorized servicer. 20 - Frigidaire FFEF4017LB | Complete Owner's Guide (English) - Page 21
MODEL B & C - SETTING AUXILIARY OVEN CONTROLS TO BAKE 1. Arrange oven racks while the oven is cool. 2. Turn the Temperature Control Knob to the desired oven temperature. When - Frigidaire FFEF4017LB | Complete Owner's Guide (English) - Page 22
Parts, Control Knobs & Decorative Trim Pieces Control Panel Porcelain Enamel Cooktop Surface, Below Cooktop, Broiler Pan & Insert (some models and insert (some models) in the dishwasher and dry upon removal. If soils are not removed, follow the cooktop cleaning instructions below. Gentle scouring - Frigidaire FFEF4017LB | Complete Owner's Guide (English) - Page 23
model A) (auxiliary oven on model B & C) IMPORTANT Adhere to the following cleaning precautions: • Allow the oven to cool before cleaning. • Wear rubber gloves when cleaning the appliance manually electrical the range, instructions. CAUTION DO NOT line the oven walls, bottom, racks or any other part - Frigidaire FFEF4017LB | Complete Owner's Guide (English) - Page 24
through the opening in the drip bowl. 2. Align the element support to rest on the rim inside the drip bowl. If your drip bowl is with clean water and polish dry with a soft cloth. (Some Models Only) CAUTION When lowering the lift-up range top, grasp the sides with finger-tips only. Be careful - Frigidaire FFEF4017LB | Complete Owner's Guide (English) - Page 25
into rangetop. Griddle (some models) CARE & CLEANING Changing oven light CAUTION Be sure the oven is unplugged and all parts are COOL before replacing faced glove for protection against possible broken glass. 3. Replace bulb with a 40 Watts appliance bulb only. 4. Press wire holder to one side to - Frigidaire FFEF4017LB | Complete Owner's Guide (English) - Page 26
the sides, pull the bottom of the door up and toward you to disengage the hinge supports. Keep pulling the bottom of the door toward you while rotating the top of the door toward the range to completely disengage the hinge levers. 4. To replace the door, reverse the door removal steps. Make - Frigidaire FFEF4017LB | Complete Owner's Guide (English) - Page 27
guide rails. 3. Hold the drawer in a horizontal position, then push in until a click is heard. Storage Drawer Drawer Guide models) Use the storage drawer for storing cooking utensils. The drawer can be removed to facilitate cleaning under the range paper towel for 30 to 40 minutes. Rinse with clean - Frigidaire FFEF4017LB | Complete Owner's Guide (English) - Page 28
BEFORE YOU CALL (Solutions to Common Problems) Oven baking For best cooking results, heat the oven before the center of the oven rack. If the water level is uneven, refer to the installation instructions for leveling the range. • Be sure to allow 5.1cm to 10.2cm (2" to 4") of clearance on all - Frigidaire FFEF4017LB | Complete Owner's Guide (English) - Page 29
Changing Oven Light section in this Use & Care Guide. work. Electrical power outage. Check house lights to be sure. Call your local electric company for service. Surface unit does not heat. No power to the appliance. Check steps under "Entire Range or Oven Does Not Operate" in this Before you - Frigidaire FFEF4017LB | Complete Owner's Guide (English) - Page 30
to Common Problems) OCCURRENCE section in the Electronic Oven Control Guide. A cooling fan may automatically turn on and off to cool internal parts. It is normal, and the Cycle" in the Electronic Oven Control Guide. Control(s) not set properly. Follow instructions under "Setting Oven Controls". Make - Frigidaire FFEF4017LB | Complete Owner's Guide (English) - Page 31
NOTES 31 - Frigidaire FFEF4017LB | Complete Owner's Guide (English) - Page 32
of your appliance or to instruct you how to use your appliance. 9. Expenses for making the appliance accessible for servicing, such as removal of trim, cupboards, shelves, etc., which are not a part of the appliance when it is shipped from the factory. 10. Service calls to repair or replace
-
 1
1 -
 2
2 -
 3
3 -
 4
4 -
 5
5 -
 6
6 -
 7
7 -
8
-
9
-
10
-
11
-
12
-
13
-
14
-
15
-
16
-
17
-
18
-
19
-
20
-
21
-
22
-
23
-
24
-
25
-
26
-
27
-
28
-
29
-
30
-
31
-
32
 |
 |

TABLE OF CONTENTS
www.frigidaire.com
USA 1-800-944-9044
www.frigidaire.ca
Canada 1-800-265-8352
All about the
Use
&
Care
of your
Range
Welcome & Congratulations
...................................
2
Important Safety Instructions
.................................
3
Features at a Glance
..............................................
6
Before Setting Surface Controls
..............................
7
Setting Surface Controls
........................................
9
Before Setting Oven Controls
...............................
13
318200715 (January 2011) Rev. B
Setting Main Oven Controls
..................................
14
Setting Auxiliary Oven
........................................
26
Care & Cleaning (Cleaning Chart)
.........................
27
Care & Cleaning
..................................................
28
Before You Call
..................................................
33
Major Appliance Warranty
....................................
36