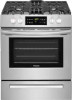
Frigidaire FFGH3051VS Installation Instructions
Frigidaire FFGH3051VS Manual
 |
View all Frigidaire FFGH3051VS manuals
Add to My Manuals
Save this manual to your list of manuals |
Frigidaire FFGH3051VS manual content summary:
- Frigidaire FFGH3051VS | Installation Instructions - Page 1
. IMPORTANT SAFETY INSTRUCTIONS If the information in this manual is not followed service must be performed by a qualified installer, service agency or the gas supplier. Important Notes to the Installer: • Read all instructions contained in these installation instructions before installing range - Frigidaire FFGH3051VS | Installation Instructions - Page 2
appliance using gas and generating heat, there are certain safety precautions you should follow. You will find them in the Use & Care Guide, read it carefully. • Be sure your range is installed and grounded properly by a qualified installer or service technician. • This range must be electrically - Frigidaire FFGH3051VS | Installation Instructions - Page 3
• Unlike some gas ranges, the cooktop is not removable. Do not attempt to remove the cooktop. Special instructions for appliances installed in gas fitter. When using a flexible connector, it must not exceed three (3) feet (36 in.) long. A "T" handle type manual gas valve must be installed in the gas - Frigidaire FFGH3051VS | Installation Instructions - Page 4
FRONT CONTROL FREESTANDING INSTALLATION INSTRUCTIONS 1. Clearances and Dimensions a. Provide adequate clearances between the range and adjacent combustible surfaces. b. Location-Check location where the range will be installed. Check for proper electrical supply and gas supply and the stability of - Frigidaire FFGH3051VS | Installation Instructions - Page 5
30" GAS FRONT CONTROL FREESTANDING INSTALLATION INSTRUCTIONS 2. Tools You Will Need (Wear Gas line manual shut-off valve (Fig. i) • A new flexible metal appliance conduit (1/2" NPT x 3/4" or 1/2" I.D.) must be design certified by CSA International. Because solid pipe restricts moving the range - Frigidaire FFGH3051VS | Installation Instructions - Page 6
30" GAS FRONT CONTROL FREESTANDING INSTALLATION INSTRUCTIONS 3. Anti-Tip Bracket Installation Instructions Important Safety Warning To reduce the risk of tipping of the range, the range should be secured to the floor by properly installed anti-tip bracket and screws packed with the range. Failure - Frigidaire FFGH3051VS | Installation Instructions - Page 7
of the appliance shall be conducted according to the instructions in step 4g. The gas supply line should be 1/2" or 3/4" I.D. 5. Seal wall openings. Seal any openings in the wall behind the range and in the floor under the range after gas supply line is installed. Pressure regulator Flexible - Frigidaire FFGH3051VS | Installation Instructions - Page 8
external manual shut-off valve (See Fig. 8). e. Attach flexible appliance conduit to flare union adaptor on shut-off valve (See Fig. 8). f. Make sure the service shut-off valve on pressure regulator is set to the ON position (See Fig. 11). g. Check for gas leaks. Turn the gas supply on to the range - Frigidaire FFGH3051VS | Installation Instructions - Page 9
30" GAS FRONT CONTROL FREESTANDING INSTALLATION INSTRUCTIONS 7. Read the following electrical connection details before connecting electricity to range. Before servicing, disconnect electrical supply at circuit breaker, fuse or power cord. Electric requirements: A dedicated, properly grounded and - Frigidaire FFGH3051VS | Installation Instructions - Page 10
Check for proper flame, and allow the burner to cycle once. Reset control to OFF. c. If your model is equipped with a waist-high broiler, set oven to Broil. See User's Manual for operating instructions. d. Within 60 seconds the broil burner should ignite. Check for proper flame. Reset control to OFF - Frigidaire FFGH3051VS | Installation Instructions - Page 11
GAS FRONT CONTROL FREESTANDING INSTALLATION INSTRUCTIONS burner locations 13. Adjust air shutter - upper oven (some models) The approximate flame length of the upper (broil) burner level the range by either adjusting the leveling legs or by placing shims under the corners of the range as needed. - Frigidaire FFGH3051VS | Installation Instructions - Page 12
30" GAS FRONT CONTROL FREESTANDING INSTALLATION INSTRUCTIONS 15. Install filler trim kit Note: Installation of the filler trim kit is not required. Disconnect electrical power to range before beginning installation. Before servicing any part of the appliance, make sure the appliance is off and the - Frigidaire FFGH3051VS | Installation Instructions - Page 13
and Maintenance Refer to the Use & Care Manual for cleaning instructions. If removing the range is necessary for cleaning or maintenance, shut off gas supply. Disconnect the gas and electrical supply. If the gas or electrical supply is inaccessible, lift the range slightly at the front and pull out - Frigidaire FFGH3051VS | Installation Instructions - Page 14
qualifié ou un technicien de service. • Assurez-vous que les revêtements muraux autour de la cuisinière peuvent supporter la chaleur générée par la cuisini la cuisinière Support antirenversement Remarque importante pour l'utilisateur Conservez ces instructions avec le guide d'utilisation et d' - Frigidaire FFGH3051VS | Installation Instructions - Page 15
Vous les trouverez dans le Guide d'utilisation et d'entretien. Lisez installateur qualifié ou un technicien de service. • Cette cuisinière doit ê États-Unis). Reportez-vous aux instructions de mise à la terre se trouvant se trouve autour de la cuisinière peut supporter la chaleur produite par celle-ci. • - Frigidaire FFGH3051VS | Installation Instructions - Page 16
. • Contrairement à celle de certaines cuisinières, la table de cuisson n'est pas amovible. Ne tentez pas de retirer cette table de cuisson. Instructions particulières pour les appareils installés dans l'État du Massachusetts : Cet appareil ne peut être installé dans l'État du Massachusetts que par - Frigidaire FFGH3051VS | Installation Instructions - Page 17
INSTRUCTIONS D'INSTALLATION 30" CUISINIÈRE À GAZ AUTONOME 1. Dégagements et dimensions a. Prévoyez À UN MINIMUM DE 5 "(127 mm) AU-DESSUS DU FOND DES ARMOIRES. 8" 41/3" Ubicación de gas Fig.3 241/8" 121/16" Ne tentez pas d'utiliser les allumeur électrique du four durant une panne de - Frigidaire FFGH3051VS | Installation Instructions - Page 18
INSTRUCTIONS D'INSTALLATION 30" CUISINIÈRE À GAZ AUTONOME 2. Outils requis (Porter des lunettes de sécurité lors de l'utilisation d'outils): Pour les pattes de nivellement et le support anti-bascule: • Clé à molette ou princes multiprises (Fig. a) • 5/16" tournevis à douille ou tournevis à tête - Frigidaire FFGH3051VS | Installation Instructions - Page 19
cuisinière elle-même ou du renversement de liquides chauds. S'il faut déplacer la cuisinière à un autre endroit, le support doit aussi être enlevé et réinstallé au nouvel emplacement. Les instructions fournies sont prévues pour l'installation dans le bois ou dans le béton, dans le plancher. Lors de - Frigidaire FFGH3051VS | Installation Instructions - Page 20
DOIT être branché en série avec la conduite d'alimentation en gaz. Si vous utilisez le nécessaire de conversion au gaz propane/GPL, suivez les instructions fournies dans ce nécessaire pour faire la conversion du détendeur. Lors de l'installation de la cuisinière, il est important de s'assurer que le - Frigidaire FFGH3051VS | Installation Instructions - Page 21
INSTRUCTIONS D'INSTALLATION 30" CUISINIÈRE À GAZ AUTONOME c. Serrez le raccord d'alimentation en gaz ou la conduite de l'appareil en le branchant à l'adaptateur de raccord-union qui - Frigidaire FFGH3051VS | Installation Instructions - Page 22
soit équivalent ou supérieur au courant nominal du circuit de dérivation. Ce type de rallonge est disponible au service après-vente de votre région. Veuillez lire attentivement ces instructions! Pour des raisons de sécurité, ce produit doit être correctement mis à la terre. Ne coupez et ne retirez - Frigidaire FFGH3051VS | Installation Instructions - Page 23
èle est muni d'un brûleur de gril situé à hauteur de la taille, réglez votre four à Broil (gril). Pour connaître les instructions d'utilisation, reportez-vous au Guide de l'utilisateur. d. Le brûleur du gril devrait s'allumer en l'espace de 60 secondes. Vérifiez la qualité de la flamme. Éteignez les - Frigidaire FFGH3051VS | Installation Instructions - Page 24
INSTRUCTIONS D'INSTALLATION 30" CUISINIÈRE À GAZ AUTONOME 12. Régler l'obturateur d'air du brûleur inférieur du four Pour déterminer si la flamme du brûleur - Frigidaire FFGH3051VS | Installation Instructions - Page 25
tentez de la réparer tandis qu'elle n'a pas refroidi, vous risquez de vous brûler ou de vous blesser de quelque autre façon. Instructions de fixation de l'entretoise : 1. Retirez les 7 vis de la garniture de ventilation à l'arrière. Cuisinière avec entretoise arrière montée. 2. Placez la garniture - Frigidaire FFGH3051VS | Installation Instructions - Page 26
peut être sous la table de cuisson. Avant de faire appel au service après-vente Lisez la section « Avant de faire appel au service après-vente » et les instructions d'utilisation qui se trouvent dans le Guide d'utilisation et d'entretien. Cela pourrait vous faire économiser temps et argent. Cette - Frigidaire FFGH3051VS | Installation Instructions - Page 27
o de cualquier otro artefacto. - QUE DEBE HACER SI PERCIBE OLOR A GAS: • No trate de encender ningún artefacto. • No toque ningún consumidor Mantenga estas instrucciones con el manual del usuario para futuras referencias • sostenga el borde trasero de la parte trasera de la estufa usando ambos - Frigidaire FFGH3051VS | Installation Instructions - Page 28
que use gas y genere calor, hay ciertas precauciones de seguridad que usted debe seguir. Estas serán encontradas en el Manual del Usuario, el Estados Unidos o por el estándar de CSA, C22.1, Canadian Electrical Code, Part 1 en el Canada. Vea las instrucciones para la puesta a tierra página 35.. - Frigidaire FFGH3051VS | Installation Instructions - Page 29
puede ser instalado en el estado de Massachusetts por un plomero o ajustador de gas licenciado de Massachusetts. Este aparato se debe instalar con un largo conector flexible de gas de tres (3) pies/36 pulgadas. Una válvula manual de gas de tipo manija de forma de "T" se debe instalar en la línea del - Frigidaire FFGH3051VS | Installation Instructions - Page 30
30" Minimum 0" clearance below cooking top and at rear of range 26 6/8" * UN MÍNIMO DE 36" DE ESPACIO ENTRE NIMO PARA LA PARTE TRASERADELAESTUFA.SIGATODOSLOSREQUERIMIENTOS ELÉCTRICA DURANTE UN APAGÓN DE LUZ. Fig.3 Ubicación de gas 241/8" 121/16" COLOQUE TODOS LOS CONTROLES EN LA POSICIÓN DE - Frigidaire FFGH3051VS | Installation Instructions - Page 31
de 1/8" (broca de taladro de hormigón de 3/16" si se instala sobre hormigón (Fig. c) • Nivel (Fig. d) Para la conexión al suministro de gas • Llave ajustable y llave de tubo (Figs. a & e) Para el ajuste de la llama del quemador: • Destornilladores de estrella y de cabeza plana (Figs. f & g) Material - Frigidaire FFGH3051VS | Installation Instructions - Page 32
INSTRUCCIONES DE INSTALACIÓN DE CONTROL DE FRENO DE GAS DE 30" 3. Instrucción para la instalación del soporte sobre la plantilla y marque la ubicación de los agujeros de los tornillos en la pared. Si la parte trasera de la estufa está a más de 1-1/4" de la pared cuando ya está instalada, instale el - Frigidaire FFGH3051VS | Installation Instructions - Page 33
roscas de tubería macho (exterior). No permita que el regulador de presión de gas encienda la tubería cuando apriete los accesorios. a. Instale una válvula manual externa para cierre de gas hacia la línea de suministro de gas que tenga una ubicación de fácil acceso fuera de la cocina. Asegúrese de - Frigidaire FFGH3051VS | Installation Instructions - Page 34
½" psig). La aplicación debe aislarse del sistema de la tubería de suministro de gas cerrando su válvula de cierre manual individual durante cualquier prueba de presión del sistema de tubería de suministro de gas para presiones de prueba iguales o mayores a 14" de presión de columna de agua - Frigidaire FFGH3051VS | Installation Instructions - Page 35
dañinos, no use la cubierta sin todas las tapas del quemador instaladas correctamente para asegurar el encendido adecuado y el tamaño de la llama del gas. Siempre mantenga las tapas del quemador y las cabezas del quemador en su lugar siempre que los quemadores de superficie estén en uso. No permita - Frigidaire FFGH3051VS | Installation Instructions - Page 36
luz. Cuando el encendedor haya alcanzado una temperatura suficiente para encender el gas, la válvula del horno controlada eléctricamente se abrirá y la la altura de la cintura, coloque el horno en la parrilla. Ver el Manual del Usuario para las instrucciones de operación. d. En 60 segundos, el - Frigidaire FFGH3051VS | Installation Instructions - Page 37
INSTRUCCIONES DE INSTALACIÓN DE CONTROL DE FRENO DE GAS DE 30" 12. Ajuste el obturador de aire horno en la parte posterior del panel inferior del horno. Tire hacia arriba en la parte trasera, desenganche la parte frontal del horno del marco frontal del horno y saque la parte inferior del horno - Frigidaire FFGH3051VS | Installation Instructions - Page 38
INSTRUCCIONES DE INSTALACIÓN DE CONTROL DE FRENO DE GAS DE 30" 15. Instalar kit de ajuste de rango de vuelta. Cocina con moldura trasera instalada. 2. Coloque el borde de relleno sobre la parte posterior alineando los 7 orificios de los tornillos del borde de relleno con el borde de ventilación - Frigidaire FFGH3051VS | Installation Instructions - Page 39
de gas. Desconecte el suministro de gas y electricidad. Si el suministro de gas o eléctrico es inaccesible, levante el alcance levemente en la parte Lea las secciones "Antes de llamar" y la instrucción de operación en su Manual de uso y cuidado. Puede ahorrarle tiempo y dinero. La lista incluye las - Frigidaire FFGH3051VS | Installation Instructions - Page 40
NOTES/NOTAS 40
-
 1
1 -
 2
2 -
 3
3 -
 4
4 -
 5
5 -
 6
6 -
 7
7 -
8
-
9
-
10
-
11
-
12
-
13
-
14
-
15
-
16
-
17
-
18
-
19
-
20
-
21
-
22
-
23
-
24
-
25
-
26
-
27
-
28
-
29
-
30
-
31
-
32
-
33
-
34
-
35
-
36
-
37
-
38
-
39
-
40
 |
 |

1
INSTALLATION INSTRUCTIONS
FRONT CONTROL FREESTANDING GAS RANGE
INSTALLATION AND SERVICE MUST BE
PERFORMED BY A QUALIFIED INSTALLER.
IMPORTANT: SAVE FOR LOCAL ELECTRICAL INSPECTOR'S USE.
READ AND SAVE THESE INSTRUCTIONS FOR FUTURE REFERENCE.
IMPORTANT SAFETY INSTRUCTIONS
If the information in this manual is not
followed exactly, a fire or electrical shock may result causing
property damage, personal injury or death.
FOR YOUR SAFETY:
— Do not store or use gasoline or other flammable vapors
and liquids in the vicinity of this or any other appliance.
— WHAT TO DO IF YOU SMELL GAS:
•
Do not try to light any appliance.
•
Do not touch any electrical switch; do not use any
phone in your building.
•
Immediately call your gas supplier from a neighbor’s
phone. Follow the gas supplier’s instructions.
•
If you cannot reach your gas supplier, call the fire
department.
— Installation and service must be performed by a qualified
installer, service agency or the gas supplier.
Important Notes to the Installer:
•
Read all instructions contained in these installation
instructions before installing range.
•
Remove all packing material from the oven
compartments before connecting the gas & electrical
supply to the range.
•
Observe all governing codes and ordinances.
•
Be sure to leave these instructions with the
consumer.
Important Notes to the Consumer:
Keep these instructions with your owner’s guide for
future reference.
•
As when using any appliance generating heat, there
are certain safety precautions you should follow.
These are listed in the Use & Care Guide, read it
carefully.
Tip Over Hazard
Range
leveling leg
Anti-tip
bracket
• A child or adult can tip the
range and be killed.
• Verify the anti-tip device has
been installed to floor or wall.
• Ensure the anti-tip device is re-engaged to floor
or wall when the range is moved.
• Do not operate the range without the anti-tip
device in place and engaged.
• Failure to follow these instructions can result in
death or serious burns to children and adults.
To check if the anti-tip bracket is installed properly, use
both arms to grasp the rear edge of the range back.
Carefully attempt to tilt range forward. When properly
installed, the range should not tilt forward.
Refer to the anti-tip bracket installation instructions
supplied with your range for proper installation.
FOR YOUR SAFETY: Do not
store or use gasoline or other flammable
vapors and liquids in the vicinity of this or
any other appliance.
•
Be sure your range is installed and grounded properly
by a qualified installer or service technician.
•
Make sure the wall coverings around the range can
withstand the heat generated by the range.
•
To eliminate the need to reach over the surface
elements, cabinet storage space above the elements
should be avoided.
P/N 809127207 (1901) Rev. A
English – pages 1-13
French
– pages 14-26
Spanish – pages 27-40