Frigidaire FFGS3025PB Installation Instructions
Frigidaire FFGS3025PB Manual
 |
View all Frigidaire FFGS3025PB manuals
Add to My Manuals
Save this manual to your list of manuals |
Frigidaire FFGS3025PB manual content summary:
- Frigidaire FFGS3025PB | Installation Instructions - Page 1
All Hookups are Complete 12 Model and Serial Number Location 12 Before You Call for Service 12 Anti-Tip Brackets Installation 13-14 Notes 44 Important Notes to the Installer 1. Read all instructions contained in these installation instructions before installing range. 2. Remove all packing - Frigidaire FFGS3025PB | Installation Instructions - Page 2
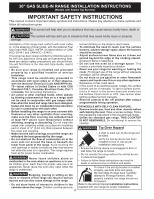
30" GAS SLIDE-IN RANGE INSTALLATION INSTRUCTIONS (Models with Sealed Top Burners) IMPORTANT SAFETY INSTRUCTIONS This manual contains important safety symbols and instructions. Please pay attention to these symbols and follow all instructions given. This symbol will help alert you to situations - Frigidaire FFGS3025PB | Installation Instructions - Page 3
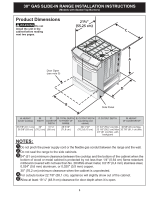
30" GAS SLIDE-IN RANGE INSTALLATION INSTRUCTIONS (Models with Sealed Top Burners) Product Dimensions 21¾" Do not (55.25 cm) install the unit in the cabinet before reading C next two pages. Door Open (see note 5) A D B Side Panel A. HEIGHT (Under Cooktop) B. C. D. TOTAL DEPTH WIDTH - Frigidaire FFGS3025PB | Installation Instructions - Page 4
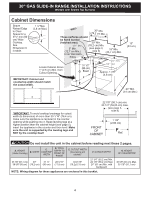
30" GAS SLIDE-IN RANGE INSTALLATION INSTRUCTIONS (Models with Sealed Top Burners) Cabinet Dimensions Shave Raised Edge (see page 5), insert the appliance in the counter and then level. Make sure the unit is supported by the leveling legs and NOT by the cooktop itself. 22 7/8" (58,1 cm) min. 23 - Frigidaire FFGS3025PB | Installation Instructions - Page 5
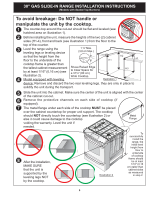
RANGE INSTALLATION INSTRUCTIONS (Models with Sealed Top Burners) To avoid breakage: Do NOT handle or manipulate the unit by the cooktop. 1 The counter-top around the cut-out should be flat and leveled (see hatched area on illustration 1). 2 Before installing for proper unit support. The cooktop - Frigidaire FFGS3025PB | Installation Instructions - Page 6
30" GAS SLIDE-IN RANGE INSTALLATION INSTRUCTIONS (Models with Sealed Top Burners) Before Starting Tools you will need For leveling legs and anti-tip brackets: ● Adjustable wrench or channel lock pliers ● 5/16" Nutdriver - Frigidaire FFGS3025PB | Installation Instructions - Page 7
30" GAS SLIDE-IN RANGE INSTALLATION INSTRUCTIONS (Models with Sealed Top Burners) • If you are using a through the floor gas entry, remove the line protector shield from the bottom of the unit to allow access for the pipe line (figure 3). • We recommend to install a pipe elbow right out of the - Frigidaire FFGS3025PB | Installation Instructions - Page 8
30" GAS SLIDE-IN RANGE INSTALLATION INSTRUCTIONS (Models with Sealed Top Burners) Once regulator is in place, open the shutoff valve in the gas supply line. Wait a few minutes for gas to move through the gas line. Check for leaks. After connecting the range to the gas supply, check the system for - Frigidaire FFGS3025PB | Installation Instructions - Page 9
GAS SLIDE-IN RANGE INSTALLATION INSTRUCTIONS (Models with Sealed Top Burners) 8. Range Installation Important Note: Door removal is not a requirement for installation of the range, but is an added convenience. Refer to the Use and Care Guide for oven door removal instructions. 8.13 Adjust leveling - Frigidaire FFGS3025PB | Installation Instructions - Page 10
RANGE INSTALLATION INSTRUCTIONS (Models with Sealed Top Burners) 9. Leveling the Range 9.1 Models Equipped with Leveling Device Level the range after installation in the cutout opening. 1. Open the range Guide packaged with the range for operating instructions and for care and cleaning of your range - Frigidaire FFGS3025PB | Installation Instructions - Page 11
RANGE INSTALLATION INSTRUCTIONS (Models with Sealed Top Burners) To prevent flare-ups and avoid creation of harmful by-products, do not use the cooktop without all burner caps properly installed Adjust the "LOW" Setting of Surface Burner Valves (linear flow) Test to verify if LOW setting should be - Frigidaire FFGS3025PB | Installation Instructions - Page 12
rating of the burners, the type of fuel and the pressure the range was adjusted for when it left the factory. Before You Call for Service Read the Before You Call Checklist and operating instructions in your Use and Care Guide. It may save you time and expense. The list includes common occurrences - Frigidaire FFGS3025PB | Installation Instructions - Page 13
Burners) 12. Anti-Tip Brackets Installation Instructions 12.1 Models Equipped with Leveling Device To reduce the risk of tipping of the range, the range must be secured to the floor by properly installed anti-tip bracket and screws packed with the range. These parts are located in the oven. Failure - Frigidaire FFGS3025PB | Installation Instructions - Page 14
SLIDE-IN RANGE INSTALLATION INSTRUCTIONS (Models with Sealed Top Burners) 12.2 Models Equipped with Leveling Legs To reduce the risk of tipping of the range, the range must be secured to the floor by the properly installed anti-tip bracket and screws packed with the range. Failure to install the - Frigidaire FFGS3025PB | Installation Instructions - Page 15
o ajustador de gas licenciado de Massachusett. Este aparato se debe instalar con un largo conector flexible de gas de tres (3) pies/36 pulgadas. Una válvula manual de gas de tipo manija de forma de "T" se debe instalar en la línea del suministro de gas de este aparato. Nota importante para el - Frigidaire FFGS3025PB | Installation Instructions - Page 16
debe seguir. Estas serán encontradas en el Manual del Usuario, léalo cuidadosamente. • No se sin provocar encogimiento, deformación o decoloración. No instale la estufa sobre una alfombra al menos que correctamente, sostenga el borde trasero de la parte trasera de la estufa usando ambos brazos. - Frigidaire FFGS3025PB | Installation Instructions - Page 17
todo exceso de derrame de alimentos. Siga las instrucciones de prelimpiado en el Manual del Usuario. • A diferencia de la gama estándar cocinas de ES MOVIBLE. No intente quitar la plancha de cocina. Dimensiones de la unidad No instale la unidad en el gabinete si no ha leído esta página. Notas: 21 - Frigidaire FFGS3025PB | Installation Instructions - Page 18
y no en el vidrio liso. 22 7/8" (58,1 cm) min. 23 1/4" (59,05 cm) max. (vea pagina 17, nota 3) FRONT OF CABINET 1 1/8" (2,86 cm) F Ref. No instale la unidad en el gabinete si no ha leído esta 2 páginas. A. ALTURA (Bajo Cubierta) B. ANCHO C. ANCHO DE LA PLANCHA DE COCINAR D. PROFUNDIDAD A LA - Frigidaire FFGS3025PB | Installation Instructions - Page 19
transporte. 5 Deslice la unidad hacia el gabinete. Asegúrese que la unidad este centrada con el centro de la abertura del gabinete. 6 Remueva la parte en plástico extruido en cada lado de la cubierta de vidrio (Algunos modelos). 7 Es imprescindible que el reborde de metal que se encuentra debajo - Frigidaire FFGS3025PB | Installation Instructions - Page 20
INSTRUCCIONES DE INSTALACIÓN DE COCINAS DE GAS DE 30" (Modelos con quemadores sellados) Antes de comenzar Herramientas que va a necesitar Para patas de nivelación y montura anti-vuelco: ● Llave ajustable o alicates ● Llave para apretar tuercas de 5/16" o un destornillador de cabeza plana ● Taladro - Frigidaire FFGS3025PB | Installation Instructions - Page 21
una salida de piso de gas, remover la protección de la línea de la parte de abajo de la unidad para permitir el acceso para la tubería de gas de FLUJO DEL GAS Regulador 2. Proporcione un suministro de gas adecuado cierre Unión manual Unión de presión Cuándo se envía de la fábrica, esta unidad - Frigidaire FFGS3025PB | Installation Instructions - Page 22
necesario para prevenir fugas de gas en la superficie de la estufa o en la linea de suministro. Desconecte la estufa y su válvula de cierre manual del sistema de tubería del suministro de gas durante cualquier prueba de presión de ese sistema a presiones mayores de 1/2 psig (3,5 kPa o 14" columna de - Frigidaire FFGS3025PB | Installation Instructions - Page 23
están verticales y alineados antes de instalar la plancha de cocinar. Lije el borde del mostrador para obtener las 31½" (80 cm) en la parte superior del mostrador. 8.3 Instale las puertas del armario a 31" (78,7 cm) de espacio entre ellas para que no interfieran con la abertura de la puerta de la - Frigidaire FFGS3025PB | Installation Instructions - Page 24
Baje el aparato, las patas de nivelación alternamente, hasta que la parte baja de la superficie de cocción repose sobre el mostrador (figura hueco y vuelva a verificar a la nivelación. Figura 9 Consulte el Manual del Usuario incluido con la estufa para instrucciones de operación y instrucciones - Frigidaire FFGS3025PB | Installation Instructions - Page 25
equipada con un electrodo separado. 11.4 Programe el ajuste BAJO de las válvulas de los quemadores superiores (flujo en linea) Pruebe el ajuste LOW (bajo) para comprobar si debe ser ajustado: a. Oprima la perilla hacia adentro y gírela a la posición LITE (encender) hasta que el quemador se encienda - Frigidaire FFGS3025PB | Installation Instructions - Page 26
el fondo del horno, retire los tornillos de ajuste del horno en la parte posterior del fondo del horno. Jale hacia arriba, desenganche el frente del fondo Llamar al Servicio Lea la sección Evite Llamadas de Servicio en su Manual del Usuario. Esto le podrá ahorrar tiempo y gastos. Esta lista - Frigidaire FFGS3025PB | Installation Instructions - Page 27
nea central en el piso donde se instalará la cocina. Si no hay pared posterior, dibujar otra línea en el piso que corresponda a la parte posterior de la cocina. 2. Desplegar el molde de papel y colocarlo alisado sobre el piso con el vértice posterior derecho posicionado exactamente en la intersecci - Frigidaire FFGS3025PB | Installation Instructions - Page 28
fijación colocando la plantilla simétricamente a la línea central de la apertura. El soporte antivuelco puede instalarse en el lado izquierdo o derecho en la parte posterior de la estufa. Marque la ubicación de los agujeros de tornillos come se muestra en el papel. C. Nivele la cocina y coloque la - Frigidaire FFGS3025PB | Installation Instructions - Page 29
service 41 Installation du support anti-bascule 42-43 Notes 44 Notes importantes à l'installateur Appareils électroménagers installés dans 1. Lisez toutes les instructions contenues dans ce feuillet avant d'installer au consommateur Conservez ces instructions avec le guide de l'utilisateur n'a - Frigidaire FFGS3025PB | Installation Instructions - Page 30
ci dans votre Guide d'utilisateur, lisez‑les avec attention. • Assurez‑vous que votre cuisinière est correctement installée et mise instructions peut causer des blessures fatales ou de graves brûlures aux enfants et aux adultes. Pour vérifier si le support anti-renversement est correctement install - Frigidaire FFGS3025PB | Installation Instructions - Page 31
INSTRUCTIONS D'INSTALLATION POUR CUISINIÈRE ENCASTRABLE DE 30" À GAZ (Modèles avec brûleurs de programmer un cycle autonettoyant. Essuyez tous les renversements excessifs. Suivez les instructions pour le pré‑nettoyage dans le Guide de l'utilisateur. • Comme sur les cuisinières standard à gaz, la - Frigidaire FFGS3025PB | Installation Instructions - Page 32
INSTRUCTIONS D'INSTALLATION POUR CUISINIÈRE ENCASTRABLE DE 30" À GAZ (Modèles nivellement au maximum, insérez l'appareil dans le comptoir et ensuite nivelez-le. Assurez-vous que l'appareil est bien supporté par les pattes de nivellement et non par la surface vitrifiée. 24" Min. (61 cm Min.) 22 7/8" - Frigidaire FFGS3025PB | Installation Instructions - Page 33
INSTRUCTIONS D'INSTALLATION POUR CUISINIÈRE ENCASTRABLE DE 30" À GAZ (Modèles de chaque côté de la table de cuisson doit reposer sur le comptoir pour que l'appareil soit bien supporté. La table de cuisson NE doit PAS toucher directement comptoir (voir l'illustration 2) sinon l'appareil pourrait ê - Frigidaire FFGS3025PB | Installation Instructions - Page 34
INSTRUCTIONS D'INSTALLATION POUR CUISINIÈRE ENCASTRABLE DE 30" À GAZ (Modèles avec brûleurs fermés) Avant de commencer Outils requis Pour les pattes de nivellement et le support anti-bascule: • Clé à molette ou pinces multiprises • 5/16" tournevis à douille ou tournevis à tête plate • Perceuse & - Frigidaire FFGS3025PB | Installation Instructions - Page 35
WALL INSTRUCTIONS D'INSTALLATION POUR CUISINIÈRE ENCASTRABLE DE 30" À GAZ (Modèles avec brûleurs fermés) (7360.2) 2 (5.1) 7½ 4.5 5 é avec le gaz propane. Une attention particulière doit être prise lors de l'installation de l'appareil pour ne pas obstruer la prise d'air pour la combustion et le - Frigidaire FFGS3025PB | Installation Instructions - Page 36
sirez convertir votre cuisinière au gaz propane, servez‑vous des orifices fixes fournis dans l'enveloppe portant l'inscription "POUR CONVERSION AU GAZ PROPANE". Suivez les instructions d'installation se trouvant dans l'enveloppe. Un installateur qualifié doit effectuer la conversion conformément aux - Frigidaire FFGS3025PB | Installation Instructions - Page 37
nettoyer l'appareil. 7. Déplacement de l'appareil en vue d'en faire le service ou le nettoyage Coupez l'alimentation électrique de l'appareil à la boîte instructions sur le gabarit fourni avec le support anti-bascule de l'appareil ou à la fin de ce feuillet. 8.7 Afin d'obtenir une installation - Frigidaire FFGS3025PB | Installation Instructions - Page 38
instructions sur le gabarit fourni avec le support anti-bascule de l'appareil ou à la fin de ce feuillet. 8.7 Afin d'obtenir une installation centre de service Sears. Installation de panneaux latéraux Vous pouvez commander un nécessaire de panneaux latéraux dans un centre de service Sears. - Frigidaire FFGS3025PB | Installation Instructions - Page 39
INSTRUCTIONS D'INSTALLATION POUR CUISINIÈRE ENCASTRABLE DE 30" À GAZ (Modèles avec brûleurs ferm dessous de la surface de cuisson. Figure 9 11. Vérification du Fonctionnement Référez‑vous au Guide de l'utilisateur inclus avec la cuisinière pour les directives de fonctionnement et pour l'entretien et - Frigidaire FFGS3025PB | Installation Instructions - Page 40
INSTRUCTIONS D'INSTALLATION POUR CUISINIÈRE ENCASTRABLE DE 30" À GAZ (Modèles avec brûleurs flamme jusqu'à ce que vous puissiez tourner rapidement le bouton de LITE à la plus basse position (LOW) sans éteindre la flamme. Celle-ci devrait être aussi minuscule que possible sans s'éteindre. Note: - Frigidaire FFGS3025PB | Installation Instructions - Page 41
INSTRUCTIONS D'INSTALLATION POUR CUISINIÈRE ENCASTRABLE DE 30" À GAZ (Modèles avec br moment de l'expédition. Avant d'appeler le service d'entretien Révisez la liste de vérifications préventives et les instructions d'opération dans votre Guide de l'utilisateur. Vous sauverez probablement du temps et - Frigidaire FFGS3025PB | Installation Instructions - Page 42
peuvent provoquer de sérieuses blessures. Suivez les instructions ci‑dessous pour installer le support anti‑bascule. Si vous déplacez la cuisinière pour l'installer à un autre endroit, vous devez également déplacer le support anti‑bascule pour les installer avec la cuisinière. Outils Requis : Tourne - Frigidaire FFGS3025PB | Installation Instructions - Page 43
INSTRUCTIONS D'INSTALLATION POUR CUISINIÈRE ENCASTRABLE DE 30" À GAZ (Modèles avec brûleurs fermés) 12.2 Modèles possédant des vis de nivellement La cuisinière doit être fixée au plancher pour éviter qu'elle ne bascule, en installant un support anti-bascule à l'aide des vis fournies avec la cuisini - Frigidaire FFGS3025PB | Installation Instructions - Page 44
NOTES - NOTAS 44
-
 1
1 -
 2
2 -
 3
3 -
 4
4 -
 5
5 -
 6
6 -
 7
7 -
8
-
9
-
10
-
11
-
12
-
13
-
14
-
15
-
16
-
17
-
18
-
19
-
20
-
21
-
22
-
23
-
24
-
25
-
26
-
27
-
28
-
29
-
30
-
31
-
32
-
33
-
34
-
35
-
36
-
37
-
38
-
39
-
40
-
41
-
42
-
43
-
44
 |
 |

INSTALLATION INSTRUCTIONS
30" GAS SLIDE-IN RANGE
Printed in United States
Important Notes to the Installer
1. Read all instructions contained in these installation
instructions before installing range.
2. Remove all packing material from the oven and the
drawer compartments before connecting the gas and
electrical supply to the range.
3. Observe all governing codes and ordinances.
4. Be sure to leave these instructions with the consumer.
5. Note: For operation at 2000 ft. elevations above see
level, appliance rating shall be reduced by 4 percent for
each additional 1000 ft.
Important Note to the Consumer
Keep these instructions with your owner's guide for the
local electrical inspector's use and future reference.
INSTALLATION AND SERVICE MUST BE PERFORMED BY A QUALIFIED INSTALLER.
IMPORTANT: SAVE FOR LOCAL ELECTRICAL INSPECTOR'S USE.
READ AND SAVE THESE INSTRUCTIONS FOR FUTURE REFERENCE.
United States
Canada
Refer to your serial
plate for applicable
agency certification.
Table of Contents
Important Safety Instructions
..........................................
2
Product & Cabinet Dimensions
....................................
3-4
To Avoid Breakage
..........................................................
5
Before Starting
................................................................
6
Cabinet Construction
...................................................
6-7
Provide an Adequate Gas Supply
...................................
7
Seal the Openings
..........................................................
7
Connect the Range to the Gas Supply
........................
7-8
LP/Propane Gas Conversion
..........................................
8
Electrical Requirements
..................................................
8
Moving the Appliance for servicing and Cleaning
...........
8
Range Installation
...........................................................
9
Leveling the Range
.......................................................
10
Decorative Rear Trim Installation
.................................
10
Check Operation
......................................................
11-12
When All Hookups are Complete
..................................
12
Model and Serial Number Location
..............................
12
Before You Call for Service
...........................................
12
Anti-Tip Brackets Installation
...................................
13-14
Notes
............................................................................
44
If the information in this manual is not followed exactly, a fire
or explosion may result causing property damage, personal injury or death.
FOR YOUR SAFETY:
— Do not store or use gasoline or other flammable vapors and liquids in
the vicinity of this or any other appliance.
— WHAT TO DO IF YOU SMELL GAS:
•
Do not try to light any appliance.
•
Do not touch any electrical switch; do not use any phone in your
building.
•
Immediately call your gas supplier from a neighbor's phone.
Follow the
gas supplier's instructions.
•
If you cannot reach your gas supplier, call the fire department.
— Installation and service must be performed by a qualified installer,
service agency or the gas supplier.
P/N 318201697 (1304) Rev. A
English – pages 1-14; Spanish - pages 15-28; French – pages 29-44
Appliances Installed in the state of
Massachusetts:
This Appliance can only be installed in the state of
Massachusetts by a Massachusetts licensed plumber or
gasfitter.
This appliance must be installed with a three (3) foot / 36
in. long flexible gas connector.
A"T" handle type manual gas valve must be installed in
the gas supply line to this appliance.
Cold temperature can damage the
electronic control. When using the appliance for the
first time, or when the appliance has not been used
for an extended period, be certain the unit has been
in temperatures above 32°F (0°C) for at least 3 hours
before turning on the power to the appliance.