Frigidaire FGET3066UF Installation Instructions
Frigidaire FGET3066UF Manual
 |
View all Frigidaire FGET3066UF manuals
Add to My Manuals
Save this manual to your list of manuals |
Frigidaire FGET3066UF manual content summary:
- Frigidaire FGET3066UF | Installation Instructions - Page 1
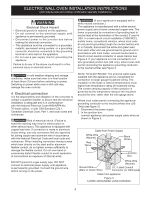
ELECTRICAL INSPECTOR'S USE. READ AND SAVE THESE INSTRUCTIONS FOR FUTURE REFERENCE. FOR YOUR SAFETY: Do not store or use gasoline or other flammable vapors and liquids in the vicinity of this or any other appliance. United States and Canada Your new wall oven has been designed to fit a variety of - Frigidaire FGET3066UF | Installation Instructions - Page 2
the appliance side rails (not included). You can order a larger bottom trim through a Service Center. Figure 2 27" and 30" Double Wall Ovens MODEL PRODUCT DIMENSIONS A B C 27" (68.6 cm) 30" (76.2 cm) MODEL 27 (68.6) 507/8 (129.2) 245/8 (62.5) 30 (76.2) 503/4 (128.9) 281/4 (71.8) CUTOUT - Frigidaire FGET3066UF | Installation Instructions - Page 3
instructions with your Owner's Guide for the local electrical inspector's use and future reference. IMPORTANT SAFETY INSTRUCTIONS • Be sure your wall oven is installed and grounded properly by a qualified installer or service technician. • This wall oven receive the oven. The oven support surface may - Frigidaire FGET3066UF | Installation Instructions - Page 4
ELECTRIC WALL OVEN INSTALLATION INSTRUCTIONS (with side-by-side and cooktop combination specialty installations) Electrical , where local code do not permit grounding trough the neutral (white) wire or in Canada, disconnect the white and green lead from each other and use ground lead to ground - Frigidaire FGET3066UF | Installation Instructions - Page 5
ELECTRIC WALL OVEN INSTALLATION INSTRUCTIONS (with side-by-side and cooktop combination specialty installations) If oven is used in a new branch circuit installation (1996 NEC), mobile home, recreational vehicle, or where local codes DO NOT permit grounding through the neutral (white) - Frigidaire FGET3066UF | Installation Instructions - Page 6
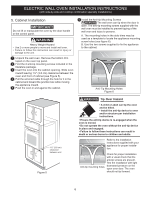
. Heavy Weight Hazard • Use 2 or more people to move and install wall oven. • Failure to follow this instruction can result in injury or damage to the unit. 1 Unpack the wall oven. Remove the bottom trim taped on the oven top panel. 2 Find the 2 anti-tip mounting screws included in the literature - Frigidaire FGET3066UF | Installation Instructions - Page 7
The trims are easier to install if the door is removed. See the Use and Care Manual for instructions on how to remove the oven door. All 30" Models: A. Place the air diverter (A) in place as shown in Figure 7. Line up screw locations and attach both ends. B. Place the color matched trim (B) in place - Frigidaire FGET3066UF | Installation Instructions - Page 8
ELECTRIC WALL OVEN INSTALLATION INSTRUCTIONS (with side-by-side and cooktop combination specialty installations) SINGLE WALL OVENS - SIDE-BY-SIDE INSTALLATION Do not remove spacers (if equipped) on the side walls of the built-in oven. These spacers center the oven in the space provided. The oven - Frigidaire FGET3066UF | Installation Instructions - Page 9
be installed over certain built-in electric oven models. Approved cooktops and built-in ovens are listed by the MFG ID number and product code (see the insert sheet included in the literature package and cooktop installation instructions for dimensions). Do not install a side-by-side configuration - Frigidaire FGET3066UF | Installation Instructions - Page 10
INSTRUCTIONS (with side-by-side and cooktop combination specialty installations) 18"(45.7 cm) Max. Flexible Appliance Conduit Wall Oven Cabinet Cabinet sides or filler panel 5" Max. 6 1/2" Min. Flare(12.7 cm) (16.5 cm) Union Flare Union 120V/60Hz Grounded Outlet Pressure Regulator Manual - Frigidaire FGET3066UF | Installation Instructions - Page 11
INSTRUCCIONES DE INSTALACIÓN PARA EL HORNO ELÉCTRICO DE PARED (con instrucciones para la instalación de la combinación lado a lado y de la estufa) LA INSTALACIÓN Y EL SERVICIO DEBEN SER EFECTUADOS POR UN INSTALADOR CALIFICADO. IMPORTANTE: GUARDE ESTAS INSTRUCCIONES PARA USO DEL INSPECTOR LOCAL DE - Frigidaire FGET3066UF | Installation Instructions - Page 12
INSTRUCCIONES DE INSTALACIÓN PARA EL HORNO ELÉCTRICO DE PARED (con instrucciones para la instalación de la combinación lado a lado y de la estufa) No quite los separadores de los muros laterales del horno empotrado. Estos espaciadores centran el horno en el espacio provisto. El horno debe estar - Frigidaire FGET3066UF | Installation Instructions - Page 13
para la instalación de la combinación lado a lado y de la estufa) Notas importantes para el instalador 1. Lea todas las instrucciones contenidas en este manual antes de instalar el horno. 2. Saque todo el material usado en el embalaje del compartimiento del horno antes de conectar el suministro el - Frigidaire FGET3066UF | Installation Instructions - Page 14
INSTRUCCIONES DE INSTALACIÓN PARA EL HORNO ELÉCTRICO DE PARED (con instrucciones para la instalación de la combinación lado a lado y de la estufa) Riesgo de choque eléctrico • Una puesta a tierra se requiere en este aparato. • No lo conecte a la corriente eléctrica hasta que el aparato haya sido - Frigidaire FGET3066UF | Installation Instructions - Page 15
INSTRUCCIONES DE INSTALACIÓN PARA EL HORNO ELÉCTRICO DE PARED (con instrucciones para la instalación de la combinación lado a lado y de la estufa) Si el horno se usa en una instalación de circuito de ramal nuevo (1996 NEC), en una casa rodante, en un vehículo para recreación o si los códigos - Frigidaire FGET3066UF | Installation Instructions - Page 16
INSTRUCCIONES DE INSTALACIÓN PARA EL HORNO ELÉCTRICO DE PARED (con instrucciones para la instalación de la combinación lado a lado y de la estufa) 5. Instalación del Gabinete IMPORTANTE No levante o manipular el aparato por el asa de la puerta o el panel de control. Peligro de Peso Pesado • Use 2 - Frigidaire FGET3066UF | Installation Instructions - Page 17
para fijar el borde inferior se suministran con el horno. Los adornos son más fáciles de instalar si se retira la puerta. Consulte el Manual de uso y B cuidado para obtener instrucciones sobre cómo retirar la puerta del horno. Todos los modelos de 30 ": A. Coloque el desviador de aire - Frigidaire FGET3066UF | Installation Instructions - Page 18
INSTRUCCIONES DE INSTALACIÓN PARA EL HORNO ELÉCTRICO DE PARED (con instrucciones para la instalación de la combinación lado a lado y de la estufa) HORNOS DE PARED SIMPLE - INSTALACIÓN LADO A LADO No quite los separadores de los muros laterales del horno empotrado. Estos espaciadores centran el horno - Frigidaire FGET3066UF | Installation Instructions - Page 19
INSTRUCCIONES DE INSTALACIÓN PARA EL HORNO ELÉCTRICO DE PARED (con instrucciones para la instalación de la combinación lado a lado y de la estufa) INSTALACIÓN TÍPICA DE BAJO CONTADOR No quite los separadores de los muros laterales del horno empotrado. Estos espaciadores centran el horno en el - Frigidaire FGET3066UF | Installation Instructions - Page 20
del horno durante el horneado o asado por convección. Antes de llamar al servicio Lea la sección Lista de Control de Averías en su Manual del Usuario. Esto le podrá ahorrar tiempo y gastos. Esta lista incluye ocurrencias comunes que no son el resultado de defectos de materiales o fabricación de - Frigidaire FGET3066UF | Installation Instructions - Page 21
CONSERVEZ CES INSTRUCTIONS POUR RÉFÉRENCES nécessaire. États-Unis et Canada FOUR SIMPLE ENCASTRÉ - INSTALLATION ou des dommages. NOTE: 1. La base doit pouvoir supporter 150 lbs (68 kg) pour les modèles garniture inférieure plus grande dans un centre de service. Entretoise de bois de 2" (5 cm) de - Frigidaire FGET3066UF | Installation Instructions - Page 22
avec les instructions pour Min. 3" (7.6 cm) Max. Boîte de jonction NOTES: 1.La base doit pouvoir supporter 300 lbs (136 kg) pour les modèles 27" et 375 lbs pour les modè Vous pouvez commander une garniture inférieure plus grande auprès d'un centre de service. MODÈLE 27" (68.6 cm) 30" (76.2 cm) MOD - Frigidaire FGET3066UF | Installation Instructions - Page 23
instructions au consommateur. 5. Retirez la porte du four pour faciliter l'installation. Voir le guide d'utilisation et d'entretien pour les instructions ou un technicien de service qualifié. • Ce four .1, Partie 1, au Canada. Grimper, s'appuyer ou appareil. La surface qui supporte l'appareil doit être - Frigidaire FGET3066UF | Installation Instructions - Page 24
mise à la terre de l'appareil. Si vous ne respectez pas toutes les instructions précédentes, un feu, des blessures corporelles ou un choc électrique peuvent en du conducteur de mise à la terre du châssis au neutre ou au Canada, débranchez les fils blanc et vert des autres et utilisez le fil de mise - Frigidaire FGET3066UF | Installation Instructions - Page 25
D'INSTALLATION POUR FOUR ENCASTRÉ ÉLECTRIQUE (avec les instructions pour l'installation côte à côte et la combinaison de table de cuisson) Fil dénudé Fils rouges Câble d'alimentation Fil blanc Fils noirs Fil dénudé ou vert - Frigidaire FGET3066UF | Installation Instructions - Page 26
ée. • Ne faites pas fonctionner la cuisinière si le dispositif anti-renversement n'est pas en place et enclenché. • Le non-respect de ces instructions peut causer des blessures fatales ou de graves brûlures aux enfants et aux adultes. Pour une installation adéquate du dispositif anti-renversement - Frigidaire FGET3066UF | Installation Instructions - Page 27
D'INSTALLATION POUR FOUR ENCASTRÉ ÉLECTRIQUE (avec les instructions pour l'installation côte à côte et la combinaison de table de cuisson) 7 Installation de la moulure inférieure: La moulure inférieure doit être installée pour - Frigidaire FGET3066UF | Installation Instructions - Page 28
(avec les instructions pour l'installation sur une installation côte à côte. 2. Chaque base doit pouvoir supporter 150 lbs (68 kg) pour les modèles 27" et 200 lbs pouvez commander une garniture inférieure plus grande dans un centre de service. * Suggested distance from floor is 31" (78.7cm). Minimum - Frigidaire FGET3066UF | Installation Instructions - Page 29
se trouve dans l'enveloppe de littérature ainsi que le feuillet d'instructions d'installation de la table de cuisson pour les dimensions). N'installez monté sur deux solives et à égalité avec le coup-depied. La base doit pouvoir supporter 150 lbs (68 kg) pour les modèles 27" et 200 lbs (90 kg) pour - Frigidaire FGET3066UF | Installation Instructions - Page 30
après l'arrêt de l'appareil, et ce, jusqu'à ce que les composantes aient refroidi. Avant d'appeler le service d'entretien Réviser la liste de vérifications préventives et les instructions d'opération dans votre Manuel d'utilisation et d'entretien. Vous sauverez probablement du temps et de l'argent - Frigidaire FGET3066UF | Installation Instructions - Page 31
- Frigidaire FGET3066UF | Installation Instructions - Page 32
-
 1
1 -
 2
2 -
 3
3 -
 4
4 -
 5
5 -
 6
6 -
 7
7 -
8
-
9
-
10
-
11
-
12
-
13
-
14
-
15
-
16
-
17
-
18
-
19
-
20
-
21
-
22
-
23
-
24
-
25
-
26
-
27
-
28
-
29
-
30
-
31
-
32
 |
 |
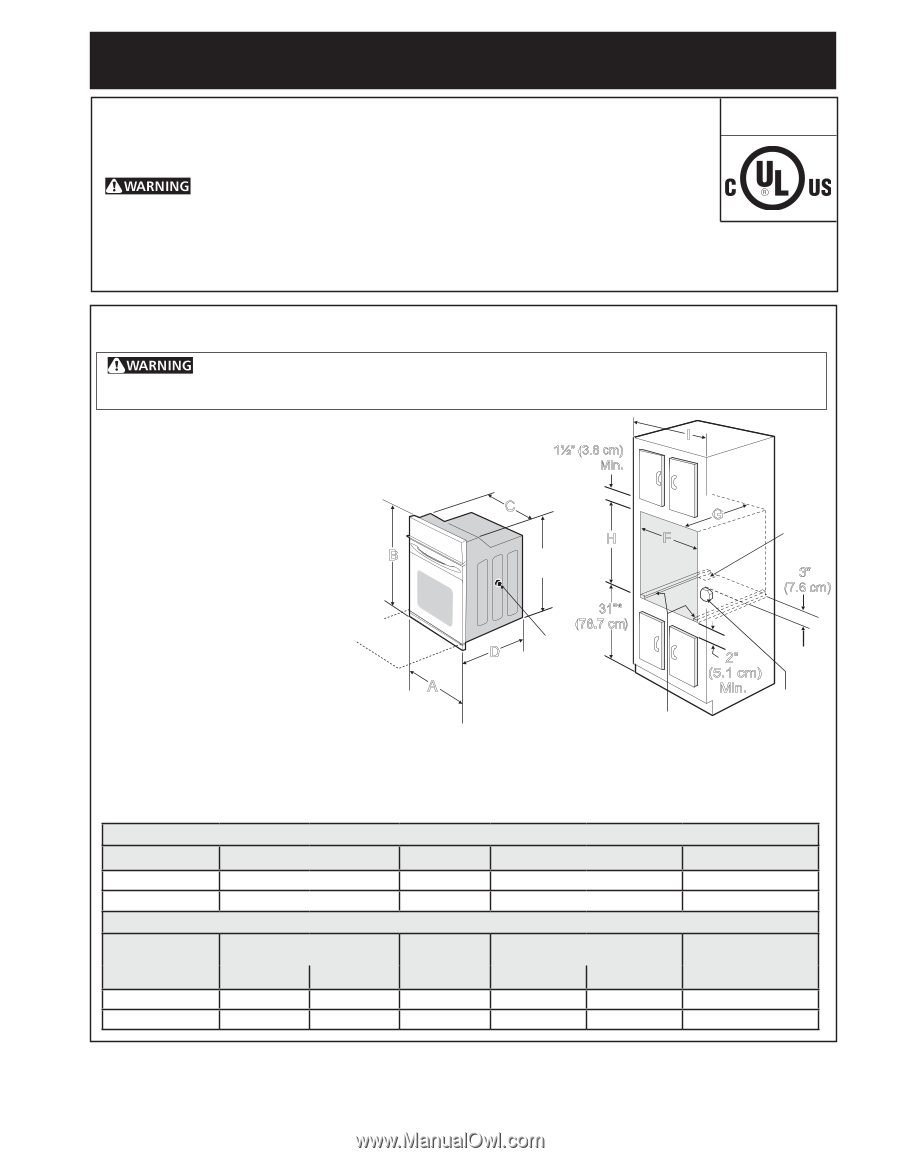
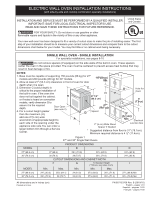
ELECTRIC WALL OVEN INSTALLATION INSTRUCTIONS
(with side-by-side and cooktop combination specialty installations)
Figure 1
27" and 30" Single Wall Ovens
PN 807153706 Rev. B (2019/10)
English – pages 1-10
Español – páginas 11-20
Français – pages 21-30
All dimensions are in inches (cm).
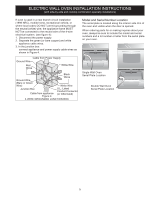
Do not remove spacers (if equipped) on the side walls of the built-in oven. These spacers
center the oven in the space provided. The oven must be centered to prevent excess heat buildup that may
result in heat damage or fire.
NOTES:
1. Base must be capable of supporting 150 pounds (68 kg) for 27"
models and 200 pounds (90 kg) for 30" models.
2. Allow at least 21" (53.3 cm) clearance in front of oven for door
depth when it is open.
than the maximum (H),
add one 2"(5 cm) wide
3. Dimension G (cutout depth) is
critical to the proper installation of
the built-in oven. If the oven trim
does not butt against the cabinet,
or if noise is heard on convection
models, verify dimension G to
assure it is the required
depth.
4. For a cutout height greater
Printed in U.S.A.
* Suggested distance from floor is 31" (78.7cm).
Minimum required distance is 4 ½" (11.4cm).
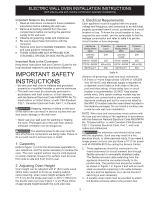
INSTALLATION AND SERVICE MUST BE PERFORMED BY A QUALIFIED INSTALLER.
IMPORTANT: SAVE FOR LOCAL ELECTRICAL INSPECTOR'S USE.
READ AND SAVE THESE INSTRUCTIONS FOR FUTURE REFERENCE.
FOR YOUR SAFETY: Do not store or use gasoline or other
flammable vapors and liquids in the vicinity of this or any other appliance.
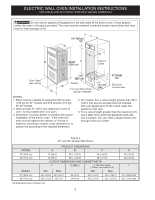
Your new wall oven has been designed to fit a variety of cutout sizes to make the job of installing easier. The first
step of your installation should be to measure your current cutout dimensions and compare them to the cutout
dimensions chart below for your model. You may find little or no cabinet work being necessary.
PRODUCT DIMENSIONS
MODEL
A
B
C
D
27" (68.6 cm)
27 (68.6)
29
1
/
2
(74.9)
24
5
/
8
(62.5)
24
3
/
4
(62.9)
30" (76.2 cm)
30 (76.2)
29 (73.7)
28
1
/
4
(71.8)
24
3
/
4
(62.9)
CUTOUT DIMENSIONS AND CABINET WIDTH
F
G
H. Standard Height
(**Others, see notes 4 & 5)
I
MODEL
Min.
Max.
Min.
Min.
Max.
27" (68.6 cm)
24
7
/
8
(63.2)
25¼ (64.1)
24 (61.0)
27¼ (69.2)
28
1
/
4
(71.8)
27
1
/
8
(68.9) Min
30" (76.2 cm)
28
1
/
2
(72.4)
29 (73.7)
24 (61.0)
27¼ (69.2)
28
1
/
8
(71.4)
30
1
/
8
(76.5) Min
United States
and Canada
wood shim of appropriate height to
each side of the opening under the
appliance side rails.You can order a
larger bottom trim through a Service
Center.
Hole for
Cord
Electrical
Junction Box
2" (5 cm) Wide Wood
Spacer if Needed
B
A
D
C
H
F
I
G
27 1/4”
(69.2 cm)
2”
(5.1 cm)
Min.
31”*
(78.7 cm)
3”
(7.6 cm)
1½” (3.8 cm)
Min.
Door Open
(see note 2)
Spacer
SINGLE WALL OVEN - SINGLE INSTALLATION
For specialty installations, see pages 8-10