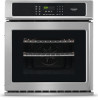
Frigidaire FGEW276SPF Installation Instructions
Frigidaire FGEW276SPF Manual
 |
View all Frigidaire FGEW276SPF manuals
Add to My Manuals
Save this manual to your list of manuals |
Frigidaire FGEW276SPF manual content summary:
- Frigidaire FGEW276SPF | Installation Instructions - Page 1
ELECTRIC WALL OVEN INSTALLATION INSTRUCTIONS (and Optional Electric or Gas Cooktop Combination) INSTALLATION AND SERVICE MUST BE PERFORMED BY A QUALIFIED INSTALLER. IMPORTANT: SAVE FOR LOCAL ELECTRICAL INSPECTOR'S USE. READ AND SAVE THESE INSTRUCTIONS FOR FUTURE REFERENCE. FOR YOUR SAFETY: Do not - Frigidaire FGEW276SPF | Installation Instructions - Page 2
instructions with your Owner's Guide for the local electrical inspector's use and future reference. IMPORTANT SAFETY INSTRUCTIONS • Be sure your wall oven is installed and grounded properly by a qualified installer or service technician. • This wall oven receive the oven. The oven support surface may - Frigidaire FGEW276SPF | Installation Instructions - Page 3
ELECTRIC WALL OVEN INSTALLATION INSTRUCTIONS (and Optional Electric or Gas Cooktop Combination) as shown in Figure 1 and with as much slack as possible remaining in the cable between the box and the appliance, so it can be moved if servicing is ever necessary. 3. A suitable strain relief must be - Frigidaire FGEW276SPF | Installation Instructions - Page 4
ELECTRIC WALL OVEN INSTALLATION INSTRUCTIONS (and Optional Electric or Gas Cooktop Combination) Cable from Power Supply White Wire (Neutral) Red Wires Black Wires Junction Box Ground Wire (Bare or Green - Frigidaire FGEW276SPF | Installation Instructions - Page 5
WALL OVEN INSTALLATION INSTRUCTIONS (and Optional Electric or Gas Cooktop Combination) 6.1.2. Support oven frame (see F, Figure 8). Figure 10 6.3 Oven door modifications: 6.3.1. Remove the three (3) screws, each side, fixing the outer door assembly (glass panel and handle). Remove also the four - Frigidaire FGEW276SPF | Installation Instructions - Page 6
ELECTRIC WALL OVEN INSTALLATION INSTRUCTIONS (and Optional Electric or Gas Cooktop Combination) 6.3.2. To remove the and reinstall it on the left side lower position (see J, Figure 13). 6.3.11. Replace the four (4) caps removed on step 6.3.5 on the right side of the inner door. 6.3.12.Turn the inner - Frigidaire FGEW276SPF | Installation Instructions - Page 7
by the door handle. Heavy Weight Hazard • Use 2 or more people to move and install wall oven. • Failure to follow this instruction can result in injury or damage to the unit. Install the Anti-Tip Mounting Screws: The wall oven can tip when the door is open. The anti-tip mounting screws supplied with - Frigidaire FGEW276SPF | Installation Instructions - Page 8
ELECTRIC WALL OVEN INSTALLATION INSTRUCTIONS (and Optional Electric or Gas Cooktop Combination) 5 Push the oven in and against the cabinet. 6 Bottom Trim Installation: For a cutout height (H) greater than 28¼" (71,7 cm) you can order a larger bottom trim, contact a Service Center. Place the top of - Frigidaire FGEW276SPF | Installation Instructions - Page 9
and product code (see the insert sheet included in the literature package and cooktop installation instructions for dimensions). To reduce the risk of personal injury and tipping of the wall oven, the wall oven must be secured to the cabinet (s) by mounting screws. Approx. 3" (7,5 cm) G 208/240 - Frigidaire FGEW276SPF | Installation Instructions - Page 10
WALL OVEN INSTALLATION INSTRUCTIONS (and Optional Electric or Gas Cooktop Combination) 18" (45,7 cm) Max. Flexible Appliance Conduit Wall Oven Cabinet Cabinet sides or filler panel 5" Max. 6 1/2" Min. Flare(12,7 cm) (16, cm) Union Flare Union 120V/60Hz Grounded Outlet Pressure Regulator Manual - Frigidaire FGEW276SPF | Installation Instructions - Page 11
Aperturas de corte * Distancia sugerida desde el suelo es 31" (78,7 cm). La distancia mínima requerida es 4 ½" (11,4 cm). Orificio para el Cable No instale el horno más cerca que la dimensión "I" (ver tabla) en ninguna ebanistería contigua ni en paredes del lado de la bisagra de la puerta. Esto - Frigidaire FGEW276SPF | Installation Instructions - Page 12
DE PARED (Combinado con una cocina eléctrica o de gas facultativa) Notas importantes para el instalador 1. Lea todas las instrucciones contenidas en este manual antes de instalar el horno. 2. Saque todo el material usado en el embalaje del compartimiento del horno antes de conectar el suministro el - Frigidaire FGEW276SPF | Installation Instructions - Page 13
INSTRUCCIONES DE INSTALACIÓN PARA EL HORNO ELÉCTRICO DE PARED (Combinado con una cocina eléctrica o de gas facultativa) Riesgo de choque eléctrico • Una puesta a tierra se requiere en este aparato. • No lo conecte a la corriente eléctrica hasta que el aparato haya sido puesto a tierra. • Desconecte - Frigidaire FGEW276SPF | Installation Instructions - Page 14
INSTRUCCIONES DE INSTALACIÓN PARA EL HORNO ELÉCTRICO DE PARED (Combinado con una cocina eléctrica o de gas facultativa) Si el horno se usa en una instalación de circuito de ramal nuevo (1996 NEC), en una casa rodante, en un vehículo para recreación o si los códigos locales NO permiten la conexión a - Frigidaire FGEW276SPF | Installation Instructions - Page 15
INSTRUCCIONES DE INSTALACIÓN PARA EL HORNO ELÉCTRICO DE PARED (Combinado con una cocina eléctrica o de gas facultativa) 6.2.2. Quite la bisagra inferior del lado izquierdo del bastidor del horno (ver C, Figura 8) y colóquela en el lado superior derecho del bastidor del horno (ver E, Figura 8). - Frigidaire FGEW276SPF | Installation Instructions - Page 16
INSTRUCCIONES DE INSTALACIÓN PARA EL HORNO ELÉCTRICO DE PARED (Combinado con una cocina eléctrica o de gas facultativa) 7. Instalación del Gabinete IMPORTANTE No levante el horno por la manija de la puerta. Figura 13 6.3.11. Vuelva a colocar los cuatro (4) topes que quitó en el paso 6.3.5 en el - Frigidaire FGEW276SPF | Installation Instructions - Page 17
INSTRUCCIONES DE INSTALACIÓN PARA EL HORNO ELÉCTRICO DE PARED (Combinado con una cocina eléctrica o de gas facultativa) 4 Insertar el horno en la abertura del gabinete. Deslizar el horno hacia dentro dejando 1½" (3,8 cm) de espacio libre entre el horno y a parte delantera del gabinete (ver la - Frigidaire FGEW276SPF | Installation Instructions - Page 18
. La altura del relleno lateral del gabinete debe permitir la instalación de modelos de tapas de cocina aprobados. 36" Min. (91.4cm) Min. H F Instale contrachapado de 3/4" (1.9 cm) sobre dos correderas, nivelado con la parrilla inferior. La base debe poder sostener 150 libras. Corte una abertura de - Frigidaire FGEW276SPF | Installation Instructions - Page 19
del gabinete (para tener acceso a la válvula de cierre manual) Figura 9 - INSTALACIÓN TÍPICA PARA UNA ESTUFA DE GAS ENCIMA DE UN HORNO DE PARED INSTALADO DEBAJO DEL MOSTRADOR 8. Asegúrese de que el horno de pared está a nivel 1. Instale una rejilla al centro del horno superior (vea la Figura 14 - Frigidaire FGEW276SPF | Installation Instructions - Page 20
INSTALLATION POUR FOUR ENCASTRÉ ÉLECTRIQUE (Combiné à une table de cuisson électrique ou à gaz (en option)) L'INSTALLATION ET L'ENTRETIEN DOIVENT ÊTRE EFFECTUÉS PAR UN INSTALLATEUR QUALIFIÉ. IMPORTANT: CONSERVEZ POUR L'INSPECTEUR D'ÉLECTRICITÉ LOCAL. LIRE ET CONSERVER CES INSTRUCTIONS de service. - Frigidaire FGEW276SPF | Installation Instructions - Page 21
instructions avec votre Manuel d'utilisation et d'entretien pour l'inspecteur d'électricité local et références futures. DIRECTIVES IMPORTANTES DE SÉCURITÉ • Assurez‑vous que votre four encastré est installé et mis à la terre conformément par un installateur ou un technicien de service qui supporte - Frigidaire FGEW276SPF | Installation Instructions - Page 22
INSTRUCTIONS D'INSTALLATION POUR FOUR ENCASTRÉ ÉLECTRIQUE (Combiné à une table de cuisson électrique ou à gaz n'autorisent pas la connexion du conducteur de mise à la terre du châssis au neutre ou au Canada, débranchez les fils blanc et vert des autres et utilisez le fil de mise à la terre pour - Frigidaire FGEW276SPF | Installation Instructions - Page 23
INSTRUCTIONS D'INSTALLATION POUR FOUR ENCASTRÉ ÉLECTRIQUE (Combiné à une table de cuisson électrique ou à gaz (en option)) Câble d'alimentation Fil blanc (neutre) Fils rouges Fils noirs Boîte de jonction - Frigidaire FGEW276SPF | Installation Instructions - Page 24
INSTRUCTIONS D'INSTALLATION POUR FOUR ENCASTRÉ ÉLECTRIQUE (Combiné à une table de cuisson électrique ou re de l'encadrement en bas à droite. Conservezla pour la réinstaller à la toute fin. Figure 9 Figure 10 6.3 Modification de la porte du four 6.3.1. De chaque côté de la porte, sous le panneau de - Frigidaire FGEW276SPF | Installation Instructions - Page 25
les risques de basculer et de blessures aux personnes. 1 Déballez le four encastré. Récupérez la moulure inférieure qui est fixée sur le côté du four. 2 Les trous situés sur les moulures latérales dont utilisés comme guide pour installer les vis de fixation de l'appareil (Figure 15). 3 Utilisez les - Frigidaire FGEW276SPF | Installation Instructions - Page 26
INSTRUCTIONS D'INSTALLATION POUR FOUR ENCASTRÉ ÉLECTRIQUE (Combiné à une table de cuisson électrique ou à gaz (en option)) Emplacement des trous pour les vis de fixation. Figure 15 4 Insérez le four dans l'armoire. Glissez-le en laissant 1½" (3,8 cm) d'espace entre le four et l'armoire (voir Figure - Frigidaire FGEW276SPF | Installation Instructions - Page 27
littérature ainsi que le feuillet d'instructions d'installation de la table de cuisson pour les dimensions). Pour réduire les risques de blessures et pour empêcher le four encastré de basculer. Utilisez les supports de fixation pour retenir le four encastré à l'armoire. Approx. 3" (7,5 cm) G Il - Frigidaire FGEW276SPF | Installation Instructions - Page 28
é à l'arrière tourne. Le ventilateur convection arrête lorsque l'on ouvre la porte du four. Avant d'appeler le service d'entretien Réviser la liste de vérifications préventives et les instructions d'opération dans votre Manuel d'utilisation et d'entretien. Vous sauverez probablement du temps et de
-
 1
1 -
 2
2 -
 3
3 -
 4
4 -
 5
5 -
 6
6 -
 7
7 -
8
-
9
-
10
-
11
-
12
-
13
-
14
-
15
-
16
-
17
-
18
-
19
-
20
-
21
-
22
-
23
-
24
-
25
-
26
-
27
-
28
 |
 |

ELECTRIC WALL OVEN INSTALLATION INSTRUCTIONS
(and Optional Electric or Gas Cooktop Combination)
2" (5 cm) Wide Wood
Spacer if Needed
Spacer
Electrical
Junction Box
Hole for
Cable
P/N 318206005 (1507) Rev. A
English – pages 1-10, Español – páginas 11-19, Français -pages 20-28
All dimensions are in inches (cm).
NOTES:
1.
Base must be capable of supporting 150 pounds (68 kg).
2.
Allow at least 27¼" (69,2 cm) clearance in front of oven for door depth when it is open.
3.
Dimension
G
(cutout depth)
is critical to the proper installation of the built-in oven. If the oven decorative trim
does not butt against the cabinet, or if noise is heard on convection models, verify dimension
G
to assure it is the
required depth.
4.
For a cutout height greater than
28
1
/
8
"
(71,4 cm)
add one 2" (5 cm) wide wood shim of appropriate height to
each side of the opening under the appliance side rails. For a cutout height
(H)
greater than
28
5
/
8
"
(72,7 cm)
you can order a larger bottom trim, contact a Service Center
Printed in United States
PRODUCT DIMENSIONS
A
B
C
D
27 (68,6)
29 (73,7)
24
5
/
8
(62,5)
24¾ (62,9)
CUTOUT DIMENSIONS AND CABINET WIDTH
F
G (Min.)
H. Standard Height
(Others, see note 4)
I
Min.
Max.
Min.
Max.
24
7
/
8
(63,2)
25¼ (64,1)
23½ (59,7)
27¼ (69,2)
28¼ (71,7)
4½ (11,4)
Do not remove spacers (if equipped) on the side walls and/or on the back of the built-in
oven. These spacers center the oven in the space provided. The oven must be centered to prevent
excess heat buildup that may result in heat damage or fire.
*
Suggested distance from floor
is 31" (78,7 cm).
Minimum required distance is
4 ½" (11,4 cm).
Door Open
(see note 2)
Figure 1
INSTALLATION AND SERVICE MUST BE PERFORMED BY A
QUALIFIED INSTALLER.
IMPORTANT: SAVE FOR LOCAL ELECTRICAL INSPECTOR'S USE.
READ AND SAVE THESE INSTRUCTIONS FOR FUTURE REFERENCE.
United States and
Canada
FOR YOUR SAFETY: Do not store or use gasoline or other flammable vapors
and liquids in the vicinity of this or any other appliance.
Your new wall oven has been designed to fit a limited variety of cutout sizes to make the job
of installing easier. The first step of your installation should be to measure your current cutout
dimensions and compare them to the cutout dimensions chart below for your model. You may
find little or no cabinet work being necessary.
Cutout openings
Do not install the
oven closer than the
dimension
"I"
(see table) to any adjoining
cabinetry or walls on the door
hinge side. This will interfere
with oven rack removal.