Frigidaire FGHB2844LF Complete Owner's Guide (English) - Page 10
Door Removal Instructions - water
 |
UPC - 012505698040
View all Frigidaire FGHB2844LF manuals
Add to My Manuals
Save this manual to your list of manuals |
Page 10 highlights
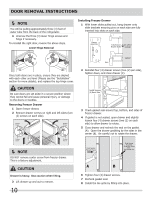
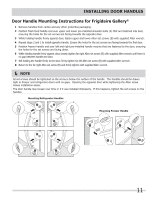
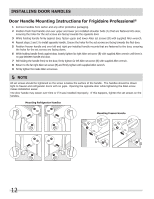
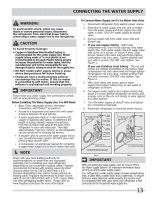
Door Removal Instructions NOTE You will be pulling approximately three (3) feet of water tube from the back of the refrigerator. 4 Unscrew the three (3) lower hinge screws and hinge if necessary. To reinstall the right door, reverse the above steps. Lower Hinge Removal Installing Freezer Drawer 1 With lower slides pulled out, hang drawer onto slide brackets ensuring pins on each side are fully inserted into slots on each side. Drawer Assembly Fully Extend (on select Drawer Slides models) Pin Slot Cabinet Once both doors are in place, ensure they are aligned with each other and level (Please see the "Installation" section for more details), and replace the top hinge cover. CAUTION Be sure doors are set aside in a secure position where they cannot fall and cause personal injury, or damage to the doors or handles. Removing Freezer Drawer 1 Open freezer drawer. 2 Remove drawer screws on right and left sides (two (2) screws on each side). 2 Reinstall four (4) drawer screws (two (2) per side), tighten down, and close drawer (C). Install Screws (2) Each Side 3 Check gasket seal around top, bottom, and sides of freezer drawer. 4 If gasket is not sealed, open drawer and slightly loosen four (4) drawer screws (two (2) on each side) to allow drawer to rotate. 5 Close drawer and recheck the seal on the gasket (A). Open the drawer grabbing by the sides in the center (B). Be careful not to rotate the drawer. NOTE DO NOT remove center screw from freezer drawer. This is a factory adjustment. CAUTION Drawer is heavy. Use caution when lifting. 3 Lift drawer up and out to remove. 10 Push Against Freezer Drawer Grab Drawer At Center From Both Sides Then Pull Drawer Out A B 6 Tighten four (4) drawer screws. 7 Recheck gasket seal. 8 Install the toe grille by fitting into place.
-
 1
1 -
2
-
3
-
4
-
 5
5 -
 6
6 -
 7
7 -
 8
8 -
 9
9 -
 10
10 -
 11
11 -
 12
12 -
 13
13 -
 14
14 -
 15
15 -
16
-
17
-
18
-
19
-
20
-
21
-
22
-
23
-
24
-
25
-
26
-
27
-
28
-
29
-
30
-
31
-
32
-
33
 |
 |