Frigidaire GLEB27M9FB Installation Instructions
Frigidaire GLEB27M9FB - 27 Inch Microwave Combination Oven Manual
 |
View all Frigidaire GLEB27M9FB manuals
Add to My Manuals
Save this manual to your list of manuals |
Frigidaire GLEB27M9FB manual content summary:
- Frigidaire GLEB27M9FB | Installation Instructions - Page 1
MICROWAVE/ WALL OVEN COMBINATION INSTALLATION INSTRUCTIONS INSTALLATION AND SERVICE MUST BE PERFORMED BY A QUALIFIED INSTALLER. IMPORTANT: SAVE FOR LOCAL ELECTRICAL INSPECTOR'S USE. READ AND SAVE THESE INSTRUCTIONS FOR FUTURE REFERENCE. FOR YOUR SAFETY: Do not store or use gasoline or other - Frigidaire GLEB27M9FB | Installation Instructions - Page 2
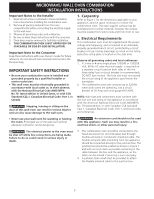
your Owner's Guide for future reference. Do not discard oven removal tools found in the literature bag. IMPORTANT SAFETY INSTRUCTIONS • Be sure your combination oven is installed and grounded properly by a qualified installer or service technician. • This wall oven must be electrically grounded in - Frigidaire GLEB27M9FB | Installation Instructions - Page 3
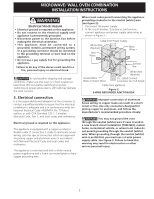
MICROWAVE/ WALL OVEN COMBINATION INSTALLATION INSTRUCTIONS Electrical Shock Hazard • Electrical ground is required on this appliance. • Do not connect to the electrical supply until appliance is permanently grounded. • Disconnect power to the junction box before making the electrical connection. • - Frigidaire GLEB27M9FB | Installation Instructions - Page 4
MICROWAVE/ WALL OVEN COMBINATION INSTALLATION INSTRUCTIONS If oven is used in a new branch circuit installation (1996 NEC), mobile home, recreational vehicle, or where local codes DO NOT permit grounding through the neutral (white) wire (see figure 3): 1. Disconnect the power supply. 2. - Frigidaire GLEB27M9FB | Installation Instructions - Page 5
MICROWAVE/ WALL OVEN COMBINATION INSTALLATION INSTRUCTIONS IMPORTANT Do not lift the oven by the door handle. 4.Push the oven in and against the cabinet; the oven side bracket will clip into the mounting bracket installed into the side of cabinet. To pull out the oven for servicing you must use the - Frigidaire GLEB27M9FB | Installation Instructions - Page 6
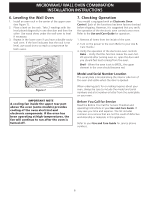
MICROWAVE/ WALL OVEN COMBINATION INSTALLATION INSTRUCTIONS 6. Leveling the Wall Oven 1. Install an oven rack in the center of the upper oven (see Figure 7). 2. Place a level on the rack. Take 2 readings with the level placed diagonally in one direction and then the other. Use wood shims under - Frigidaire GLEB27M9FB | Installation Instructions - Page 7
los separadores de los muros laterales o/y de la parte posterior del horno empotrado. Estos espaciadores centran el horno (62.2) 24½ (62.2) DIMENSIONES DEL HUECO Y ANCHURA DEL ARMARIO MODELO Min. F Max. Horno de pared 27 (68.6) 247/8 (63.2) 25¼ (64.1) Horno de pared 30 (76.2) 28½ (72.4) 29 ( - Frigidaire GLEB27M9FB | Installation Instructions - Page 8
. Nota importante al consumidor Conserve estas instrucciones y el manual del usuario para referencia futura. No tirar las herramientas para ón en los Estados Unidos, o el Código Eléctrico Canadiense CSA Standard C22.1, Part 1, en Canadá. Pisar, apoyarse, o sentarse sobre la puerta de este horno de - Frigidaire GLEB27M9FB | Installation Instructions - Page 9
con el Código Eléctrico Nacional ANSI/ NFPA No. 70-última edición en los Estados Unidos, o el Código Eléctrico Canadiense CSA Standard C22.1, Part 1, en Canadá. En este electrodomestico se necesita un cable de toma a tierra. Este electrodoméstico viene equipado con un cable de conexión de cobre. Si - Frigidaire GLEB27M9FB | Installation Instructions - Page 10
y los tornillos que se incluyen en el paquete de literatura. 2. Instale los soportes de montaje como en la figura 4. Nota: Para prevenir * Si hay instaladas cuñas de madera, calcular esta dimensión desde la parte superior de la cuña hasta el medio del soporte de montaje. Figura 4 3. - Frigidaire GLEB27M9FB | Installation Instructions - Page 11
está abierta. Después de insertar las herramientas, extraer el horno hacia fuera (ver la Figura 6). 5.Instalación de la Guarnición Inferior Colocar la parte superior de la guarnición inferior sobre las lengüetas laterales del horno, debajo de la puerta del horno, y fijarlas usando los 2 tornillos - Frigidaire GLEB27M9FB | Installation Instructions - Page 12
el horno de pared está a nivel 1. Instale una rejilla al centro del horno superior (vea parte trasera superior arriba del horno (en algunos modelos) permite la refrigeración de los componentes eléctricos y electr sección Lista de Antes de llamar en su Manual del Usuario. Esto le podrá ahorrar tiempo
-
 1
1 -
 2
2 -
 3
3 -
 4
4 -
 5
5 -
 6
6 -
 7
7 -
8
-
9
-
10
-
11
-
12
 |
 |

MICROWAVE/ WALL OVEN COMBINATION
INSTALLATION INSTRUCTIONS
B
A
D
F
I
H
G
11½”
(29.2 cm)
11½”
(29.2 cm)
1¼”
(3.2 cm)
Min.
1¼”
(3.2 cm)
Min.
3” (7.6 cm)
Max.
3” (7.6 cm)
Max.
1” (2.5 cm)
Min.
1” (2.5 cm)
Min.
40-15/16”
(104 cm)
40-15/16”
(104 cm)
C
INSTALLATION AND SERVICE MUST BE PERFORMED BY A QUALIFIED INSTALLER.
IMPORTANT: SAVE FOR LOCAL ELECTRICAL INSPECTOR'S USE.
READ AND SAVE THESE INSTRUCTIONS FOR FUTURE REFERENCE.
FOR YOUR SAFETY:
Do not store or use gasoline or other flammable vapors and liquids in
the vicinity of this or any other appliance.
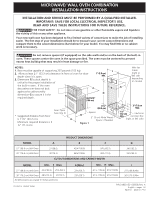
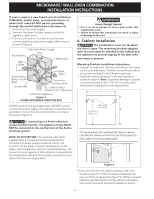
Your new wall oven has been designed to fit a limited variety of cutout sizes to make the job of installing
easier. The first step of your installation should be to measure your current cutout dimensions and
compare them to the cutout dimensions chart below for your model. You may find little or no cabinet
work is necessary.
P/N 318201521 (0503) Rev. A
English – pages 1-6
Español – páginas 7-12
All dimensions are stated in inches and (cm).
Do not remove spacers (if equipped) on the side walls and/or on the back of the built-in
oven. These spacers center the oven in the space provided. The oven must be centered to prevent
excess heat buildup that may result in heat damage or fire.
2" (5 cm) Wide Wood
Spacer if Needed
PRODUCT DIMENSIONS
CUTOUT DIMENSIONS AND CABINET WIDTH
Min.
F
Max.
Min.
H
Max
.
MODEL
27" (68.6 cm) Wall Oven
30" (76.2 cm) Wall Oven
MODEL
27" (68.6 cm) Wall Oven
30" (76.2 cm) Wall Oven
A
27 (68.6)
30 (76.2)
B
42¾ (108.6)
42¾ (108.6)
G (Min.)
23½ (59.7)
23½ (59.7)
C
24
5
/
8
(62.5)
28¼ (71.8)
D
24½ (62.2)
24½ (62.2)
I
27
1
/
8
(68.9) Min
30
1
/
8
(76.5) Min
24
7
/
8
(63.2)
28½ (72.4)
25¼ (64.1)
29 (73.7)
41
1
/
8
(104.5)
41
1
/
8
(104.5)
41¼ (104.8)
41¼ (104.8)
NOTES:
1.
Base must be capable of supporting 225 pounds (102 kg).
2.
Allow at least 21" (53.3 cm) clearance in front of oven for door
depth when it is open.
3.
Dimension
G
(cutout depth)
is
critical to the proper installation of
the built-in oven.
If the oven
decorative trim does not butt
against the cabinet verify
dimension
G
to assure it is the
required depth.
Door Open
(see note 2)
Spacer
Electrical
Junction Box
(right or left side)
Hole for
Cable
(right or
left side
depending
on model)
*
Suggested distance from floor
is 11½" (29.2 cm).
Minimum required distance is 4
½" (11.4 cm)
Figure 1
Printed in United States