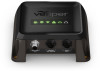
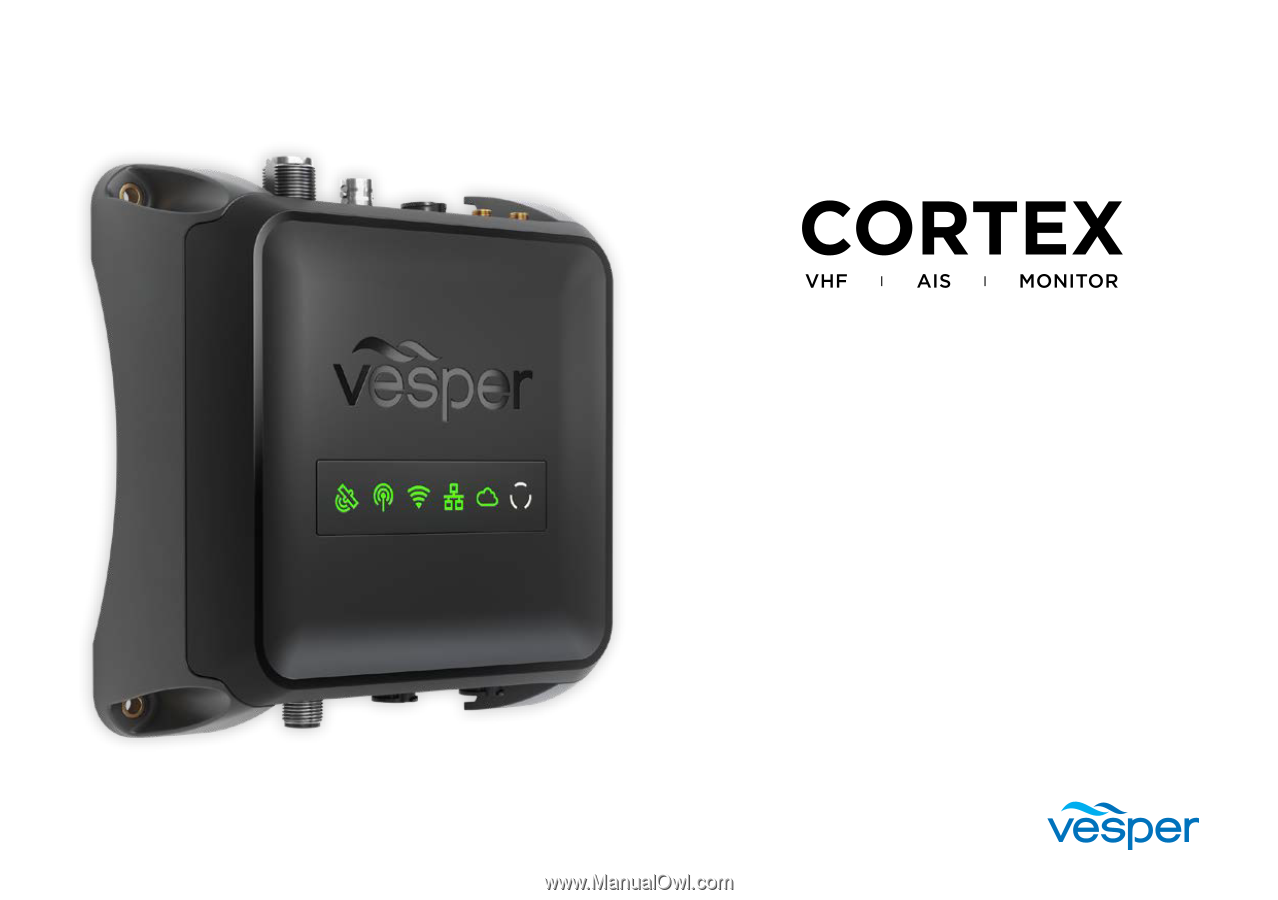
Garmin Cortex M1 Hub Cortex Hub Installation Guide
Garmin Cortex M1 Hub Manual
 |
View all Garmin Cortex M1 Hub manuals
Add to My Manuals
Save this manual to your list of manuals |
Garmin Cortex M1 Hub manual content summary:
- Garmin Cortex M1 Hub | Cortex Hub Installation Guide - Page 1
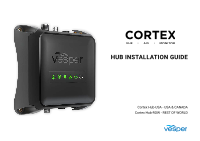
HUB INSTALLATION GUIDE Cortex Hub-USA - USA & CANADA Cortex Hub-ROW - REST OF WORLD - Garmin Cortex M1 Hub | Cortex Hub Installation Guide - Page 2
Cortex network 6 LED indicator panel 7 Cortex Hub port locations 7 Cortex Hub positioning 8 Cortex Hub mounting 8 To connect power 9 Wiring color codes 9 AIS / VHF Antenna sensor 33 Dimensions 34 Specifications 35 Contents Dimensions LED icon troubleshooting 37 Warnings 39 Warranty 41 - Garmin Cortex M1 Hub | Cortex Hub Installation Guide - Page 3
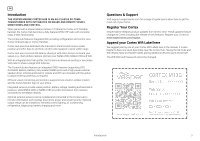
lighting, air conditioning, refrigeration, bilge pump, battery charging and more. Questions & Support Visit support.vespermarine.com for a range of guide topics about how to get the most out of you Cortex. Register Your Cortex Vesper Marine releases product updates from time to time. These updates - Garmin Cortex M1 Hub | Cortex Hub Installation Guide - Page 4
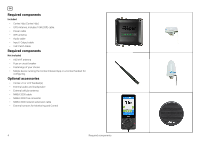
cable • Input / Output cable • VHF Patch Cable Required components Not included • AIS/VHF antenna • Fuse or circuit breaker • Fastenings of your choice • Mobile device running the Cortex Onboard App or a Cortex Handset for configuring. Optional accessories • Cortex H1 or H1P handset(s) • External - Garmin Cortex M1 Hub | Cortex Hub Installation Guide - Page 5
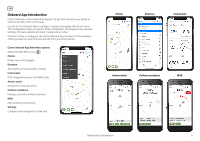
Handset offering access to most functions directly from your smart device. Cortex Onboard App Main Menu options Select the Main Menu icon ( ) Plotter Plotter view of AIS targets Directory AIS targets and manual DSC contacts Instruments GPS, integrated sensors and NMEA data Anchor watch Monitor - Garmin Cortex M1 Hub | Cortex Hub Installation Guide - Page 6
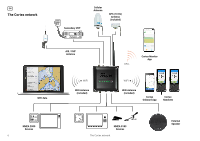
EN The Cortex network Secondary VHF Cellular Antenna GPS (10 Hz) Antenna (included) AIS / VHF Antenna WiFi data WIFI WiFi Antenna (included) CELL Cortex Monitor App WIFI WiFi Antenna (included) Cortex Onboard App Cortex Handsets NMEA 2000 Devices 6 NMEA 0183 Devices The Cortex network - Garmin Cortex M1 Hub | Cortex Hub Installation Guide - Page 7
See LED indicator panel on page 22 for a full troubleshooting list. Cortex Hub port locations 1. WiFi Antenna port 2. GPS VHF port 6. VHF Antenna 1 3 2 4 5 6 7. NMEA 2000 port 8. Input / Output port (NMEA 0183 and GPIO sensors) 9. Audio Port (External Speaker, Loudspeaker) 7 8 9 GPS VHF - Garmin Cortex M1 Hub | Cortex Hub Installation Guide - Page 8
page 25 Ensure that the minimum safe compass distance is maintained. Standard: 0.8 m, Steering: 0.4 m. Cables Allow 2"/50mm WiFi Antenna Allow 8"/200mm Cortex Hub mounting 1. Use the Cortex Hub as a template for mounting holes 2. Mark the holes on the mounting surface and drill them 3. Align the - Garmin Cortex M1 Hub | Cortex Hub Installation Guide - Page 9
EN To connect power Cortex DC power requirements: Hub Nominal Draw Hub VHF High Power Transmit (Max) Handset Nominal 0.5A @ 12V 6. 24 hour circuit remains powered even when the normal DC house system is powered off. Cortex Hub has a low Nominal draw of 0.5A @ 12V which most vessel house systems - Garmin Cortex M1 Hub | Cortex Hub Installation Guide - Page 10
beam path of a radar. Inadequate separation may damage the Cortex transponder and void your warranty. Never operate the Cortex Hub unless it is connected directly to a suitable VHF antenna. The VHF indicator light will display red when a problem is detected with the antenna system (ie, the VSWR is - Garmin Cortex M1 Hub | Cortex Hub Installation Guide - Page 11
port will still provide a path to the antenna for the external VHF radio in the event of an Cortex Hub power failure. AIS / VHF Antenna connection Auxiliary VHF VHF Antenna • Connect the AIS/VHF Antenna plug (PL259) to the Cortex Hub port labeled ANTENNA. • Hand tighten clockwise. Do not over torque - Garmin Cortex M1 Hub | Cortex Hub Installation Guide - Page 12
in the path of radar, HF and/or high power satellite communication (such as Iridium Go) antennas. • Consider the distance between the handset and Cortex Hub onboard. Some objects and materials such as steel, aluminum and carbon composites may provide interference to degrade the WiFi signal strength - Garmin Cortex M1 Hub | Cortex Hub Installation Guide - Page 13
Data is made available to NMEA 0183 and 2000 plotters. The Gateway supports a range of wind, depth, speed, heading, temperature, barometric pressure and need to translate data from NMEA 2000 to 0183. Gateway: The Cortex Hub receives NMEA 2000 PGNs and automatically converts these to 0183 sentences - Garmin Cortex M1 Hub | Cortex Hub Installation Guide - Page 14
data, including GPS to be sent to other NMEA 2000 devices. • The NMEA sentences (PGNs) supported are listed on page 26. • A NMEA 2000 drop cable and T connector are required to connect the Cortex Hub to a vessel's NMEA 2000 network. • Modifying the Instance or System Identification can be done - Garmin Cortex M1 Hub | Cortex Hub Installation Guide - Page 15
Hub I/O (Sensors GPIO / NMEA 0183) expansion port. • The NMEA sentences supported are included on page 26. The NMEA Baud rate can be changed via the Cortex Onboard App or from the H1 handset. Cortex Onboard App: > Menu ( ) > Settings > Device Settings > Networks > NMEA 0183... > Baud rate (select - Garmin Cortex M1 Hub | Cortex Hub Installation Guide - Page 16
> Networks > Cloud > Use external antenna (select on/off) The Cortex Hub includes an internal Cellular antenna for installations where the external antenna is not , connect the SMA connector of the Cellular Antenna cable to the Cortex Hub port labeled Cloud. Tighten clockwise. Do not over torque. - Garmin Cortex M1 Hub | Cortex Hub Installation Guide - Page 17
Audio Speaker Volume • Frequency response of 80Hz-18kHz BROWN INPUT / OUTPUT Audio Speaker volume can be set at the desired volume using a Cortex Handset or the Cortex Onboard App. The external speaker should be installed at least 1m (3ft) from any magnetic compass, flux gate sensor and the - Garmin Cortex M1 Hub | Cortex Hub Installation Guide - Page 18
port can output up to 30W into a 4ohm load. Setting Loudspeaker Volume Loudspeaker volume will default to Mute. To set the desired volume, use a Cortex Handset of the Cortex Onboard App. Setting Loudspeaker Tone You can also set the pitch the horn will use between 200-500Hz from the Horn and Hailer - Garmin Cortex M1 Hub | Cortex Hub Installation Guide - Page 19
will connect with up to 10 devices. The Cortex V1 package (Cortex M1 + H1) ships with the handset pre-configured to the Cortex Hub. See the Support Portal at vespermarine.com for connecting devices to use the NMEA 2000 data from an Cortex Hub over WiFi. Connection information: Connection Type = TCP - Garmin Cortex M1 Hub | Cortex Hub Installation Guide - Page 20
> From the list of available WiFi, identify and select the Cortex Hub WiFi SSID. The WiFi SSID is identified by the Cortex Hub serial number eg: CORTEX-95211616 The Cortex V1 package (Cortex Hub+H1) ships with the handset preconfigured to the Cortex Hub. > Key the WiFi Password found on the label - Garmin Cortex M1 Hub | Cortex Hub Installation Guide - Page 21
a valid MMSI number. You can configure your MMSI using the Cortex Onboard App or a Cortex handset. Your MMSI may have been entered by your dealer. You must be carried out by a Vesper Marine dealer. The included instructions contain information on how to verify the correct programming. WARNING: It - Garmin Cortex M1 Hub | Cortex Hub Installation Guide - Page 22
Cortex Cortex Hub and handset ON. Switch the vessel's batteries ON to power the Cortex Hub 2. Connect the handset to the Cortex Hub via WiFi See Connecting to an Cortex . > Systems > AIS (View RX and TX data counter) Onboard App VHF > Main Menu ( ) to open the Settings Menu. > Device Settings - Garmin Cortex M1 Hub | Cortex Hub Installation Guide - Page 23
EN Monitoring and control Off-boat vessel monitoring and control is supported via a built-in cellular modem and the Cortex Monitor App on your phone. Once the Cortex Hub is installed and operating, data from the Cortex Hub's integrated sensors, from external sensors wired into the GPIO port and data - Garmin Cortex M1 Hub | Cortex Hub Installation Guide - Page 24
Onboard App Free download from the iOS or Google Play stores 2. Turn Cortex Cortex Hub and device ON Switch the vessels batteries ON to power the Cortex Hub 3. Connect the device to the Cortex Hub via WiFi See Connecting to an Cortex Hub section 4. Open the app and program as follows; > Select the - Garmin Cortex M1 Hub | Cortex Hub Installation Guide - Page 25
that is performed from the Onboard App or a handset. The Cortex Onboard App 1. Turn Cortex Cortex Hub and device ON Switch the vessel's batteries ON to power the Cortex Hub 2. Connect the device to the Cortex Hub via WiFi See Connecting to an Cortex Hub section 3. Open the app and program as follows - Garmin Cortex M1 Hub | Cortex Hub Installation Guide - Page 26
EN NMEA PGNs and Monitoring Instruments Received PGNs are translated and outputted over NMEA 0183 and WiFi. See support.vespermarine.com for an up to date list. Received PGNs PGN 127250 128259 128267 128275 129283 129284 129285 130306 130314 130310 130311 130312 130313 DESCRIPTION - Garmin Cortex M1 Hub | Cortex Hub Installation Guide - Page 27
EN M1 Wiring color codes RED BLACK POWER +VE POWER -VE NMEA TX B NMEA TX A NMEA RX B NMEA RX A NMEA 0183 COMMON and GPIO GROUND ORANGE WHITE DARK GREEN YELLOW BLACK ORANGE BLACK RED BROWN AUDIO +VE AUDIO -VE LOUDSPEAKER +VE LOUDSPEAKER -VE RED LIGHT GREEN BROWN GRAY VIOLET BLUE PULLUP - Garmin Cortex M1 Hub | Cortex Hub Installation Guide - Page 28
Hub. When a sensor does not provide more than 2V, the Pullup provides an appropriate high level reference for the Cortex Hub's input. GPIO sensor configuration example Sensor / control name Sensor / control type Default input high Active when high Silence Alarm silence Pullup enabled No, normally - Garmin Cortex M1 Hub | Cortex Hub Installation Guide - Page 29
Hub. When a sensor does not provide more than 2V, the Pullup provides an appropriate high level reference for the Cortex Hub's input. GPIO sensor configuration example Sensor / control name Sensor / control type Anchor light On/Off switch +ve 12/24V RED LIGHT GREEN BROWN PULLUP - Garmin Cortex M1 Hub | Cortex Hub Installation Guide - Page 30
Hub. When a sensor does not provide more than 2V, the Pullup provides an appropriate high level reference for the Cortex Hub's input. GPIO sensor configuration example Sensor / control name Sensor / control type Default input high Active when high Cockpit Motion 1 Security sensor Pullup enabled - Garmin Cortex M1 Hub | Cortex Hub Installation Guide - Page 31
Hub. When a sensor does not provide more than 2V, the Pullup provides an appropriate high level reference for the Cortex Hub's input. GPIO sensor configuration example Sensor / control name Sensor / control type Default input high Active when high Bilge high water High water sensor Pullup - Garmin Cortex M1 Hub | Cortex Hub Installation Guide - Page 32
/ control type Default input high Active when high Engine room bilge Bilge pump Pullup disabled Yes, normally closed +ve 12/24V Three way switch manual on / off / auto on RED LIGHT GREEN BROWN GRAY VIOLET PULLUP VOLTAGE (not requied in this example) INPUT/OUTPUT 5 INPUT/OUTPUT 4 INPUT 3 INPUT - Garmin Cortex M1 Hub | Cortex Hub Installation Guide - Page 33
Hub. When a sensor does not provide more than 2V, the Pullup provides an appropriate high level reference for the Cortex Hub's input. GPIO sensor configuration example Sensor / control name Sensor / control type Forward Hatch 1 Security sensor Default input high Pullup enabled Active when - Garmin Cortex M1 Hub | Cortex Hub Installation Guide - Page 34
This could be a simple DC mains plug, or a AC-DC Rectifier. If the AC supply disconnects, this will cause the DC voltage connected to Cortex to drop and generate an alarm. GPIO sensor configuration example Sensor / control name Sensor / control type Default input high Active when high Shore Power - Garmin Cortex M1 Hub | Cortex Hub Installation Guide - Page 35
(2 5/16") 58.7mm 58.7mm (2 5/16") EN Dimensions Cortex Hub 58.7mm (2 5/16") External GPS Antenna 168mm (6 5/8") 18.5mm (3/4") 147.5mm (5 13/1165"m)2m1.5(5m/8m")(7/8") 7mm (1/4") 18.5mm (3/4") 15mm (5/8") 7mm (1/4") 58.721m.5mmm (7/8") (2 5/ - Garmin Cortex M1 Hub | Cortex Hub Installation Guide - Page 36
EN Specifications CORTEX HUB GENERAL HUB SIZE POWER SUPPLY WEIGHT ENVIRONMENTAL OPERATING TEMPERATURE SUPPORTED PROTOCOLS TRANSMITTER FREQUENCY 025 - 162.025 MHz 5W -113 dBm 80 dB 70 dB 67 dB VHF VOICE VHF FREQUENCY RANGE TX RX DEDICATED RX CHANNELS POWER OUTPUT REGIONS SENSITIVITY (12 DB SINAD) - Garmin Cortex M1 Hub | Cortex Hub Installation Guide - Page 37
CONTROL OUTPUTS 2 Outputs, Low side driven (max 150mA) CORTEX HUB GNSS SENSITIVITY CONSTELLATIONS CHANNELS DIFFERENTIAL SUPPORT NAVIGATION RATE CONNECTOR CERTIFICATIONS FEATURES -167dBm GPS, GLONASS, Bei 600 cd/m2, Ambient Light sensor for auto dimming Dimensions LED icon troubleshooting 37 - Garmin Cortex M1 Hub | Cortex Hub Installation Guide - Page 38
indicate a GPS system error, contact Vesper marine technical support if this state persists. FUNCTION VHF VHF VHF VHF VHF COLOR Orange Orange Green Red Red STATE Solid Flashing Solid Solid Flashing DESCRIPTION Initializing Before the Cortex Hub can transmit it requires 1 minute to initialize - Garmin Cortex M1 Hub | Cortex Hub Installation Guide - Page 39
or has joined the network. WiFi not operational. Contact Vesper Marine technical support. DESCRIPTION NMEA 2000 bus network is not connected or not powered on. NMEA bus connected and exchanging information with the Cortex Hub. NMEA 2000 bus error detected. Check the integrity of the NMEA network - Garmin Cortex M1 Hub | Cortex Hub Installation Guide - Page 40
power of the transmitter and using a standard half-wave monopole VHF antenna with a maximum gain of 3dBi and termination impedance of be installed and operated according to the instructions contained in this manual. Failure to do so may result Cortex Hub may become hot to touch during long periods of - Garmin Cortex M1 Hub | Cortex Hub Installation Guide - Page 41
In most countries the operation of a VHF unit may require the possession of a current VHF radiotelephone license which lists the AIS system Programming must be carried out by a Vesper Marine dealer. The included instructions contain information on how to verify the correct programming. WARNING: It - Garmin Cortex M1 Hub | Cortex Hub Installation Guide - Page 42
has been operated with an incompatible GPS antenna or without a suitable VHF antenna, or with an incompatible antenna splitter, where applicable to the Copyright © 2020, Vesper Marine Ltd. Vesper Marine, Vesper, Cortex, VHF Reimagined, WatchMate, AIS WatchMate, WatchMate Vision, deckWatch, smartAIS
-
 1
1 -
 2
2 -
 3
3 -
 4
4 -
 5
5 -
 6
6 -
 7
7 -
8
-
9
-
10
-
11
-
12
-
13
-
14
-
15
-
16
-
17
-
18
-
19
-
20
-
21
-
22
-
23
-
24
-
25
-
26
-
27
-
28
-
29
-
30
-
31
-
32
-
33
-
34
-
35
-
36
-
37
-
38
-
39
-
40
-
41
-
42
 |
 |
HUB INSTALLATION GUIDE
Cortex Hub-USA - USA & CANADA
Cortex Hub-ROW - REST OF WORLD