Garmin Foretrex 101 Quick Start Guide
Garmin Foretrex 101 - Hiking GPS Receiver Manual
 |
UPC - 753759046101
View all Garmin Foretrex 101 manuals
Add to My Manuals
Save this manual to your list of manuals |
Garmin Foretrex 101 manual content summary:
- Garmin Foretrex 101 | Quick Start Guide - Page 1
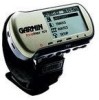
GUIDE Built-in GPS Antenna Waterproof Case LCD Display (with Backlight) Power Button (Backlight) Up/Down Buttons Step-by-Step Instructions to Get You Started (Turn this page and begin with Step 1) *Flip this Quick Start Guide over for a detailed explanation of the Foretrex 101 buttons. Part - Garmin Foretrex 101 | Quick Start Guide - Page 2
instructions. Using the Foretrex 101 Buttons POWER GOTO PAGE ENTER/ MARK DOWN UP The POWER button: • Press and hold to turn unit on and off • Press and release to turn display backlight on and off The GOTO button: • Press to initiate a GoTo (navigate to a specific destination/ waypoint
-
 1
1 -
 2
2
 |
 |

Using the Map Page
The Map Page shows where you are (the animated figure)
and provides a picture of where you are going.
As you travel, the
animated figure ‘walks’ and leaves a ‘trail’ or ‘track log’.
Waypoint
names and symbols are also shown on the map.
Map Page
To use the Map Page while moving around:
1.
Press the
PAGE
button until the Map Page is displayed.
Press the
DOWN
button to zoom in for a more detailed view
of the map.
Press the
UP
button to zoom out for a view of a
larger map area.
2.
Walk or drive around for a few minutes, make a right or left
turn, then continue for a few more minutes and stop.
Marking a Waypoint
Waypoints are locations or landmarks worth recording and stor-
ing in your GPS.
These are locations you may later want to return
to, such as check points on a route or significant ground features
like your campsite or a favorite fishing spot.
Waypoints may be defined and stored in the unit manually by
taking coordinates for the waypoint from a map or other refer-
ence.
This can be done before ever leaving home.
Or more usually,
waypoints may be entered directly by taking a reading with the unit
at the location itself, giving it a name, and then saving the point.
To mark your current location as a waypoint:
1.
Press and hold the
ENTER/MARK
button for two seconds
to display the Mark Waypoint Page.
Your current location is
marked as a waypoint and assigned a three-digit number.
2.
The ‘OK’ button is highlighted so press the
ENTER/MARK
button again to save the Waypoint.
Navigating to a Location
Basic navigation with your Foretrex requires only three steps:
mark
,
move
, and
return
.
Mark your location as a waypoint, move
a distance away, and then return after choosing one of several meth-
ods, such as using a GoTo or following a virtual breadcrumb trail.
To return to a waypoint using the GOTO button:
1.
Press the
GOTO
button to display the GoTo Waypoint Page.
2.
Use the
UP
and
DOWN
buttons to select the desired tab and
press
ENTER
.
3.
Use the
UP
and
DOWN
buttons to select the waypoint you
would like to route to and press
ENTER
.
The Navigation Page automatically displays to lead you to the
waypoint.
Using the Navigation Page
The Navigation Page helps guide you to a destination: Just follow
the arrow in the center of the compass.
To use the Navigation Page to get to a destination:
1.
With a destination already selected and a navigation started,
press the
PAGE
button repeatedly until the Navigation Page is
displayed, if it is not already.
2.
The Navigation Page displays a
Pointer indicating the direction
to go.
Because you cannot
always travel in a straight line,
refer to the Pointer from time
to time.
As you move, turn in
the direction the Pointer directs
until it points straight up.
At
which time, travel forward until
you arrive at your destination.
3.
To stop navigating, press the
ENTER
button while on either
the Map or Navigation page.
Use the
UP/DOWN
buttons
to highlight ‘
STOP NAVIGATION
’, and then press the
ENTER
button.
Using Tracks
The Foretrex 101 automatically draws an electronic breadcrumb
trail or ‘track log’ on the Map Page as you travel.
Tracks are marked
BEGIN and END.
The Foretrex 101 uses the Track Log to allow you
to navigate using the saved track or using the TracBack feature.
TracBack guides you to where you started by following the track
log that you left behind, allowing you to return along a traveled path
without marking any waypoints.
You can retrace your track in both
directions.
If you want to keep a record of a certain track log or use
the ‘TracBack’ feature, clear the Track Log before you start traveling.
To navigate using TracBack:
1.
Press the
PAGE
button to access the Main Menu.
2.
Use the
UP
and
DOWN
arrows to highlight ‘TRACKS’ and press
ENTER
to open the Tracks Menu Page.
3.
Use the
UP
and
DOWN
arrows to highlight ‘PAN & TRACBACK’
and press
ENTER
.
4.
Use the
UP
and
DOWN
arrows to pan the track log.
Press
ENTER
to display the Pan Options.
Panning the Track Log
5.
Use the
UP
and
DOWN
arrows to select ‘
TRACBACK
’ and press
ENTER.
6.
The Navigation Page displays a Pointer indicating the direction
to go.
Follow the arrow as you would for a normal navigation.
To clear the track log:
1.
From the Map Page, press
ENTER
to access the Map Page
Options.
Use the
UP
and
DOWN
buttons to select ‘CLEAR
TRACK LOG’ and press
ENTER
Or
From the Main Menu, press
ENTER
when ‘TRACKS’ is
highlighted to open the Tracks Menu Page.
Use the
UP
and
DOWN
arrows to highlight ‘CLEAR TRACK’ and press
ENTER
.
2.
Use the
UP
and
DOWN
arrows to highlight ‘YES’ on the pop-
up window and press
ENTER
to clear the track log.
Foretrex
™
101
Using Routes
Route navigation allows you to create a sequence of waypoints to
lead you to your final destination.
To create a route:
1.
From the Main Menu Page press the
UP
or
DOWN
button to
highlight ‘ROUTES’, then press the
ENTER
button.
2.
Select ‘CREATE NEW’ and press
ENTER
.
Press
ENTER
to
display the ‘ADD POINT TO ROUTE PAGE’.
3.
Use the
UP/DOWN
and
ENTER
buttons to select the desired
waypoint and press
ENTER
.
Repeat until all of the desired
waypoints are in the route.
Route Page
The route is automatically named with the first waypoint and
the last waypoint, such as Camp-Dock.
Press
PAGE
to exit the
Route Page and return to the Route Menu.
Use the
UP
and
DOWN
buttons to highlight ‘DELETE’ and press
ENTER
to delete the entire
route.
Use the
UP
and
DOWN
buttons to highlight ‘FOLLOW’ and
press
ENTER
to follow the route.
Using the Timer
After the Timer Page is enabled and a count down time is
entered, you can use the timer for a variety of applications, such as
running and sailboat racing.
The synchronization and quick reset
capabilities make the Foretrex an extremely handy timer.
To stop and start the timer:
1.
Press the
PAGE
button until the Timer Page is displayed.
2.
To start the timer, press the
ENTER
button when ‘START’ is
displayed along the bottom of the page.
3.
To stop the timer, press the
ENTER
button when ‘STOP’ is
displayed along the bottom of the page.
Step-by-Step Instructions
to Get You Started
(Turn this page and begin with Step 1)
*Flip this Quick Start
Guide over for a
detailed explanation
of the Foretrex 101
buttons.
Waterproof
Case
LCD Display
(with Backlight)
Built-in GPS
Antenna
Power Button
(Backlight)
Up/Down
Buttons
Part Number 190-00360-01 Rev B
Foretrex 101 Features
Foretrex 101 Features
Foretrex 101 Features
Foretrex 101 Features
Navigation Page
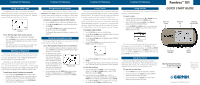
QUICK START GUIDE