Garmin G3000 User Guide
Garmin G3000 Manual
 |
View all Garmin G3000 manuals
Add to My Manuals
Save this manual to your list of manuals |
Garmin G3000 manual content summary:
- Garmin G3000 | User Guide - Page 1
in the SD card adapter of your computer. 3) With the computer connected to the internet, open Jeppesen Services. Use the user ID and password. 4) The Update Manager will display all the available databases in your account. 5) Scroll down to a "G3000 Electronic Chart Service" with the cycle date you - Garmin G3000 | User Guide - Page 2
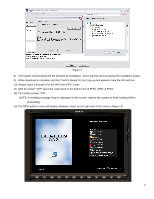
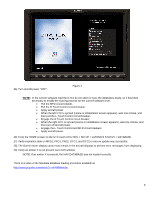
Figure 2 8) The system will download the file followed by installation -Don't pull the card out during the installation phase. 9) When : A verifying message may be displayed on the screen, wait for the system to finish loading before proceeding. 13) The MFD splash screen will display database status on - Garmin G3000 | User Guide - Page 3
, PFD1, PFD2, GTC1, and GTC2 to ensure update was successful. 17) The Garmin lower display cards must remain in the aircraft displays to prevent error messages from displaying. There is a video of the ChartView database loading procedure available at: http://www.youtube.com/watch?v=nzyWLRQ17ow 3 - Garmin G3000 | User Guide - Page 4
updates. 2) With a computer configured with Jeppesen Chart Services, and an SD card adapter/reader, place the aviation data SD card in the adapter/reader. 3) Connect the computer to the internet and open Jeppesen Services. 4) The Update Manager will display all the available databases in your - Garmin G3000 | User Guide - Page 5
database cycle expires, the standby database will become the active the first time the aircraft is powered up after that date (as stated on the screen in Figure 2). as on PFD1. 19) When complete, remove the NavData SD card and re-install the Diagnostics SD card in the TOP slot of the MFD. 20) Insert - Garmin G3000 | User Guide - Page 6
in the aircraft displays to prevent error messages from displaying. 29) Verify an amber X is not present over CAS window. NOTE: If an amber X is present, the NAV DATABASE was not loaded correctly. There is a video of the NavData database loading procedure available at: http://www.youtube.com/watch - Garmin G3000 | User Guide - Page 7
from the MFD. (Figure 1) GARMIN LOWER SD CARD Figure 1 2) Place the lower MFD SD card in the SD card adapter of your computer. 3) With the computer connected to the internet, open Jeppesen Services. Use the user ID and password. 4) The Update Manager will display all the available databases in our - Garmin G3000 | User Guide - Page 8
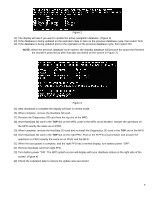
Figure 2 8) The system will complete a download followed by an installation- Don't pull the card out during the installation. 9) When download is complete 14) From the HOME screen on the GTC touch UTILITIES > SETUP > AVIONICS STATUS > DATABASE. 15) Monitor the Sync Status of the updated databases in - Garmin G3000 | User Guide - Page 9
UTILITIES > SETUP > AVIONICS STATUS > DATABASE. 19) Verify expiration date on MFD1, PFD1and PFD2 to ensure update was successful. 20) Verify airport directory expiration date on GTC1 and GTC2 to ensure update was successful. 21) The Garmin lower display cards must remain in the aircraft displays to - Garmin G3000 | User Guide - Page 10
MFD, & PFD 2. (Figure 1) GARMIN LOWER SD CARD Figure 1 2) Place the PFD 1 lower SD card in the SD card adapter of your computer. 3) With the computer connected to the internet, open Jeppesen Services. Use the user ID and password. 4) The Update Manager will display all the available databases in our - Garmin G3000 | User Guide - Page 11
Figure 2 8) The system will complete a download followed by an installation- Don't pull the card out during the installation. 9) When download ". A verifying message may be displayed on the screen, wait for the system to finish loading before proceeding. 13) The MFD splash screen will display database status - Garmin G3000 | User Guide - Page 12
Figure 3 14) From the HOME screen on the GTC touch UTILITIES > SETUP > AVIONICS STATUS > DATABASE. 15) Verify expiration date on MFD1, PFD1, and PFD2 to ensure update was successful. 16) The Garmin lower display cards must remain in the aircraft displays to prevent error messages from displaying. 12 - Garmin G3000 | User Guide - Page 13
Place the PFD 1 lower SD card in the SD card adapter of your computer. 3) With the computer connected to the internet, open the flyGarmin website. Use the user ID and password. a. The Basemap database is only available from Garmin, so if the only account is through Jeppesen, an account will need to - Garmin G3000 | User Guide - Page 14
update all of the databases except Basemap. o When setting up an account, as for the Pilot Pak for G3000. This will include everything you will need so that you do not have to go to Garmin for SafeTaxi, Obstacle, or Airport Directory databases. o If a download needs to be reloaded you can contact
-
 1
1 -
 2
2 -
 3
3 -
 4
4 -
 5
5 -
 6
6 -
 7
7 -
8
-
9
-
10
-
11
-
12
-
13
-
14
 |
 |

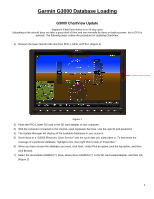
Garmin G3000 Database Loading
G3000 ChartView Update
Jeppesen ChartView works on a 14-day cycle.
Uploading at the aircraft does not take a great deal of time and can normally be done on battery power, but a GPU is
advised. The following steps outline the procedure for updating ChartView.
1)
Remove the lower Garmin SD card from PFD 1, MFD, & PFD 2.
(Figure 1)
Figure 1
2)
Place the PFD 1 lower SD card in the SD card adapter of your computer.
3)
With the computer connected to the internet, open Jeppesen Services. Use the user ID and password.
4)
The Update Manager will display all the available databases in your account.
5)
Scroll down to a “G3000 Electronic Chart Service” with the cycle date you subscribed to. To determine the
coverage of a particular database, highlight a line, then right click to look at “Properties.”
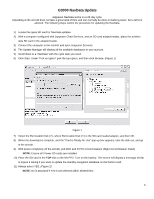
6)
When you have chosen the database you need, click Start. Under Pick an option, pick the top option, and then
click Browse.
7)
Select the removable GARMIN (?:) drive, where drive GARMIN (?:) is the SD card reader/adapter, and then OK.
(Figure 2)
GARMIN LOWER SD CARD
1