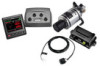
Garmin GHP Compact Reactor Hydraulic Autopilot Starter Pack Configuration Guid
Garmin GHP Compact Reactor Hydraulic Autopilot Starter Pack Manual
 |
View all Garmin GHP Compact Reactor Hydraulic Autopilot Starter Pack manuals
Add to My Manuals
Save this manual to your list of manuals |
Garmin GHP Compact Reactor Hydraulic Autopilot Starter Pack manual content summary:
- Garmin GHP Compact Reactor Hydraulic Autopilot Starter Pack | Configuration Guid - Page 1
Hydraulic Configuration Guide The autopilot same NMEA 2000® network as the autopilot CCU. Instructions for configuration using either the helm control or a boat. If the RPM numbers do not align, there may be a problem with the NMEA 2000 speed source or connection. Reviewing the Results of - Garmin GHP Compact Reactor Hydraulic Autopilot Starter Pack | Configuration Guid - Page 2
progress. 3 After the procedure is finished, follow the on-screen instructions. 4 Select an option: • If the Autotune procedure is not run the autotune procedure at a later time or if you want to manually adjust the gain settings (not recommended) (Adjusting the Autopilot Gain Settings, - Garmin GHP Compact Reactor Hydraulic Autopilot Starter Pack | Configuration Guid - Page 3
Increase the setting if the autopilot turns too quickly. • Decrease the setting if the autopilot turns too slowly. When you manually adjust the acceleration limiter, make relatively small adjustments. Test the change before making additional adjustments. 4 Test the autopilot configuration. 5 Repeat - Garmin GHP Compact Reactor Hydraulic Autopilot Starter Pack | Configuration Guid - Page 4
procedures, select Autopilot Tuning > Autotune (Performing the Autotune Procedure, page 2). 4 Follow the on-screen instructions. Defining Individual Configuration Settings Manually Configuring certain configuration settings may require you to modify other settings. Review the detailed configuration - Garmin GHP Compact Reactor Hydraulic Autopilot Starter Pack | Configuration Guid - Page 5
Allows you to set the direction the rudder must move to turn the vessel to port and to starboard. You can test and reverse the steering direction if necessary. Garmin® and the Garmin logo are trademarks of Garmin Ltd. or its subsidiaries, registered in the USA and other countries. GHP™, GHC™, - Garmin GHP Compact Reactor Hydraulic Autopilot Starter Pack | Configuration Guid - Page 6
© 2016 Garmin Ltd. or its subsidiaries www.garmin.com/support
-
 1
1 -
 2
2 -
 3
3 -
 4
4 -
 5
5 -
 6
6
 |
 |
GHP
™
Compact Reactor
™
Hydraulic
Configuration Guide
The autopilot system must be configured and tuned to your boat
dynamics. The Dockside Wizard and the Sea Trial Wizard are
used to configure the autopilot. These wizards walk you through
the necessary configuration steps.
If your autopilot package did not contain a helm control, you
must configure the autopilot system using a compatible
chartplotter on the same NMEA 2000
®
network as the autopilot
CCU. Instructions for configuration using either the helm control
or a chartplotter are provided.
Dockside Wizard
NOTICE
If you perform the Dockside Wizard while your boat is out of the
water, provide rudder-movement clearance to avoid damage to
the rudder or other objects.
You can complete the Dockside Wizard while the boat is in or
out of the water.
If the boat is in the water, it must be stationary while you
complete the wizard.
Performing the Dockside Wizard
NOTICE
If you have a boat with a power assist steering system, turn on
the power assist steering system before performing the
Dockside Wizard to avoid damaging the steering system.
1
Turn on the autopilot.
The first time you turn on the autopilot, you are prompted to
complete a short setup sequence.
2
If the
Dockside Wizard
does not start automatically after the
setup sequence, select an option:
•
On a helm control, select
Menu
>
Setup
>
Dealer
Autopilot Setup
>
Wizards
>
Dockside Wizard
.
•
On a chartplotter, select
Settings
>
My Vessel
>
Autopilot Installation Setup
>
Wizards
>
Dockside
Wizard
.
3
Select the vessel type.
4
Test the steering direction (
Testing the Steering Direction
,
page 1
).
5
If necessary, select the speed source (
Selecting a Speed
Source
, page 1
).
6
If necessary, verify the tachometer (
Verifying the
Tachometer
, page 1
).
7
Test the helm lock-to-lock.
8
Review the results of the
Dockside Wizard
(
Reviewing the
Results of the Dockside Wizard
, page 1
).
Testing the Steering Direction
1
While moving at a low rate of speed, select
and
.
When you select
, the rudder must turn the boat to the left.
When you select
, the rudder must turn the boat to the right.
2
Select
Continue
.
3
Select an option:
•
If the steering test turns the boat in the correct direction,
on a helm control, select
Yes
.
•
If the steering test turns the boat in the correct direction,
on a chartplotter, select
Next
.
•
If the steering test turns the boat in the opposite direction,
on a helm control, select
No
, and repeat steps 1 though 3.
•
If the steering test turns the boat in the opposite direction,
on a chartplotter, select
Switch Direction
, and repeat
steps 1 though 3.
Selecting a Speed Source
Select an option:
•
If you connected one or more NMEA 2000 compatible
engines to the NMEA 2000 network, on a helm control,
select
Tach. - NMEA 2000 or Proprietary
.
•
If you connected one or more NMEA 2000 compatible
engines to the NMEA 2000 network, on a chartplotter,
select
Tachometer
.
•
If NMEA 2000 tachometer data source is not available
from one or more engines, or is unusable, select
GPS
as
a speed source.
•
If you did not connect a NMEA 2000 tachometer or GPS
device as a speed source, select
None
.
NOTE:
If the autopilot does not perform well using
None
as the speed source, Garmin
®
recommends connecting a
tachometer through the NMEA 2000 network or using a
GPS device as the speed source.
Verifying the Tachometer
This procedure does not appear when GPS or None is selected
as the speed source.
With the engine (or engines) running, compare the RPM
readings on the helm control with the tachometer (or
tachometers) on the dashboard of your boat.
If the RPM numbers do not align, there may be a problem
with the NMEA 2000 speed source or connection.
Reviewing the Results of the Dockside Wizard
The values you chose when you ran the Dockside Wizard are
displayed.
1
Examine the results of the
Dockside Wizard
.
2
Select any incorrect value.
3
Correct the value.
4
Repeat steps 2 and 3 for all incorrect values.
5
When you are finished reviewing the values, select
Done
.
Sea Trial Wizard
The Sea Trial Wizard configures the fundamental sensors on the
autopilot, and it is extremely important to complete the wizard in
conditions appropriate for your boat.
Important Sea Trial Wizard Considerations
The Sea Trial Wizard must be completed in calm water.
Because the nature of calm water is relative to the size and
shape of the boat, before you begin the Sea Trial Wizard, the
boat must be in an appropriate location.
•
The boat must not rock while sitting still or moving very
slowly.
•
The boat must not be significantly affected by the wind.
While completing the Sea Trial Wizard, observe these
considerations.
•
Weight on the boat must remain balanced. While completing
any of the steps in the Sea Trial Wizard, do not move around
on the boat.
Performing the Sea Trial Wizard
1
Drive your boat to an open area of calm water.
2
Select an option:
•
On a helm control, select
Menu
>
Setup
>
Dealer
Autopilot Setup
>
Wizards
>
Sea Trial Wizard
.
February 2016
Printed in Taiwan
190-02054-02_0A