Garmin GPSMAP 296 Pilot's Guide - Page 132
Resizing the Split Screen, Using the Pointer on the Sonar Noise Reject, Normal, No Zoom
 |
View all Garmin GPSMAP 296 manuals
Add to My Manuals
Save this manual to your list of manuals |
Page 132 highlights
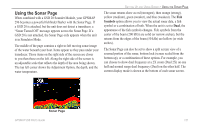
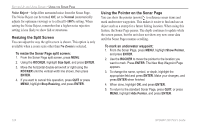
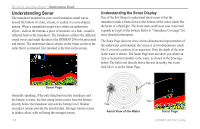
SETTING UP AND USING SONAR > USING THE SONAR PAGE Noise Reject-helps filter unwanted noise from the Sonar Page. The Noise Reject can be turned Off, set to Normal (automatically adjusts for optimum viewing) or to a fixed 1-100% setting. When setting the Noise Reject, remember that a higher noise rejection setting is less likely to show fish or structures. Resizing the Split Screen You can adjust the way the split screen is shown. This option is only available when a zoom scale other than No Zoom is selected. To resize the Sonar Page split screen: 1. From the Sonar Page split screen, press MENU. 2. Using the ROCKER, highlight Size Split, and press ENTER. 3. Move the horizontal double-arrow left or right using the ROCKER until the vertical width line shows, then press ENTER. 4. If you want to cancel this operation, press QUIT or press MENU, highlight Stop Resizing, and press ENTER. Using the Pointer on the Sonar Page You can show the pointer (arrow) to reference sonar items and mark underwater waypoints. This makes it easier to find and use an object such as a stump for a future fishing location. When using this feature, the Sonar Page pauses. The depth continues to update while the screen pauses, but the unit does not show any new sonar data until the Sonar Page resumes scrolling. To mark an underwater waypoint: 1. From the Sonar Page, press MENU, highlight Show Pointer, and press ENTER. 2. Use the ROCKER to move the pointer to the location you want to mark. Press ENTER. The New Map Waypoint Page appears. 3. To change the name, symbol, or depth, highlight the appropriate field and press ENTER. Make your changes, and press ENTER when finished. 4. When done, highlight OK, and press ENTER. 5. To return to the standard Sonar Page, press QUIT; or press MENU, highlight Hide Pointer, and press ENTER. 124 GPSMAP 296 Pilot's Guide
-
 1
1 -
2
-
3
-
4
-
5
-
6
-
7
-
8
-
9
-
10
-
11
-
12
-
13
-
14
-
15
-
16
-
17
-
18
-
19
-
20
-
21
-
22
-
23
-
24
-
25
-
26
-
27
-
28
-
29
-
30
-
31
-
32
-
33
-
34
-
35
-
36
-
37
-
38
-
39
-
40
-
41
-
42
-
43
-
44
-
45
-
46
-
47
-
48
-
49
-
50
-
51
-
52
-
53
-
54
-
55
-
56
-
57
-
58
-
59
-
60
-
61
-
62
-
63
-
64
-
65
-
66
-
67
-
68
-
69
-
70
-
71
-
72
-
73
-
74
-
75
-
76
-
77
-
78
-
79
-
80
-
81
-
82
-
83
-
84
-
85
-
86
-
87
-
88
-
89
-
90
-
91
-
92
-
93
-
94
-
95
-
96
-
97
-
98
-
99
-
100
-
101
-
102
-
103
-
104
-
105
-
106
-
107
-
108
-
109
-
110
-
111
-
112
-
113
-
114
-
115
-
116
-
117
-
118
-
119
-
120
-
121
-
122
-
123
-
124
-
125
-
126
-
 127
127 -
 128
128 -
 129
129 -
 130
130 -
 131
131 -
 132
132 -
 133
133 -
 134
134 -
 135
135 -
 136
136 -
 137
137 -
138
-
139
-
140
-
141
-
142
-
143
-
144
-
145
-
146
-
147
-
148
-
149
-
150
-
151
-
152
-
153
-
154
-
155
-
156
-
157
-
158
-
159
-
160
-
161
-
162
-
163
-
164
-
165
-
166
-
167
-
168
 |
 |
