Garmin GPSMAP 296 Pilot's Guide - Page 144
Using xImage for Customized Waypoint Symbols, Installing and Removing Data Cards
 |
View all Garmin GPSMAP 296 manuals
Add to My Manuals
Save this manual to your list of manuals |
Page 144 highlights
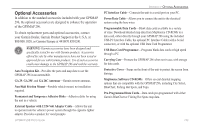
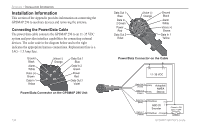
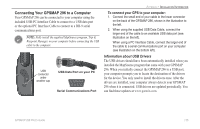
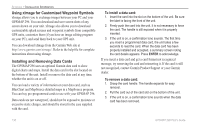
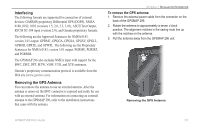
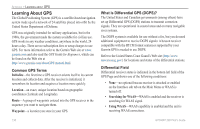
APPENDIX > INSTALLATION INFORMATION Using xImage for Customized Waypoint Symbols xImage allows you to exchange images between your PC and your GPSMAP 296. You can download and save screen shots of any screen shown on your unit. xImage also allows you to download customizable splash screens and waypoint symbols from compatible GPS units, customize them (if you have an image editing program on your PC), and send them back to your GPS unit. You can download xImage from the Garmin Web site at http://www.garmin.com/ximage/. Refer to the help file for complete instructions about using xImage. Installing and Removing Data Cards The GPSMAP 296 uses an optional Garmin data card to show digital charts and maps. Install the data card in the slot located on the bottom of the unit. Install or remove the data card at any time, whether the unit is on or off. You can load a variety of information on your data card, such as BlueChart and MapSource detailed maps in a MapSource program. You can buy pre-programmed cards to use with your GPSMAP 296. Data cards are not waterproof, should not be exposed to moisture or excessive static charges, and should be stored in the case supplied with the card. To install a data card: 1. Insert the card into the slot on the bottom of the unit. Be sure the label is facing the front of the unit. 2. Firmly push the card into the unit. It is not necessary to force the card. The handle is still exposed when it is properly inserted. 3. If the unit is on, a confirmation tone sounds. The first time you insert a programmed data card, the unit takes a few seconds to read the card. When the data card has been properly installed and accepted, a summary screen noting the card details appears. Press ENTER to acknowledge. If you insert a data card and get a card format not recognized message, try removing the card and reinserting it. If the card is still not recognized, contact Garmin Product Support or your Garmin dealer. To remove a data card: 1. Grasp the card handle. The handle expands for easy removal. 2. Pull the card out of the card slot on the bottom of the unit. 3. If the unit is on, a confirmation tone sounds when the data card has been removed. 136 GPSMAP 296 Pilot's Guide
-
 1
1 -
2
-
3
-
4
-
5
-
6
-
7
-
8
-
9
-
10
-
11
-
12
-
13
-
14
-
15
-
16
-
17
-
18
-
19
-
20
-
21
-
22
-
23
-
24
-
25
-
26
-
27
-
28
-
29
-
30
-
31
-
32
-
33
-
34
-
35
-
36
-
37
-
38
-
39
-
40
-
41
-
42
-
43
-
44
-
45
-
46
-
47
-
48
-
49
-
50
-
51
-
52
-
53
-
54
-
55
-
56
-
57
-
58
-
59
-
60
-
61
-
62
-
63
-
64
-
65
-
66
-
67
-
68
-
69
-
70
-
71
-
72
-
73
-
74
-
75
-
76
-
77
-
78
-
79
-
80
-
81
-
82
-
83
-
84
-
85
-
86
-
87
-
88
-
89
-
90
-
91
-
92
-
93
-
94
-
95
-
96
-
97
-
98
-
99
-
100
-
101
-
102
-
103
-
104
-
105
-
106
-
107
-
108
-
109
-
110
-
111
-
112
-
113
-
114
-
115
-
116
-
117
-
118
-
119
-
120
-
121
-
122
-
123
-
124
-
125
-
126
-
127
-
128
-
129
-
130
-
131
-
132
-
133
-
134
-
135
-
136
-
137
-
138
-
 139
139 -
 140
140 -
 141
141 -
 142
142 -
 143
143 -
 144
144 -
 145
145 -
 146
146 -
 147
147 -
 148
148 -
 149
149 -
150
-
151
-
152
-
153
-
154
-
155
-
156
-
157
-
158
-
159
-
160
-
161
-
162
-
163
-
164
-
165
-
166
-
167
-
168
 |
 |