Garmin GPSMAP 296 Pilot's Guide - Page 48
Setting Up the Panel Manually Setting a Course, Set OBS and Hold - user manual
 |
View all Garmin GPSMAP 296 manuals
Add to My Manuals
Save this manual to your list of manuals |
Page 48 highlights
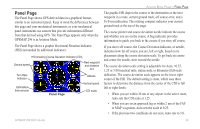
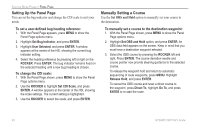
AVIATION MODE PAGES > PANEL PAGE Setting Up the Panel Page You can set the bug indicator and change the CDI scale to suit your needs. To set a user-defined bug heading reference: 1. With the Panel Page appears, press MENU to show the Panel Page options menu. 2. Highlight Set Bug Indicator, and press ENTER. 3. Highlight User Selected, and press ENTER. A window appears at the center of the HSI, showing the current bug indicator setting. 4. Select the heading reference by pressing left or right on the ROCKER. Press ENTER. The bug indicator remains fixed on the selected heading until a new bug heading is chosen. To change the CDI scale: 1. With the Panel Page shown, press MENU to show the Panel Page options menu. 2. Use the ROCKER to highlight Set CDI Scale, and press ENTER. A window appears at the center of the HSI, showing the scale settings. The current setting is highlighted. 3. Use the ROCKER to select the scale, and press ENTER. Manually Setting a Course Use the Set OBS and Hold option to manually set your course to the destination. To manually set a course to the destination waypoint: 1. With the Panel Page shown, press MENU to show the Panel Page options menu. 2. Highlight Set OBS and Hold option, and press ENTER. An OBS data field appears on the screen. Keep in mind that you must have a destination waypoint selected. 3. Select the OBS course by pressing the ROCKER left and right. Press ENTER. The course deviation needle and course pointer now provide steering guidance to the selected course. To release the waypoint hold and return to automatic sequencing of route waypoints, press MENU. Highlight Release Hold, and press ENTER. To cancel the OBS course and reset a direct course to the waypoint, press Direct To, highlight Go To, and press ENTER to re-start the route. 40 GPSMAP 296 Pilot's Guide
-
 1
1 -
2
-
3
-
4
-
5
-
6
-
7
-
8
-
9
-
10
-
11
-
12
-
13
-
14
-
15
-
16
-
17
-
18
-
19
-
20
-
21
-
22
-
23
-
24
-
25
-
26
-
27
-
28
-
29
-
30
-
31
-
32
-
33
-
34
-
35
-
36
-
37
-
38
-
39
-
40
-
41
-
42
-
 43
43 -
 44
44 -
 45
45 -
 46
46 -
 47
47 -
 48
48 -
 49
49 -
 50
50 -
 51
51 -
 52
52 -
 53
53 -
54
-
55
-
56
-
57
-
58
-
59
-
60
-
61
-
62
-
63
-
64
-
65
-
66
-
67
-
68
-
69
-
70
-
71
-
72
-
73
-
74
-
75
-
76
-
77
-
78
-
79
-
80
-
81
-
82
-
83
-
84
-
85
-
86
-
87
-
88
-
89
-
90
-
91
-
92
-
93
-
94
-
95
-
96
-
97
-
98
-
99
-
100
-
101
-
102
-
103
-
104
-
105
-
106
-
107
-
108
-
109
-
110
-
111
-
112
-
113
-
114
-
115
-
116
-
117
-
118
-
119
-
120
-
121
-
122
-
123
-
124
-
125
-
126
-
127
-
128
-
129
-
130
-
131
-
132
-
133
-
134
-
135
-
136
-
137
-
138
-
139
-
140
-
141
-
142
-
143
-
144
-
145
-
146
-
147
-
148
-
149
-
150
-
151
-
152
-
153
-
154
-
155
-
156
-
157
-
158
-
159
-
160
-
161
-
162
-
163
-
164
-
165
-
166
-
167
-
168
 |
 |