Garmin GPSMAP 441s Owner's Manual - Page 38
SELECT, Information, User Data, Routes, Unsaved Route, Save/Edit, New Route, Use Chart
 |
View all Garmin GPSMAP 441s manuals
Add to My Manuals
Save this manual to your list of manuals |
Page 38 highlights
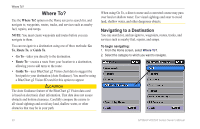
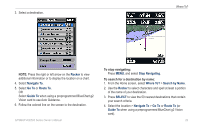
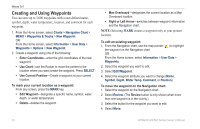
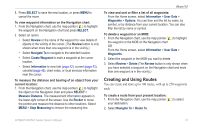
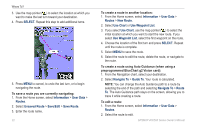
Where To? 3. Use the map pointer ( ) to select the location at which you want to make the last turn toward your destination. 4. Press SELECT. Repeat this step to add additional turns. 5. Press MENU to cancel, to undo the last turn, or to begin navigating the route. To save a route you are currently navigating: 1. From the Home screen, select Information > User Data > Routes. 2. Select Unsaved Route > Save/Edit > Save Route. 3. Enter the route name. 32 To create a route in another location: 1. From the Home screen, select Information > User Data > Routes > New Route. 2. Select Use Chart or Use Waypoint List. 3. If you select Use Chart, use the map pointer ( ) to select the initial location at which you want to start the new route. If you select Use Waypoint List, select the first waypoint on the route. 4. Choose the location of the first turn and press SELECT. Repeat until the route is complete. 5. Select MENU to save the route. 6. Select the route to edit the route, delete the route, or navigate to the route. To create a route using Auto Guidance (when using a preprogrammed BlueChart g2 Vision card): 1. From the Navigation chart, select your destination. 2. Select Navigate To > Guide To. Your route is calculated. NOTE: You can change the Auto Guidance path to a route by selecting the end of the path and selecting Navigate To > Route To. The Auto Guidance path stays on the screen, allowing you to trace it while creating a route. To edit a route: 1. From the Home screen, select Information > User Data > Routes. 2. Select the route to edit. GPSMAP 400/500 Series Owner's Manual
-
 1
1 -
2
-
3
-
4
-
5
-
6
-
7
-
8
-
9
-
10
-
11
-
12
-
13
-
14
-
15
-
16
-
17
-
18
-
19
-
20
-
21
-
22
-
23
-
24
-
25
-
26
-
27
-
28
-
29
-
30
-
31
-
32
-
 33
33 -
 34
34 -
 35
35 -
 36
36 -
 37
37 -
 38
38 -
 39
39 -
 40
40 -
 41
41 -
 42
42 -
 43
43 -
44
-
45
-
46
-
47
-
48
-
49
-
50
-
51
-
52
-
53
-
54
-
55
-
56
-
57
-
58
-
59
-
60
-
61
-
62
-
63
-
64
-
65
-
66
-
67
-
68
-
69
-
70
-
71
-
72
-
73
-
74
-
75
-
76
-
77
-
78
-
79
-
80
-
81
-
82
-
83
-
84
-
85
-
86
-
87
-
88
-
89
-
90
-
91
-
92
-
93
-
94
-
95
-
96
 |
 |
