Garmin GPSMAP 527 Installation Instructions
Garmin GPSMAP 527 Manual
 |
View all Garmin GPSMAP 527 manuals
Add to My Manuals
Save this manual to your list of manuals |
Garmin GPSMAP 527 manual content summary:
- Garmin GPSMAP 527 | Installation Instructions - Page 1
according to the following instructions. You need the appropriate fasteners, tools, and mounts listed in each section. If you experience difficulty installing the chartplotter, seek the assistance of a professional installer, or contact Garmin Product Support. Before installing your GPSMAP 400 or - Garmin GPSMAP 527 | Installation Instructions - Page 2
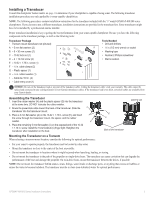
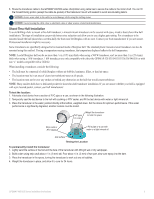
or at the navigation station. • Flush Mount-use an optional flush mount kit to mount the chartplotter into a flat panel. For more information on the optional flush mount kit, visit www.garmin.com or contact your local Garmin dealer. Surface-Mounting the Chartplotter Use the included bracket to - Garmin GPSMAP 527 | Installation Instructions - Page 3
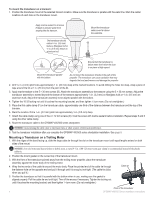
installer. Proper transducer installation is key to getting the best performance from your sonar-capable chartplotter. Be sure you have the following components in the transducer package, as well as the following tools: Transducer Package • Transom-mount transducer (not pictured) A - 5 mm flat - Garmin GPSMAP 527 | Installation Instructions - Page 4
the GPSMAP 400/500 series chartplotter installation. See page 9. Mounting a Transducer on a Trolling Motor 1. With the ridges of the band facing up, slide the large cable tie through the slot on the transducer mount until equal lengths extend on both sides of the mount. notice: For cold water and - Garmin GPSMAP 527 | Installation Instructions - Page 5
while using the trolling motor. Notice: Avoid routing the cable close to electrical wires or other sources of electrical interference. Shoot-Thru-Hull Installation To avoid drilling a hole to mount a thru-hull transducer, a transom-mount transducer can be secured with epoxy inside a boat (shoot - Garmin GPSMAP 527 | Installation Instructions - Page 6
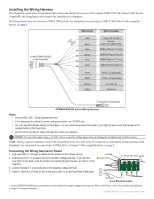
a wiring harness that connects the chartplotter to power and to optional NMEA 0183 and Garmin CANet devices. If applicable, the wiring harness also connects the chartplotter to a transducer. The wiring harness does not connect to a NMEA 2000 network. For instructions on connecting to a NMEA 2000 - Garmin GPSMAP 527 | Installation Instructions - Page 7
GPSMAP 400/500 Series Chartplotter to a Horn, a Lamp, or Both * Certain GPSMAP 400/500 series chartplotters can be connected to higher-voltage power sources. Refer to the Power section of the System Specifications on page 10 for more information. GPSMAP 400/500 Series Installation Instructions 7 - Garmin GPSMAP 527 | Installation Instructions - Page 8
Device If your GPSMAP 400/500 series chartplotter is Garmin CANet-compatible, it can receive sonar information from a CANet-compatible Garmin Sounder or Fishfinder device. See the chartplotter functionality matrix on page 1 to determine whether your chartplotter is CANet compatible. Using the CANet - Garmin GPSMAP 527 | Installation Instructions - Page 9
and hold the POWER key until the chartplotter beeps and turns on. Using the ROCKER and the SELECT keys, follow the screens to configure your chartplotter. Testing the Optional Transducer Installation Because water is necessary to carry the sonar signal from the sounder, the transducer must be in - Garmin GPSMAP 527 | Installation Instructions - Page 10
mount transducer installation: 1. Begin testing the installation at a slow speed. If the sonar appears to be working properly, gradually increase the speed of the boat while observing the operation of the sonar. If the sonar was turned off. Update Rate: 1/second, continuous GPS Accuracy: Position: < - Garmin GPSMAP 527 | Installation Instructions - Page 11
Sonar Power: 1 kW Transducer, 1,000 W (RMS), 8,000 W (peak to peak); (1 kW transducers are supported by the GPSMAP 525s/526s/535s/536s/545s/546s/555s/556s units only.) Dual Frequency, 500 W (RMS), 4,000 W (peak to peak); Dual Beam, 400 W (RMS), 3, - Garmin GPSMAP 527 | Installation Instructions - Page 12
National Maritime Electronics Association. For the latest free software updates (excluding map data) throughout the life of your Garmin products, visit the Garmin Web site at www.garmin.com. © 2009-2012 Garmin Ltd. or its subsidiaries Garmin International, Inc. 1200 East 151st Street, Olathe, Kansas
-
 1
1 -
 2
2 -
 3
3 -
 4
4 -
 5
5 -
 6
6 -
 7
7 -
8
-
9
-
10
-
11
-
12
 |
 |
GPSMAP 400/500 Series Installation Instructions
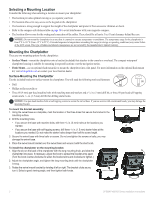
Your GPSMAP 400/500 series chartplotter must be properly installed according to the following instructions. You need the appropriate
fasteners, tools, and mounts listed in each section.
If you experience difficulty installing the chartplotter, seek the assistance of a
professional installer, or contact Garmin Product Support.
Before installing your GPSMAP 400 or 500 series chartplotter, confirm that the package contains the items listed on the box. If any parts are
missing, contact your Garmin dealer immediately.
WARNING
: See the
Important Safety and Product Information
guide in the product box for product warnings and other important
information.
WARNING:
Always wear safety goggles, ear protection, and a dust mask when drilling, cutting, or sanding.
NOTICE:
When drilling or cutting, always check the opposite side of the drilling or cutting surface.
To install and use your chartplotter:
1
Select a mounting location (
page 2
).
2. Mount the chartplotter (
page 2
).
3. Install the transducer, if applicable (
page 3
).
4. Install the wiring harness (
page 6
).
5. Connect the chartplotter to a NMEA 2000 network (optional, if applicable) (
page 8
).
6. Connect the cables to the chartplotter (
page 9
).
7. Test the installation (
page 9
).
Chartplotter Functionality Matrix
The chartplotters in the GPSMAP 400/500 series have different functionality based on model number. Use this matrix to determine the feature
set and installation requirements of your chartplotter.
Chartplotter
NMEA 2000
NMEA 0183
Garmin CANet
Sonar
GPSMAP 420/430/430x/440/440x/450
No
Yes
Yes
“s” version only
GPSMAP 520/525/530/535/540/545/550/555
No
Yes
Yes
“s” version only
GPSMAP 421/441/451
Yes
Yes
No
“s” version only
GPSMAP 431/531
No
Yes
No
“s” version only
GPSMAP 521/526/536/541/546/551/556
Yes
Yes
No
“s” version only
March 2012
190-01074-02 Rev. C
Printed in Taiwan