Garmin GPSMAP 740/740s Owner's Manual - Page 14
Fishing Chart Setup, Chart Appearance
 |
View all Garmin GPSMAP 740/740s manuals
Add to My Manuals
Save this manual to your list of manuals |
Page 14 highlights
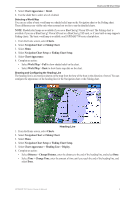
Charts and 3D Chart Views Selecting the Heading Line Source The source for the display of the heading line on the chartplotter is determined by the heading line source setting (Auto or GPS Hdg) and whether heading information is available from a heading sensor. • If heading information is available from a heading sensor and the source heading is set to Auto, both the heading line and the vehicle icon will be aligned to the heading from the sensor. • If heading information is available from a heading sensor and the source heading is set to GPS Hdg, the heading line will be aligned to the GPS heading, but the vehicle icon will be aligned to the heading from the sensor. • If heading information is not available from a heading sensor, both the heading line and the vehicle icon will be aligned to the GPS heading. 1. From the Home screen, select Charts. 2. Select Navigation Chart or Fishing Chart. 3. Select Menu. 4. Select Navigation Chart Setup or Fishing Chart Setup. 5. Select Chart Appearance > Heading Line > Source. 6. Complete an action: • Select GPS Hdg. • Select Auto. Showing and Configuring Spot Depth Soundings On the Navigation Chart, you can turn on spot soundings and set a dangerous depth. Spot depths that are equal to, or more shallow than, the dangerous depth will be indicated by red text. 1. From the Home screen, select Charts > Navigation Chart > Menu > Navigation Chart Setup > Chart Appearance > Spot Depths > On. 2. Select Spot Depths > Dangerous. 3. Enter the dangerous depth. 4. Select Done. Configuring Depth Shading You can customize the appearance of depth shading on the Navigation chart. Note: Depth shading is available with a preprogrammed BlueChart g2 Vision data card. 1. From the Home screen, select Charts > Navigation Chart > Menu > Navigation Chart Setup > Chart Appearance > Safety Shading. 2. Complete an action: • Enter the depth and select Done. Areas on the chart with depths shallower than the specified value are shaded in blue, while areas with depths greater than the specified value are shaded in white. The contour is always drawn at, or deeper than, the selected depth. • Select Auto to use the depth from the g2 Vision chart. Showing and Configuring Navaid Symbols You can show and configure the appearance of navaid symbols on the Navigation chart or the Fishing chart. 1. From the Home screen, select Charts. 2. Select Navigation Chart or Fishing Chart. 3. Select Menu. 4. Select Navigation Chart Setup or Fishing Chart Setup. 5. Select Chart Appearance > Symbols. 10 GPSMAP 700 Series Owner's Manual
-
 1
1 -
2
-
3
-
4
-
5
-
6
-
7
-
8
-
 9
9 -
 10
10 -
 11
11 -
 12
12 -
 13
13 -
 14
14 -
 15
15 -
 16
16 -
 17
17 -
 18
18 -
 19
19 -
20
-
21
-
22
-
23
-
24
-
25
-
26
-
27
-
28
-
29
-
30
-
31
-
32
-
33
-
34
-
35
-
36
-
37
-
38
-
39
-
40
-
41
-
42
-
43
-
44
-
45
-
46
-
47
-
48
-
49
-
50
-
51
-
52
-
53
-
54
-
55
-
56
-
57
-
58
-
59
-
60
-
61
-
62
-
63
-
64
-
65
-
66
-
67
-
68
-
69
-
70
-
71
-
72
-
73
-
74
-
75
-
76
-
77
-
78
-
79
-
80
-
81
-
82
-
83
-
84
-
85
-
86
-
87
-
88
-
89
-
90
-
91
-
92
-
93
-
94
-
95
-
96
-
97
-
98
-
99
-
100
 |
 |